Memory is an essential element to the smooth operation of a compuer, but not all computers come with enough of it. Here’s how to add more memory to your Macbook Pro.
When to Add/Replace RAM
RAM (Random Access Memory) is a piece of your computer that stores all of the files currently in use on your Macbook Pro. These include files such as images, games or video files. For example, right now my RAM is holding all the data for Skype, FireFox, and Disk Utility, all of which are programs currently running on my computer. When I turn off these programs, the memory will no longer need to be used and can be freed up for the next thing you want to open, hence the name “random access”.
So how do you know if you should replace your RAM? Well, if applications begin to run sluggishly the more you open, chances are you’ll be needing some more pretty soon. If, however, things are always running slowly regardless of how many programs you have open, the issue is likely with your processor as opposed to your memory.
Step 1) Removing the Back Cover
After you’ve purchased compatible Macbook memory, which can be found online for relatively cheap, you’ll want to grab your Macbook and a small phillips head screwdriver. Flip your Macbook over onto its back and notice the small screws holding the back plating into place. Take your screwdriver, carefully unscrew these and set them aside somewhere you won’t lose them. Gently lift off the back cover.
Step 2) Removing Old Memory
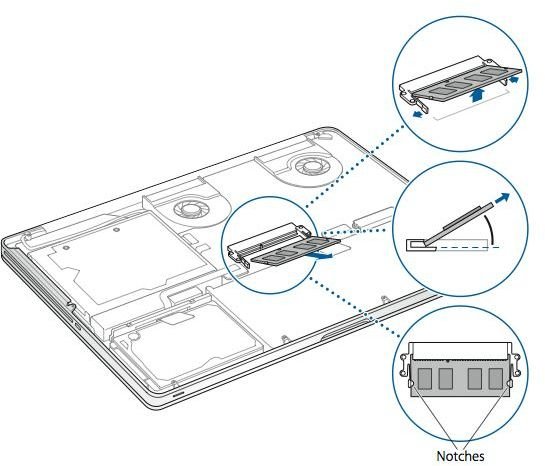
On most 15 inch Macbook laptops, the memory chip should be clearly displayed in just about the center of of the computer (check the image on the left for reference) and can be removed without issue. Carefully clamp the two locks and gently pull out on the memory, assuring you don’t break anything in the process. If you see no clamps, don’t worry; very carefully pull on the end of the memory that isn’t presently attached to anything and it should come loose.
Note: If you do not want to remove the old memory and simply want to add new memory, skip to step 3.
Step 3) Replacing the Old Memory
After removing and setting aside your old memory chip, take your new one and gently (always be gentle with computers) put it in the same way the other one came out. If the other one had clamps, slide it into the same location and wait for the click. If it didn’t, simply push firmly but gently on the card until you feel it’s as far in as it’s going to go.
Note: If you have multiple ‘sticks’ of RAM, simply repeat this process for the remaining sticks. If your computer does not have the necessary hubs for more sticks, you’re out of luck.
Step 4) Putting the Back Cover Back On
After all is said and done, place the back cover back onto the laptop and screw all of the screws back into their original positions. It is very
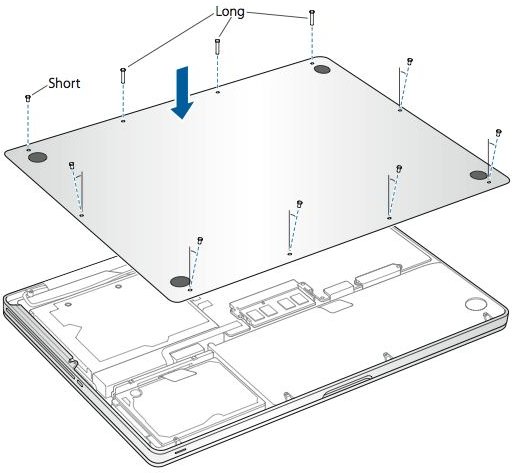
important that they all get back to where they came from, as some screws are long and some are short. Putting a short screw in a long screw’s hole could cause undesired performance or effect while the laptop is in use or otherwise.
References
All images come from this link.
All information comes either author knowledge or from this link.