So you want to run Windows on your Mac but do not fancy the boot camp method. Read on to find out how to probably install Windows using the latest version of Parallels for Mac. Discover how easy it is to install and to tweak the settings.
The New Parallels 6 for Mac
Parallels is a popular tool for installing a virtual drive in the Mac OS X environment. The application has recently reached version six, which is the first version to have full 64-bit support. It also promises a 40% speed improvement over the last version and although we did not do any proper side-by-side tests, a speed improvement is definitely noticeable.
Naturally a sixth version should also bring the necessary improvements in simplicity and integration with Windows 7. Lets see just how simple installation is, as we installed Windows 7 through parallels 6.
Installing Windows 7 With Parallels Software for Mac
Once Parallels 6 is installed on your OS X computer, the installation of Windows 7 is fairly simple. The quickest method of getting Windows 7 installed is as follows:
-
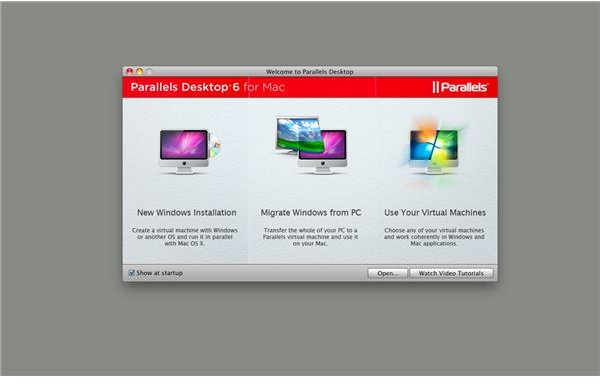
When you open Parallels 6 for the first time you will be greeted with a welcome screen. Here you can select to either install a new Windows installation, migrate a Windows install from a PC or continue using your virtual machine when it is already installed. Select the first option to install a fresh copy of Windows.
Advertisement -
Insert the Windows install disc in the Mac’s disc drive and select continue in the ‘Create New Virtual Machine’ that pops up.
-
**
 Advertisement
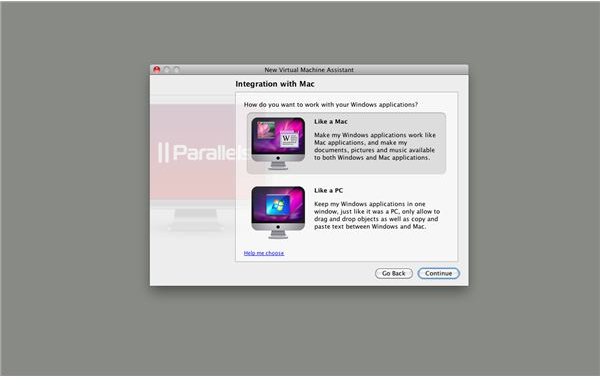
Select** what type of integration you would like to have from your Windows 7 OS. ‘Like a Mac’ will run Windows in coherence mode, meaning it will seamlessly integrate within your Mac environment. ‘Like a PC’ will let you run Windows 7 either full screen or in a window. Note that these options can be changed afterwards.
-
In the next screen select the name for your virtual machine and the location it should be installed. The default location is /Users/Your__User Name/Documents/Parallels. Here you can also select whether or not you would like to customize settings before installation (more on settings later). However, these configurations can be altered at any time after the installation as well, so it is really a matter of preference.
Advertisement -
Select ‘Create’ to have Parallels create a virtual drive. By default Parallels software for mac will create a ‘flexible’ virtual drive with a maximum of approximately 60 GB. This can be adjusted afterwards or beforehand if you selected to customize the settings in the prior window.
-
 Advertisement
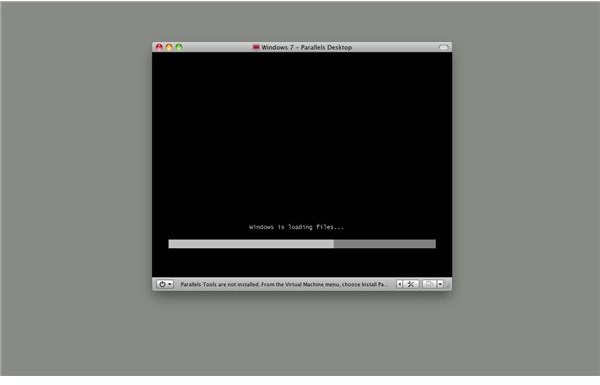
When the allocated space is set, Parallels will start installing Windows. Right at the start of the process it will ask the Windows product key, which you can insert at this stage. Click next to let Parallels do all the work for you. Approximately 30-45 minutes later your Windows 7 installation will be up and running!
Note that this process will work for any version of Windows as Parallels 6 for Mac can now automatically detect which version is inserted in the disc drive.
Changing Your Settings in Parallels 6
This method of installation, which is described above, will work based on typical, recommended settings by Parallels itself. Usually this should pose no problems but it can be useful to play around with settings.
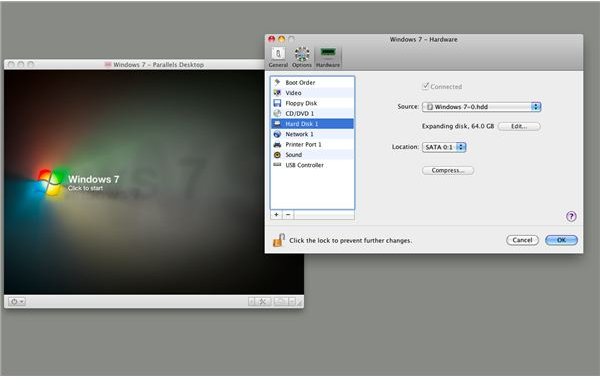
Note that you can only alter settings when your virtual machine is not running or prior to installation as mentioned before.
The settings or configuration menu is accessed through the bottom right tool button of the Parallels main screen. Users have three main configuration panels, namely ‘General’, ‘Options’ and ‘Hardware’. In the general tab, the user can select how much processor cores and RAM is allocated to the virtual drive. If you feel that your Windows installation runs too slow, here you can allocate more resources to speed up the process.
The Options tab focuses mostly on the esthetically inclined options as you can choose how the various integration modes behave and in which mode Windows should start up. The Hardware tab sort of speaks for itself as you can make tweaks to how your virtual OS will behave in combination with your Mac devices. Here you can for instance re-allocate how much hard drive space the virtual drive can use. Further options cover the boot order, video settings, CD/DVD settings, network, printer sound, etc.
Parallels 6: Your Windows Companion on Mac
Parallels 6 is a great improvement over the fifth version and shows that running Windows 7 as a virtual machine is a very good alternative to boot camp. This guide also showed that with the latest Parallels for Mac it is a piece of cake to install your Windows 7 operating system as the process is quick and pain-free. You can adjust your configuration afterwards and you never have to fear that you have not allocated enough memory or other settings to the virtual drive. This makes Windows 7 on your Mac a very real and almost seamless experience.
References
- Parallels 6 for Mac, https://www.parallels.com/products/desktop/
- Author’s own experience.
- All screenshots by the author.


