Apple’s Time Capsule hard drives are useful for backing up your data with Mac OS X’s Time Machine or for simply keeping your files on a shared location that your MacBook Air can access. Read on to learn how to set up your MacBook Air for wirelessly accessing your Time Capsule hard drive.
Setting Up and Initially Accessing Your Time Capsule
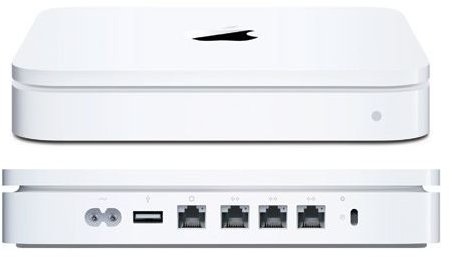
If you haven’t already configured your Time Capsule, there’s a few steps to take before you can use it with your MacBook. First, you’ll need to connect your modem to the network port on the back of the Time Capsule. Usually, you can do this by connecting an ethernet cable from your DSL or Cable modem to the WAN port on the Time Capsule.
Since the Time Capsule will also provide wireless Internet for your MacBook Air, you don’t have to worry about connecting any cables to your laptop. Next, connect the power cable to the back of the Time Capsule and to your wall outlet.
Now that you have connected all necessary cords, you are ready to set up the Time Capsule on your MacBook . At this point, you want to make sure that Wi-Fi is enabled, so click the Airport icon on the menu bar and select “Turn Airport On” if it’s not already enabled. Select “Apple Network” as the network name, keeping in mind that there will be a letter and number combination following the name.
Next, click open the Applications folder, select Utilities and open Airport Utility. A wizard will open that looks like the one below but will have your own personalized default settings.
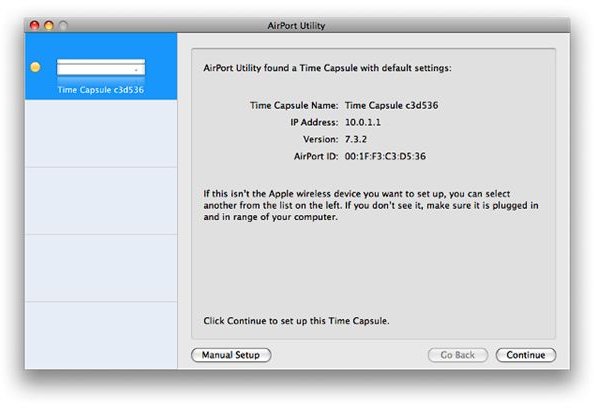
At this point, click Continue and type a name and password for your Time Capsule on the next screen. Click Continue and select “I want to create a new wireless network” on the following screen. Click Continue again to create a network name and select a method for securing your Time Capsule. It is recommended that you select the WPA/WPA2 Personal option since it will require a password before someone can access your data or Internet connection.
Click Continue when done to view the Guest Network Setup option. This option allows you to provide wireless Internet for others in your house, without specifically letting them access the files on the hard drive. After you enter a network name and password if you want, click Continue and select the method that you use to connect to the Internet. Click Continue to view the Time Machine Setup option.
Select Yes if you plan to use the Time Capsule for backing up your computer and click Continue. Finally, click Update to save your configuration.
You will see a prompt telling you that the Time Capsule will be unavailable for a few minutes as it updates the configuration. Simply click Continue and wait for your Time Capsule to restart. Click Quit once Airport Utility shows the “Congratulations” screen.
Backing Up and Accessing Files
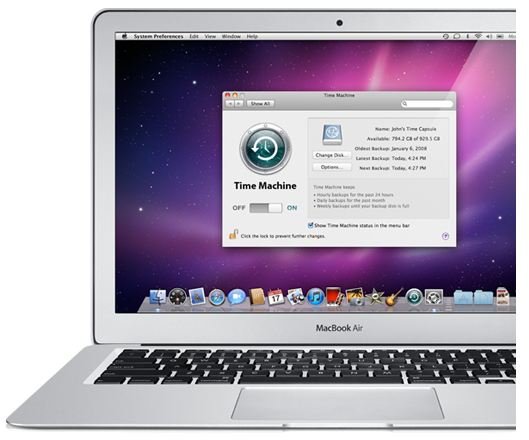
Now that your Time Capsule is set up and ready to go, you are ready to configure it for storing backups and accessing files. If you want to back up your computer now, click Time Machine on the Mac dock and click the On button under the big Time Machine logo. Time Machine will begin to back up your entire computer to the Time Machine’s hard drive and will keep track of backups on an hourly, daily and weekly basis until the hard drive is full. This is an automated process, so you will not have to change any settings again.
If you want to manually save folders to your Time Capsule or want to access files on it, you can open a Finder window and select your Time Capsule’s name from the left-hand side of the window. On the right you’ll see the files and folders you saved on the Time Capsule and can open, copy or delete files as you do on your own computer’s hard drive.
References
All images and references taken from Apple Time Capsule, Fourth Generation.
Apple Time Capsule’s official manufacturer website: https://www.apple.com/timecapsule/
Instructions taken from the Time Capsule setup manual: https://manuals.info.apple.com/en/TimeCapsule _SetupGuide.pdf


