In this article I will go through some of the best Ubuntu backup tools to have in your arsenal in order to protect your data against hard drive failure and other unforeseen circumstances. I will go through one simple method which I would advise anyone to use, and also a more advance method.
Introduction
The best Ubuntu backup tools are often discussed on forums and chat networks, and there are two which come up over and over again. One of them was designed with simplicity and ease-of-use in mind and would probably be far better for those who are still confused by the Linux command line.
The other one is a more advance tool which is far more customizable. However, it is not for the light of heart because you need to know how Linux names it’s file systems so that you don’t accidentally overwrite something important. You also need to be able to make sure you understand what you are typing into the terminal so that you can check for mistakes (which can be fatal to your system!).
Ubuntu Simple Backup Suite
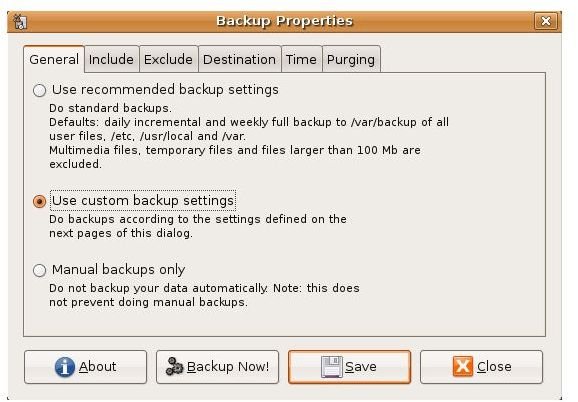
The Ubuntu Simple Backup Suite is the easier of the two to use because it has a GUI interface which looks like this picture on the left. You can decide whether to use the recommended backup settings, your own custom settings or even turn automatic backups completely. You can also add your own ‘include’ and ’exclude’ rules to customize your backup further.
Restoring your data should something go wrong is just as easy. However, it requires that you have a working Ubuntu system to begin with which is not always possible. It is always possible to reinstall Ubuntu and then use the restore suite but this two-stage process often seems tedious and annoys more advance users.
The Ubuntu Simple Backup Suite is quite limited but it will work well for someone who just wants to backup somewhere, it even includes the ability to backup to a remote SSH server . You can find it in the repositories under the name of “sbackup” and if you want to install via the terminal use: sudo apt-get install sbackup
The Advance Utility: dd
This is where things get more interesting. dd is a command line utility and is far more flexible than the Ubuntu simple backup suite. It also does many things that the Ubuntu Simple Backup Suite can’t, such as an exact hard drive clone and the ability to restore even if you cannot boot into Ubuntu desktop.
There are three main commands which you will need to remember to do a full backup and a full restore. The first one is:
sudo fdisk -l
which will list all of your drives and their respective Linux names. The Linux names (/dev/sdx for example) are important for dd so it knows where its backing up from and restoring too. The second command which you will need is:
sudo dd if=/dev/sdx of=~/backup.img
This will backup /dev/sdx (you will need to put your own Linux name in from the first command) to the image file backup.img and store it in your home directory. You are then free to gzip it or put it in a safe place on another computer. Another note about this command, you can use /dev/sdx1 as the input file (if) to just backup the first partition on /dev/sdx.
The final command you will need is just switching the input and output files to restore the backup:
sudo dd if=backup.img of=/dev/sdx
You may have to use this command from a LiveCD or another environment as you can’t be booted into the system when restoring to it, but that should restore the backup and make your Linux system exactly the way it was when you performed the backup. It may complain about time jumping etc, do not worry too much about these warnings as they will fix themselves.
Conclusion
In this article I have shown you two methods of backing up your system. As long as you use one of them your personal files such as photos and music should be safe from hard drive failure or accidental destruction of the partition. (I have done it myself on more than one occasion.)
The dd command is for more advance users who are comfortable using the terminal in Ubuntu and would rather use the terminal than the GUI menus (we are still out there) but the Ubuntu Simple Backup Suite is a viable alternative. Whichever way you choose, if you need any extra help feel free to comment below!


