If you’re interested in working with Knoppix Linux, but not sure if it’s right for you, learn the very basics in these Knoppix tutorials.
The Knoppix tutorials presented in this article are intended for people who are interested in switching to a Linux operating system or specifically to the Knoppix distribution. You can download this open source software free of charge from www.Knoppix.net if you have a high speed Internet connection, or you may purchase a live Compact Disc (CD) which can usually be obtained very economically. There’s no need to worry about the process of installation at this point or about interfering with any other operating systems you might have already installed on your computer. The temporary installation into RAM will allow you to work through these Knoppix tutorials closely to the way you could if the system was installed to the local disk. Be aware that if you have a dial-up connection using a “winmodem,” also known as a softmodem, your chances of it being detected by Knoppix are very slim.
The Basics
To begin your first session with Knoppix, simply place the CD in the optical drive and restart your Personal Computer (PC). This is usually done by pressing Ctrl+Alt+Delete simultaneously. You might have to modify the boot order in setup; some systems offer the option of a temporary modification without going into setup. If you have such an option, it should show during boot. If not, press the indicated key to enter setup and make necessary changes. For example, if there’s an operating system already installed on the C: drive (local disk), you don’t want it to boot. Simply, have the optical (CD/DVD) drive first in the boot order list so the BIOS will find it before the installed system.
If you have a sound card detected by the system, you’ll probably hear a message that Knoppix is loading. Sudden sound can be startling if you weren’t expecting it, so I thought I’d give you a heads up. The only good thing I can say about this annoyance is that you’ll know almost instantly that your sound card has been detected. A message will also appear on the screen advising you not to remove the CD until shutdown; at shutdown, you’ll be prompted on the screen when to remove it and hear another audio message suddenly say, “Initiating shutdown sequence.” It will simply be informing you that Knoppix is shutting down.
Common Computing Tasks in Knoppix
One of the best ways to really discover if a particular Linux distro (distribution) is going to suit your computing needs is to do actual work with it. I give Knoppix two thumbs up when it comes to availability of applications for word processing, electronic spreadsheets, presentations, and database management. These are all a part of the OpenOffice suite of programs. Writer is for word processing and is able to save Microsoft (MS) Word compatible files, including .docx. Calc is the equivalent of MS Excel and able to save documents in the all of the latest Excel file types. Base is the database management program of the OpenOffice suite. There’s also the Math and Draw applications of OpenOffice that come bundled in the distro.
I would suggest saving any practice work you do on a USB drive for any testing you’ll want to do with opening and editing files on other Linux distros or Windows. Note that programs and files are opened by clicking only once on their icons. Let’s begin by plugging in your USB drive. Don’t expect to see an icon appear on the desktop; however, you won’t have to manually mount the file system. Simply click once on home in the upper left corner to open the graphical file browser. Along the left side you’ll see that your drive is available; if you click it once, you’ll see any files you have saved on it. If you have .docx files, you’ll need to first open Writer (word processing) from which you can then open the file.
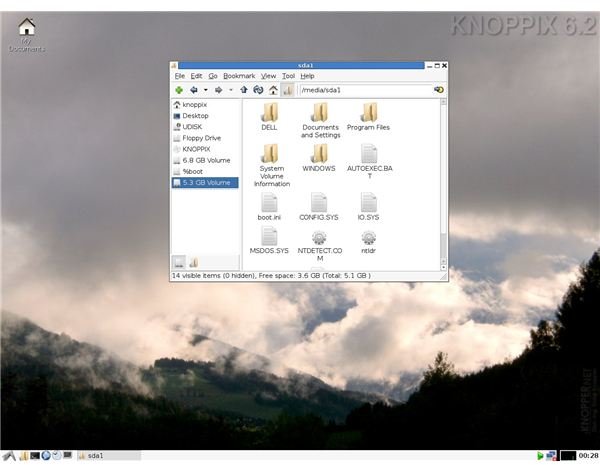
Below is a screen shot of Knoppix running in live mode on my Dell Latitude. If you click to enlarge the image, you’ll see that I have access to files on my USB drive (UDISK) as well as access to two other drives. These other two drives are actually partitions since this is a triple boot system. One of those partitions holds Windows XP. Knoppix tutorials, like any other tutorials, are only helpful if you have hands-on experience. Now would be a good time to write a sample short letter in Writer and save it as a .doc or .docx file if you’re a Windows user. Note that you’ll need to specify this file type once you see the save window. Simply click on the arrow and scroll down to Microsoft Word 2007 xml, otherwise you’ll be saving by default in the native file type (.odt). You’ll receive a message that says the document may contain formatting or content that cannot be saved in the MS Word 2007 xml file format. You’ll then be asked if you want to save in that format anyway. Rarely have I had a problem with saving file corruption when saving in other formats.
Knoppix for Your Other Computing Needs
If you work heavily with graphics, you’ll be pleased to know that the GNU Image Manipulation Program (GIMP) comes bundled with this distro. The included web browser is Iceweasel which is a simple, but hearty browser. Icedove handles your email and news, and Pidgin is the Internet Messenger (IM). I haven’t used Pidgin in Knoppix, but I’ve used it extensively under Fedora and it is a fine application. Simple text editing is efficiently handled with Leafpad and there’s a web-phone client included–Linphone. The synaptic package manager is available for software management which is probably the most intimidating part of working with any Linux distribution for novices. Fortunately, the popular distros come bundled with most of what is needed for the home and small business user.
These Knoppix tutorials were based on version 6.2 of Knoppix which was based on Microknoppix. Each version of each distribution has slight to significant differences in the way things work, but a solid familiarity lends much help when faced with changes that you might or might not like.


