Installing operating systems or running them from USB flash drives are way faster than working from CD/DVD. Linux is the frontier in this arena and here we go with a portable Linux Mint system.
Windows Users
To create a Linux Mint system in Windows, we need to download a few files (please note that the installation described applies only to Linux Mint 7.0, codenamed Gloria):
- USBMint7.exe
- fixmint7.exe
- Linux Mint 7 (Gloria) ISO
You can download the USBMint7.exe and fixmint7.exe applications from PenDriveLinux web site. Linux Mint ISO from Linux Mint’s home page.
After downloading the files, plug your USB stick into a free USB slot on your computer and run USBMint7.exe. It will extract the contents and create a folder named USBMint. Then place the fixmint7.exe and the ISO file in the USBMint folder and double click on the fixmint7.exe. Follow the instructions, which will create a bootable USB drive with Linux Mint.
Just a couple of notes here:
- It is recommended to have a USB stick with at least 2 Gigabytes of capacity. The installation will take about 1 Gigabyte and the remaining 1 Gigabyte will be used for saving files and configuration preferences.
- The USB stick should be formatted with the FAT32 filesystem. By default all USB sticks are FAT32 formatted, so if you did not reformat your drive after your purchase, you should be fine.
- The process will erase all the data on the USB stick. Don’t forget to back up any necessary data.
If you have a large capacity thumb drive, such as 2 Gigabytes or higher, then you will need to replace the casper-rw file in your USB stick to allow yourself to use the available space to save your files. Depending on your USB stick’s capacity, download the relevant file below, open it and copy the contents to your stick, replacing the existing casper-rw file:
Ubuntu Users
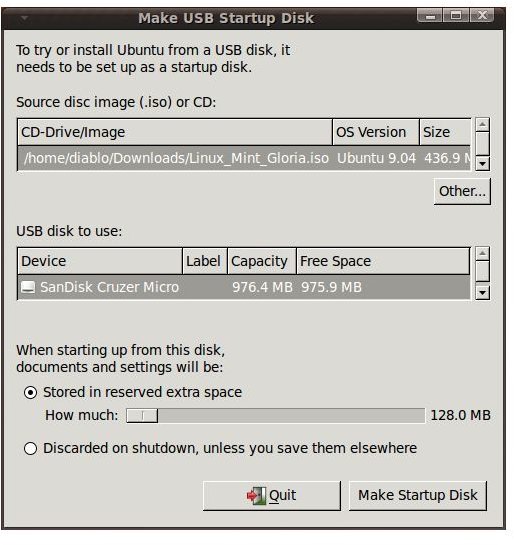
Delete all the files/folders on your USB stick and place it into an empty USB slot. Go to System -> Administration -> USB Startup Disk Creator. In the opened window at the top, select “Other” in the “Source disk image (.iso) or CD.” In the middle, under “USB disk to use:” you will see your USB stick. And finally at the bottom, there is a slider that lets you set the size on the disk where you will store your documents and configuration settings. If you plan on fully utilizing your system to use as a portable operating system, then select the maximum size. As you will see in the screenshot, in my 1 GB USB stick I have only 128 Megabytes to save my files. Pushing the slider to the right will set all the 128 Megabytes for my use. Selecting the other option will not save your files; when you shutdown your portable system, all your files, folders you created, and your settings will be gone.


