At this point in the series, we have successfully installed our Linux distribution. Now we will certainly want to install the applications and programs we want to use. Here’s how.
Introduction
In Linux terms, installing and uninstalling programs are considered administrative tasks and therefore should be performed by the user who has administrative privileges (in Ubuntu, a member of the admin group) or by the root user. You do not need to think about this in detail because Linux will ask you your password whenever it thinks you want to perform administrative tasks.
Installing Software - Ubuntu and Derivatives (Kubuntu, Xubuntu etc.)
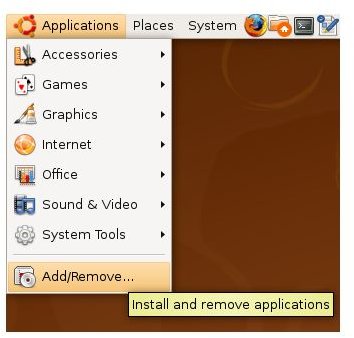
There are actually three ways to install software in Ubuntu and its derivatives. The first one is “Add/Remove” under the Applications menu. The program can be found with the name “Adept” under “System” menu in Kubuntu and Xubuntu. When you open the program, you will see three panes: on the left you choose the application groups such as Accessibility, Application, Games etc., in the right pane at the top you will see all the applications under the group and in the right pane at the bottom you will see the application details that you select at the top. Simply tick the box to the left of the application you want to install and click “Apply changes” button at the bottom-right.
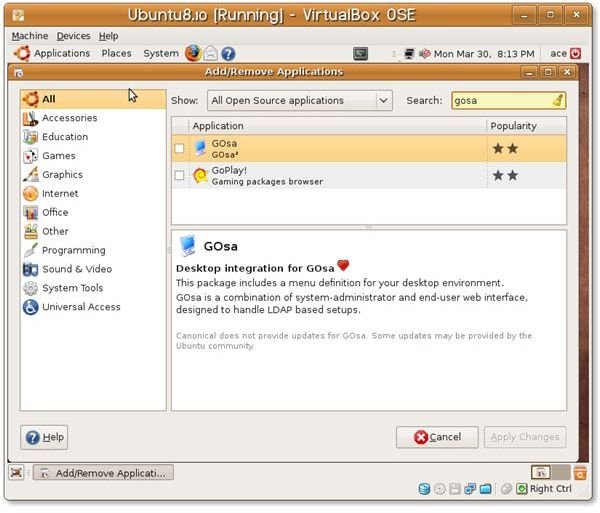
By default, only the open source applications are displayed, which you can see in the top right box titled Show that “Supported Ubuntu Applications” are selected. You can change this to show unsupported or restricted applications to access even more programs.
Your second option is to use Synaptic package manager, which is located under System -> Administration menu. The usage of Synaptic is more or less the same with Add/Remove program. The change that you will immediately notice is that there are fewer graphics. If you want to enable unsupported and restricted applications, simply head over to System -> Applications -> Software Sources and select the appropriate repositories under the “Ubuntu Software” tab. Then start Synaptic and click on the “Reload” button at the icon bar. This will make Synaptic connect to the repositories and retrieve the latest software list. Then, select the application you want to install by putting a tick, and then click “Apply” to install the program. Synaptic will warn you the number of packages to be installed, upgraded or uninstalled together with the download and installation sizes. Click OK if you accept and wait for Synaptic to finish.
The third option is the command line installation. Open up a terminal window and issue sudo apt-get update to refresh the program list. Then issue sudo apt-cache search program_name to search for the string “program_name.” Finally issuing sudo apt-get install program_name to install the software to your computer. If you want to install more than one program, you can do so by sudo apt-get install program1 program2 program 3.
Installing Software - openSuSE
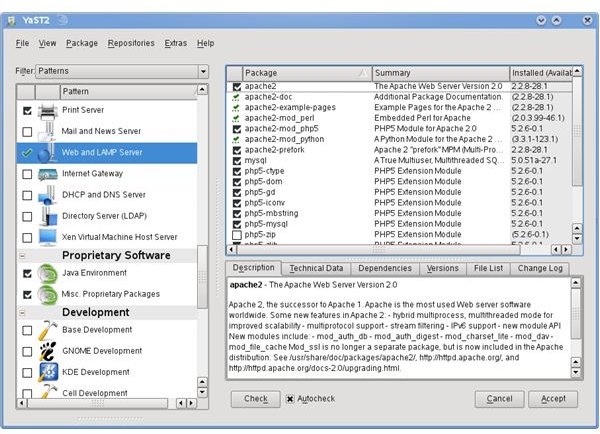
To install software under openSuSE, go to System -> YaST and select “Software” from the left and “Software Management” on the right. In the opened window, which is similar to the other package managers such as Adept and Synaptic, you will see the program groups on the left and programs on the right. Tick the boxes for the programs you want to install and then click “Accept” on the bottom right to go.
To change the view and search for the programs, select the dropdown box named “Filter” to the top of the left pane. In the screenshot, the filter is “Patterns.”
Conclusion
As you have already seen, the software installation is much easier than Windows. You do not need to search the Internet to find the program that you want to install, download the installation file, click “Next,” “Finish” and then - most probably - restart. You select the software, accept to install it, and that’s it. And the good part is, if there is an update to the program, you will be notified about it by the update applet.


