
Installing and getting started with Gambas – a Visual-Basic style GUI programming environment for Linux
Getting started
When I first encountered Microsoft’s Visual Basic back in the early 90s, it was a little gem of a program, small enough to come to grips with quickly, but powerful enough to do anything that a non-professional programmer could want. Unfortunately the intervening years have not been kind to VB, and like many other products from the same stable it has become a resource-hungry behemoth that requires weeks of training to use effectively. But some of the charm and convenience of those early versions has been recaptured for the Linux environment with the Gambas program for Linux.
“Gambas” means “shrimp” in Spanish, and the logo of the program is a funky three-dimensional shrimp. It is designed to run under KDE, but I was able to get it running under GNOME after a clean install; subsequent attempts were less successful. On starting the program the user is prompted to open or create a new “project” – a self-contained program stored in a separate folder. Although Gambas can be used to develop command-line programs, its main role is in graphical interfaces, and it has a range of options for different graphic interfaces, including QT and GTK+. If you are unsure which to use, or you want to make a general-purpose program, the generic “graphic interface” option should be fine for most systems. Specify a folder location and give your program a name, and you are ready to start designing.
Program design
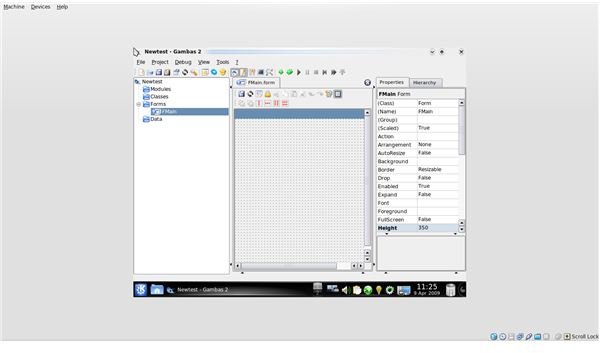
Gambas program design works in terms of controls and containers. The outermost container is a form, and although programs can use several forms and even forms-within-forms, beginners will probably want to start with just one. This is created automatically and given the name FMain. The Gambas window showing the form also displays the form Properties on the right and a hierarchy of Modules, Classes, and Data on the left. Form properties include the name, border shape, background colour and whether the form is re-sizable.
Opening the Toolbox via the View menu brings up four tabbed panels with types of tools – Form, Dialog, Container and Special. The Form controls include labels, text fields, buttons, check boxes, radio buttons, scroll bars, drop-down menus, etc – all the standard elements of windows-style programs – plus special-purpose panels for displaying directory lists, pictures, and movies. Any of these tools can be dragged out into a rectangle on the form to create an element of that type. The Dialog controls include standard dialog boxes for setting colours, dates, fonts, files and directories. The Container tools include standard vertical or horizontal layouts, and allow controls to be stored in frames or tabbed panels. They also include drawing areas for graphics and stepwise Wizard panels. Finally, the Special tools include a Timer, an Embedding tool for external controls, and a TrayIcon tool. Developers can add a menu through the Menu Editor, described in Part Two of this series.
Gambas in action
A simple program
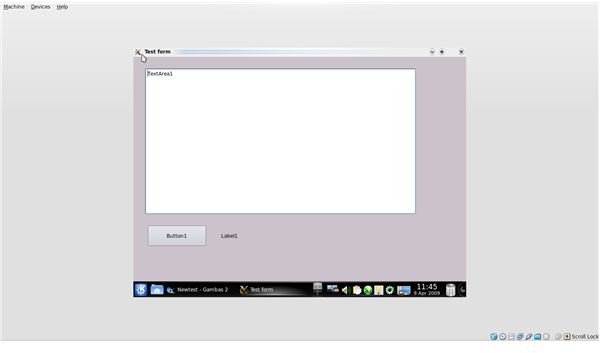
The first step in creating a basic Gambas program is to design a form and put together the controls that you will need for it to function. Let’s say, for instance, that you want to create a program which counts the number of words in a text area. The most basic requirements – after the form – are the text area itself, a button to click when you are ready to count the words, and a label to display the result. Each of these can be created with a tool from the Form controls area and stretched and moved to an appropriate position. They will be given names automatically – Label1, TextArea1 and Button1. This names will also appear in the text areas and on the button as the default text. We can change the initial settings via the text properties shown at the right. The button text should say something like “Count Words”, the text area should be empty, and the label should be set to zero. The illustrations below show the design process, and the result that appears when the user presses the Run button in the main toolbar.
The Menu Editor
Menus are created in Gambas with the Menu Editor. Open the project from the previous article and double-click on “FMain” at the left to bring up the form. In the small toolbar running across the top of the form there is a button labelled “Menu Editor.” Click on it to bring up the menu editing panel. We are going to add two menus to our form: one File menu with a single entry “Quit” which closes the program, and an Edit menu with three options: “Clear,” which clears the text area; “Copy,” which copies the text in the text area to the Clipboard; and “Paste,” which pastes the contents of the Clipboard into the text area.
Menu items have a name, which identifies them to the program, and a caption which appears to the user. If you add an ampersand to the caption – e.g. “C&lear” – the resulting menu item will appear with an underline below the letter following the ampersand, and will automatically be linked to an Alt-key combination – in this case Alt-L. You can use the Menu Editor to link menu items to other shortcut keys as well.
Create the menus shown below, then close the Menu Editor. Don’t worry at this stage about the Action setting.
This is a good spot to save. In Part Two of this series I will describe how to add code so that our new program actually does something.

This post is part of the series: Gambas – A Visual Basic for Ubuntu?
Gambas is a GUI-based programming environment that brings the ease and charm of early versions of Visual Basic into the Linux environment.


