Having a low powered netbook with a low resolution camera does not mean that you can’t squeeze the best out of both. Hop in to see how you can perform basic photo tasks without eating too much resources or sacrificing too much time.
Introduction
OK, we all accept that netbooks are low powered computers and that their cameras have low resolutions. On the other hand, they are portable and we can take them wherever we want, and when we are going to this “wherever” we often have our digital cameras with us. Let’s get going with each point and see how we can use our netbooks more efficiently.
Importing Photos from Digital Cameras
I know that many of you will say that this is not something new . However, considering the applications that you will load on your netbook there is an easier way to import your digital photos with the command line: gphoto2 .
Of course, instead of gphoto2, you can use an application such as F-Spot , digikam or Picasa . But, there is a downside here: Your netbook will probably have 1 Gigabyte of RAM in total and this will be allocated to many other programs. Using an additional graphical program will make the system allocate some of these resources to this program which, in turn, will make you experience a slower overall computer usage. Taking out the memory card and plugging it into your netbook is also fine, but your netbook must have a slot that can accept your digital camera’s media device. Also, you will have to deal with the task of taking out the memory card, plugging it into your netbook, taking it out, and plugging it back to your camera. On the other hand, you can just plug in your camera to your computer using a USB cable and download the pictures. I will take this option.
Gphoto2 is available in many distributions’ repositories. For Ubuntu, you can install the package with Synaptic or apt-get install gphoto2 from the command line.
After you plug in your camera, turn it on and set it to the mode that enables it to communicate with the computer. Then, open up a terminal and type gphoto2 –auto-detect to see your camera. The output will show your camera mark and model if it is recognized (such as Kodak EasyShare C653). Next, type gphoto –summary to see more information about your camera. You should see something like the following.
tolga@balci:~$ gphoto2 –summary
Detected a ‘Kodak EasyShare C653’
Camera Summary:
Camera identification:
Model: Kodak EasyShare C653
Owner: Tolga BALCI
Power status: on battery (power OK)
Flash disk information:
Drive D:
331'558'644 bytes total
205'312'268 bytes available
Time: 2009-03-09 21:22:48 (host time +0 seconds)
Next, we go ahead and list the files by typing gphoto2 –list-files. You will see the list of files in your camera and memory card. To retrieve them to your computer, simply type gphoto2 –get-all-files.
Of course there are other tools available for this purpose. However, I have chosen gphoto2 for the job, because the command parameters are intuitive and very easy to remember.
What About Photos? Movies? Audio?
It will be an underestimation to use the gphoto2 tool for just retrieving your images. Imagine that you can use the tool for shooting photos and movies with your netbook’s camera, as well as recording audio.
If your digital camera is plugged in, remove it (safely) so that the only camera available is your netbook’s. Then, open up a terminal and ask for a summary again by gphoto2 –summary. The output should show your netbook’s camera. Then issue gphoto2 –capture-image to shoot a photo, gphoto2 –capture-movie to record a movie stream or gphoto2 –capture-sound to record audio from the built-in microphone.
Batch Processing Images
When you go to sleep or leave your computer at the hotel for some time, you can save time by processing the images which you were planning to handle when you got back home. If you are going out to dinner, why not leave your netbook open so that it can take care of your photos?
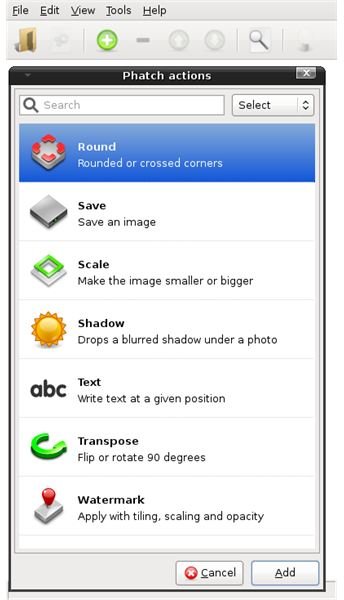
To process your images, I recommend using Phatch (PHoto bATCH.) Phatch lets you define your actions one by one and in order, and then goes on to apply these actions to your photo set. You can scale your images, drop a blurred shadow, insert text, transpose, embed watermark and save. The interface is very simple and by clicking on the green plus sign, you can begin defining your actions.
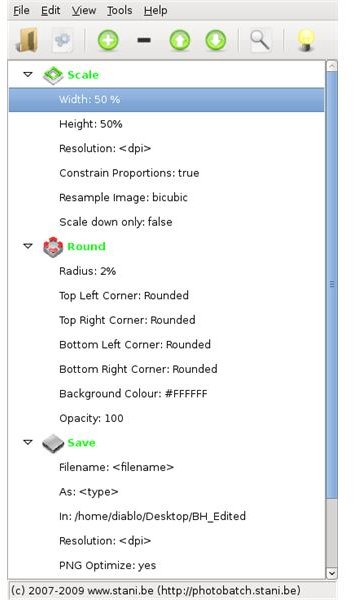
For example, I am preparing some photos to send to my friends. I don’t want to go through the File -> Open -> Scale -> Save As routine for each photo (plus rounding the edges) so I simply open Phatch and add the actions as: Scale to 50% (both width & height), keep proportions, resample by bicubic algorithm, round all corners by 2% radius with 100% opacity, and Save them to my BH_Edited folder on my desktop with PNG optimization. Then, I select the files to be processed and start the processing. Instead of spending hours, I have hundreds of photos ready in a couple of minutes.
Uploading Images
It is always of use to us geeks if we can locate a free hotspot and do our Internet work there. Uploading our photos to our Flickr, MySpace and/or Picasa accounts before we get back home would be a very nice idea. However, I can not say that this is so easy with netbooks. Picasa will be a pain to run, Flickr does not provide a native Linux application (but you can go through F-Spot), and MySpace certainly does not have anything to do with Linux. In this case, I can only recommend that you to go with F-Spot to upload the photos to your webspace. (I could not get Uploadr for Flickr to work.)
Closing
Do not underestimate the power that comes with your netbook. The processor may not be the top in the list, the camera might be a VGA one, and your RAM may be limited. With Linux installed, these are not considered restrictions and you can still do your work very easily by just opening up a terminal and typing a few easy commands.


