
If you do any image creation or editing you know that layers are one of the most important tools you can use. With layers you add depth, complexity, and create an ease of editing you wouldn’t have otherwise. In this Bright Hub article you will learn how to use layers with The Gimp.
Before you start
The Gimp is an open source image manipulation application. To get a quick overview of what this tool is, take a look at this article Linux Applications: The Gimp . Don’t let the interface intimidate you. The Gimp is quite easy to use. Note that for this article I will be referring to The Gimp version 2.6. From version 2.4 to 2.6 there were some major changes to the user interface.
The tools you need
When you open up The Gimp you will notice there are three windows. The window you want to concentrate on for layering is the Utility Window.
Utility Window
How to use the Utility Window
Notice there are four tabs in the Utility Window. The Layers tab is the first tab (the one open in the image above). This is where you will do your work with Layers. Here you will create new layers, manipulate layers, anchor layers, delete layers, and copy layers.
The first thing you will need to do is to either have an image open that you want to add layers to, or create a new image. Once your file is open (or created) go to the Layers tab in the Utility Window. In the lower portion of the window you will see a toolbar that contains six buttons. Those buttons are (from left to right):
- Add a new layer
- Move a layer up
- Move a layer down
- Create a duplicate layer
- Anchor a layer
- Delete a layer
Click on the Add a new layer button (far left) and a new window will appear.
Layer properties
Creating a new layer
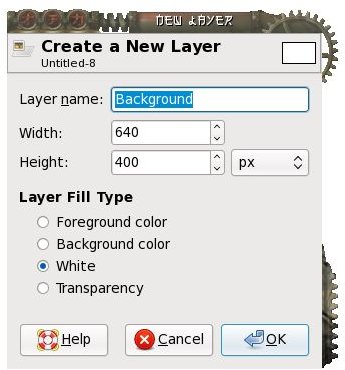
In the Create a New Layer dialog box you really only need pay attention to a few details. The first, and most important detail is the Layer Fill Type. If you are placing a layer on top of another layer you should make sure the fill type is Transparency. If you choose otherwise, your lower layers will be hidden behind the new layer color.
You should also give the layer a name that will let you know what purpose that layer serves. For example: If you are creating a layer that will contain nothing but text, you might call that layer “Text”. Simple.
The rest of the information can be left as default - unless you have special needs for your layer (such as size).
New layer
Manipulating your new layer
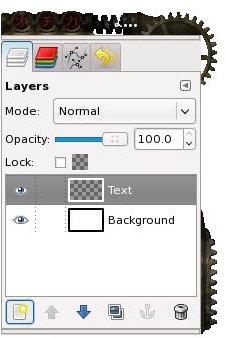
Now you can see how more than one layer shows up in the Layer tab. The layer that is selected will be the layer you are currently working with. So if you are ready to add your text to the text layer, click on the Text layer in the Layer tab and then go back to your editing window and go to work.
You can now move your layers up or down. Say you have created a layer that needs to go between your text layer and your background layer. By default, when you create a new layer, it will lay the new layer on top of your current layers. To move this layer down one level, select the new layer and click the down arrow at the bottom of the Layer window. The new layer will move down one layer.
Other manipulations
If you have created a layer and want to duplicate that layer you can click the Duplicate button at the bottom of the Layer window. The duplicate layer will appear on top of the layers. If you are duplicating the Text layer, the copy of the Text layer will be titled “Text copy”.
You will also notice two other features: Mode and Opacity. These two features work in conjunction with one another. Click on the Mode dropdown and you will see numerous possibilities. Each of these are different modes that affect how the selected layer’s opacity functions. If you select the Dissolve mode as you drag the opacity slider to the left, more and more of the selected image will dissolve. By default, Normal mode simply fades the layer as the slider moves to the left.
Final Thoughts
There you have it, the basics of working with layers in The Gimp. With a good understanding of how layers work, The Gimp will become a very powerful image editing tool for you.


