Linux comes with a powerful suite of recovery tools for creating, manipulating, and extracting data from cloned hard drives and recovery images. Find out how to recover data from old backups made for recovery or how to browse a recovery image’s files under Linux.
Recovery Images
Many backup applications and programs for GNU/Linux can create disc recovery images. Programs such as dd , that have been included in UNIX-like operating systems since the 1970s, have a large following because of their sleek versatility. Unlike Microsoft Windows, Linux comes with built-in support for mounting recovery images as if they were physical discs, allowing users to fluidly browse and modify the files within the image. Many digital forensics, file carving, and other data recovery applications that run under Linux can take recovery images as input for analysis, rendering the physical hard drive or disc unnecessary. A broad range of free and open source applications are available for working with recovery images in a Linux operating environment.
Creating Recovery Images
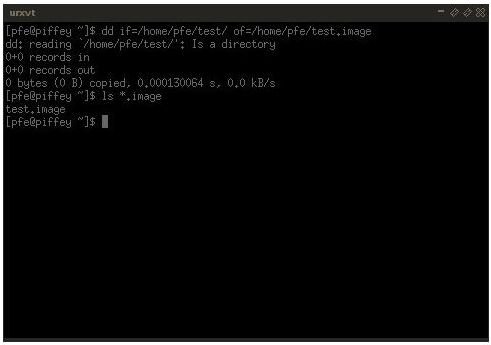
The most common way to create a recovery image is using the dd program. The versatility of dd has made the program a staple of UNIX-like operating systems and many graphical applications are nothing more than a front end for dd. By providing an input and an output, dd can create dozens of image types from whole hard drives, partitions, or simply a directory and send them to a dedicated backup device, over a network connection, or simply onto the same drive. For example, using something like the following will create a fully imaged backup of a user’s home directory.
dd if=/home/user of=/media/backupdevice/userhome.image
Furthermore, dd’s input and output can be fine tuned by defining sector sizes and other minutae. Finally, since dd copies sections of data bit by bit, even corrupted or lost data is transferred into the image so a recovery application can analyze and extract lost content.
For full partition imaging, some system’s administrators prefer partimage . Partimage makes it easy to restore or create images of entire sections of a hard drive . While dd can do this as well, some users claim that partimage can do it a lot quicker. Using partimage you can create a single image from a hard drive, then replicate it on to an indefinite number of computers. This makes installations across several machines much easier. Many other console-based programs exist for image creation, such as dd_rescue, an extension of dd with specific recovery options and Clonezilla , a popular alternative to partimage because of its easier to use interface. Many users prefer Clonezilla because of how similar the application is to Norton’s Ghost.
Verifying Recovery Images
If your recovery image is of a complete hard drive or just a few partitions, you may need to use fdisk to verify the logical start and end points of the image before you mount and browse the file system. Typically, if the hard drive you imaged was one in need of data recovery or file carving, you will want to skip verifying the image and move directly to using a recovery application. There is nothing that fdisk or any other application could tell you that you do not already know. However, if you need to verify an image you’ve received second hand, you can issue the fdisk command in the Linux console to verify the sanity of the recovery image before proceeding.
fdisk recoverfile.image
Browsing Recovery Images
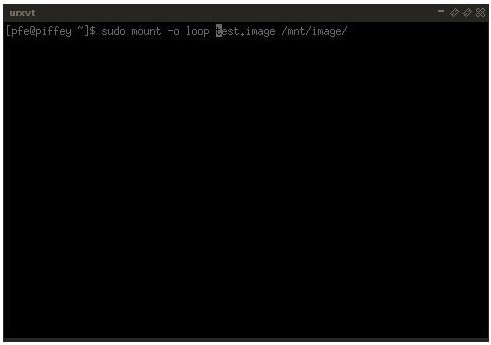
Depending on the image type, you should be able to easily mount a recovery image as root using Linux’s built-in loopback device. You will need to replace recoveryfile.image with the image’s file name and /mnt/image with the name of the folder you want to use to mount the image, but the command below will work with the majority of image files.
sudo mount -o loop recoveryfile.image /mnt/image/
You can then use the cd command, or your distribution’s file manager, to navigate into the image’s directory and work with the mounted files. Similarly, issuing the umount command, followed by your mount directory, unmounts the image. When using file recovery or digital forensics tools with a recovery image, make sure that the image is unmounted before attempting to work with its contents.
Checking A Recovery Image for Errors
Although typically unnecessary, you may need to check and repair an image before using it to restore a system. This is most useful when dealing with virtual machines , where disk images are often and quickly swapped out. Just like with a regular disk, checking a recovery image is as easy as using Linux’s built-in fsck command. However, fsck is a wrapper for a number of sub-applications. The main fsck command actually detects and redirects a user’s instance of fsck to the proper version for whatever file system type needs to be checked.
Since fsck cannot read images directly, you have to then mount the image, using the “-o loop” option, using Linux’s loopback device. Then, since fsck cannot read the recovery image’s file system type, you need to manually call the correct version of fsck. For ext3 file systems, commonly used in Linux, the command is fsck.ext3 while for common Windows partitions, NTFS, the command is fsck.ntfs. Linux will then check and repair any issues with the recovery image’s partitions. A typical check on a Linux ext3 image that was mounted to /mnt/image might be:
sudo fsck.ext3 /mnt/image/
Recovering Files from an Image
The great thing about image files is that they are a direct clone of the hard drive, typically bit-by-bit, including “deleted” data. Since
files are never truly erased from a partition until they have been written over multiple times, you can use a technique called file carving to retrieve deleted files from an image of a fully functional or corrupt drive. File carving looks at the leading bits of data to recognize a file and its file type. Sophisticated file carving applications can then piece together parts of the file, or the entire thing, from the remnants on the computer’s hard drive. Linux can work with a number of file systems as well, including Microsoft’s NTFS and the FAT file system commonly used with USB drives.
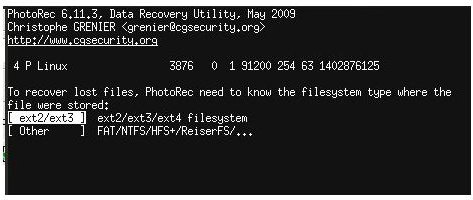
For Linux there are three main file carving applications that can take recovery images: foremost , PhotoRec , and scalpel . Like the majority of tools so far, they are all run from the command line and are free and open source. Foremost was originally developed for the United States Air Force Office of Special Investigations. Scalpel is a complete rewrite of foremost, aiming to be faster and more efficient. Finally, PhotoRec was originally developed to read data off of corrupted memory cards, but has expanded to encompass all aspects of file carving. PhotoRec is the only application with somewhat of a GUI, having a text-based menu for navigation. All of the applications work the same way. Simply point them at the image file, choose what types of files you want to recover, then wait while the application parses every bit of information possible in the recovery image.
Using foremost to save all of the JPEG image files from an image.
foremost -t jpeg -i recoveryfile.image
Using scalpel to save all of the deleted files from an image to the /mnt/network/drive directory.
scalpel recoveryfile.image -o /mnt/network/drive
Restoring A Recovery Image
Cloned hard drives and recovery images are not always stored because they are corrupt. Some people keep backups of disk images so they can simply rewrite them over a corrupted partition if need be later on. The same tools used to create recovery images can be used to clone images back to the drive. With dd, simply make the recovery image the input (if) and the hard drive or partition the output (of). Make sure that once you restore the drive with the recovery image that you verify the drive using fdisk or a similar program before attempting to use the machine. Recovery images, as long as they do not become corrupt, can be used indefinitely.
dd if=/media/backupdevice/userhome.image of=/home/user
This post is part of the series: Linux Recovery Tutorials
Learn how to use the free and open source operating system, GNU/Linux, to analyze, recover, and repair your computer. Using Linux’s free utilities you can fix lost partitions, resurrect deleted files, and repair seemingly unrepairable hard disks.


