One of the most promising features of iOS 4.2 for the iPad was printing from the iPad with AirPrint. Unfortunately, this feature was crippled when the update was released. This article will show you ways around the limits of AirPrint.
Native Printing From The iPad
When Apple announced iOS 4.2 several months ago one of the most exciting new features announced was the ability to print by using AirPrint on the iPad. AirPrint was suppose to print to any printer connected to your Mac.
Well, November and iOS 4.2 came to the iPad and AirPrint was a lot less than promised. Right now AirPrint will only print directly to certain AirPrint enabled HP printers. If you don’t have one of these printers AirPrint will not print to your printer without installing something on your Mac. A list of AirPrint enabled printers can be found here : http://www.apple.com/ipad/features/airprint.html .
Software Solutions To Print To Any Printer With The iPad
There is a free solution and a paid solution to using AirPrint on the iPad to any printer connected to your Mac.
The free alternative was something called Hactivator, which installed missing files into your system that activate AirPrint. As per Apple’s request, Hactivator has been pulled. However, the developer of Hactivator has replaced it with AirPrint Activator. You can find this piece of software here: https://netputing.com/airprintactivator . Once you install Activator you need to turn on Printer Sharing on your computer, which is outlined below.
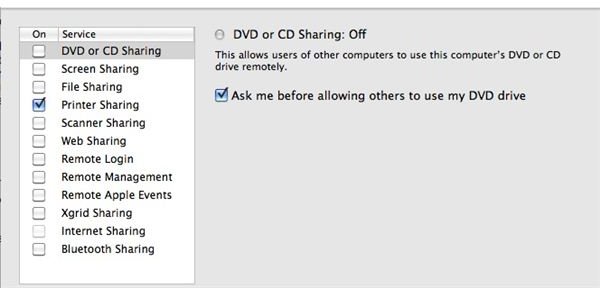
To enable Printer Sharing go to the Apple Menu and choose System Preferences. Once there pick Sharing and in the list check off Printer Sharing.
The pay alternative is Printopia. Printopia, from eCamm , is a $9.95 piece of software that will make iPad printing available through your Mac. It installs and lives inside the System Preference window on your Mac. Printopia not only enables printing to your printer, it also prints files to Dropbox or right to your Mac. There is a free seven day trial available to see if this will work for you and if you like it.
The only question about Printopia is how soon will Apple turn printing via printer sharing back on. Is it worth essentially $10 to enable printing and risking having that feature for free at some point in the future? It could be one week, it could be one month, it could be one year. We don’t know.
How To Print From The iPad
Once you have a compatible HP printer or AirPrint enabled on your Mac via a method above (or another method) you are ready to print from your iPad. Printing from the iPad is very easy.
First you have to make sure you are on the same wireless network as the printer. You also have to be in an app that supports AirPrint (Mail, Safari, and iWork apps are a few). Within the app you want to click the arrow that would normally let you email a link , or open a link in Safari (for example). One of the options in the list is now “Print.”
When you choose print you will be prompted to select the printer you want to print to. Choose your printer and say OK. Within seconds the printer will start working without a problem. On occasion I have had to do this twice before the printer show up.
Once you send a print job a little printer icon shows up in the dock. This is very similar to the print utility that opens up when you print on your Mac and a printer shows up in your dock.
Assuming your printer is on, has ink, and has paper your document should print without a problem. If you are printing through a shared printer on your computer you MUST MAKE SURE THE COMPUTER IS ON. If you leave your computer on all of the time this will not be an issue. If you turn your computer off, you have to remember to turn it on if you plan on doing any printing.
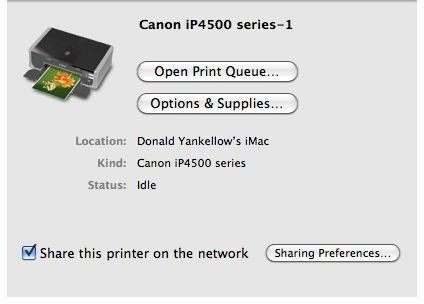
If printing is not working open the Print & Fax System Preference. Make sure the “Share this printer on the network” button is checked.
Overall, using AirPrint on the iPad isn’t difficult. It is a shame that Apple has temporarily disabled some features. Luckily there are solutions out that let anyone print from their iPad.


