So your USB drive does not mount on your computer? I understand how frustrating it is when you can’t access your drive but there’s no need to despair. With the simple steps below, you will be able to mount and then access your USB drive in no time.
USB drive does not mount
A USB drive is now an essential add-on to computers to carry around. Not only does it provide the extra storage, but it gives the added comfort of carrying your important audio, video files and personal documents when travelling. Having a 32GB USB drive is like carrying a mini hard disk around, except more convenient. However, using a USB drive has its issues as well.
There are times when you insert your USB stick in your PC and when you go to My Computer, you fail to locate the USB drive in it. You think there must have been a mistake, and you pull out your USB, and insert it again, expecting it to work. Again, you find that your computer failed to locate the USB drive and display it in My Computer. Hence, you conclude that there is something wrong with your USB drive and therefore, there are problems mounting it.
Solution
The most probable cause is that the computer has renamed your USB drive to a letter that is being used already. This means that you need to change the drive letter of your USB drive in order to fix this problem. You can follow these simple steps and you will be able to see your USB drive in My Computer in no time.
1. Locate My Computer on your desktop or in Windows Explorer. Right click on it and then select “Manage” from the list of options in the menu.
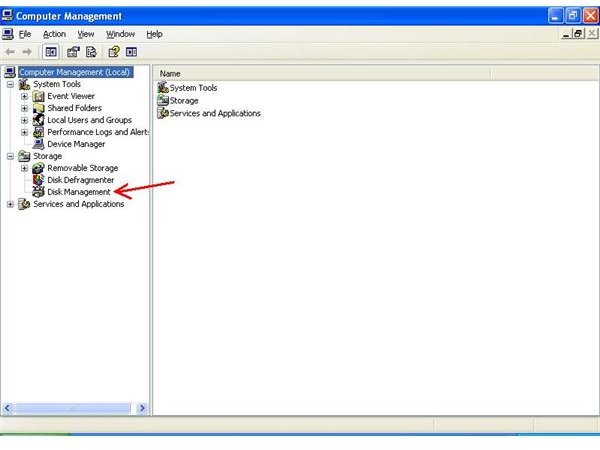
2. In the Computer Management console that opens, locate the ‘Disk Management’ icon in the left pane and double-click on it.
3. You will be able to see all your drives here, their status, and their letters as well as capacity and whether they are healthy or not. In simple terms, whether all your drives are functioning correctly as they should, or not. Next, right click on your USB drive (say, MyDrive (F:) ) and select “Change Drive Letters and Paths…”, a small window will open.
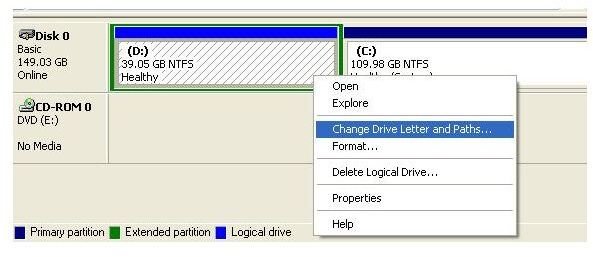
4. Click on ‘Change’, and then select another letter of the alphabet from the drop-down list for your USB drive. You can choose any letter of your choice; just make sure it doesn’t coincide with any of your other drive letters.
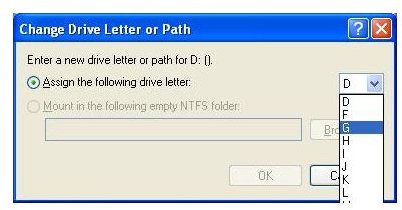
5. You’ll be asked to confirm your action. Click ‘Yes’ if you want to use the drive letter you just selected and you are done.
These were the few simple steps for bringing your missing USB drive icon back to My Computer . Remember, this procedure is tested on Windows XP. For other versions of Windows, the same method should work but there will be slight variations in the steps.
Tip:
It is a good idea to use the “Auto Play” option. By using this option, you will be able to access your USB drive immediately after connecting it to the computer.
Related Articles
Ten Excellent Cheap Jump Drives