CDs are a little out of date but I’m sure you still have a lot sitting around. Here is a guide to easily copy the contents of your CD onto a Flash drive so that you can easily transport the files to other places, including mobile devices that don’t have CD drives.
Get Rid of the CDs!
CDs are outdated. They are easily scratched, hard to manage, and are too big for smaller devices like netbooks and tablets. Increasingly it is becoming important to convert all those CDs into more manageable and versatile forms that will allow you to keep the music, videos, pictures and software they may contain. Here are two easy ways you can move your CD contents onto a USB Flash drive.
Copy-Paste Method
Believe it or not, copying over the CD can be as easy as copying and pasting the files from one window to another. You can even drag them if you like. All you need is to have a computer with a CD drive.
However, this method might only work for a non-software CD. A CD that has your pictures, home videos, or music can work easily this way but if you are wanting to keep your old software you need to skip this method and try making an ISO as described below.
Here’s how copying works
- Plug in your USB thumb drive to the computer. Windows will ask you what you want to do with it–Select “open to view files”. If this doesn’t come up, go to Start Menu < Computer < Select the Flash Drive. Make a Folder on your Flash drive where you want to place the files.
- Insert the CD you want to copy. Ignore any boxes that come up.
- Open up a new file browser by selecting Start Menu < Computer. Right click on the CD and click “Open.” This should open a file browser so you can see the files.
- Select all the files on the CD. Either hit Ctrl-A or just drag the box over them.
- You can now either copy (Right click “copy”) and paste (Right click “paste”) the files into the new folder you made on the USB thumb drive or you can simply drag them from one window to the other.
Now the contents of the CD are on the USB drive.
ISOs and Other Formats: Making an Image of the CD
Many CDs that contain programs are meant to function as CDs and can be difficult to just copy the files over. In some cases you can just copy the whole CD into a folder using the method above and it will still work; but as often as not you’ll have to make an ISO. An ISO is literally an image of a CD that the computer copies into a file. You can then use an ISO reader to open the contents of the CD. An ISO is mounted into an ISO reader as if it is a CD and it acts just like a CD but without any physical disk.
To use ISOs requires a few programs. First you need an ISO creator. You can use one like MagicISO or ImageBrn to make the ISO image. Then you’ll need a program for your computer to read it. An excellent solution is Daemon Tools which will allow you to both create and read the ISOs. You can get a free trial of it or pay for the lighter version which is relatively cheap.
An ISO is just one type of file format the creates an image of the disk. You can also use other formats such as the .mdx file format created by Daemon Tools.
Making an ISO with Daemon Tools
For the sake of the article I’ll guide you briefly through using Daemon Tools. Other image making programs are similar.
-
Install Daemon Tools from their website. I’d recommend unchecking the boxes where they want to add toolbars or set defaults on your computer. The best way to avoid this is to just buy it.
Advertisement -
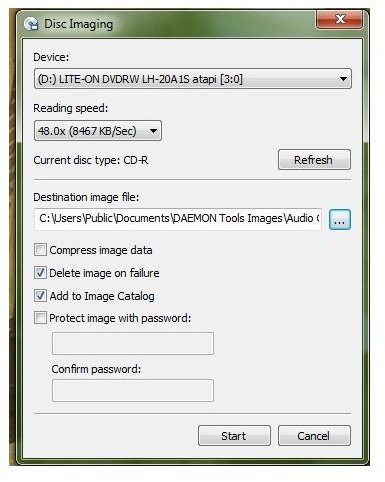
After the computer restarts, Daemon will open automatically and will be in your taskbar tray (where it has your wireless signal, volume, antivirus, etc). Find the icon, right click it and hit “Disc Imaging.” It is a very simple menu that looks like this:
-
The menu is quite simple. Make sure the device selected is the CD drive with the CD in it. Then select the Image Destination File. Put this on the USB thumb drive.
Advertisement -
Select “Start”. Once this completes you should see the file in the location you selected. If you are using the free version it probably won’t be an ISO but Daemon tools .mdx format. No problem, it just means you have to use Daemon Tools to read it.
-
To read it on your other computer it also has to have Daemon tools installed. Now to run it you have to mount the image file on the virtual disk. To do so right click on the Daemon tools icon and select Virtual Devices < Device 0 [K] (or any Device listed) < Mount Image
Advertisement
-
Find and select the file you want to mount. Once selected the computer acts as if you just inserted a CD into the computer. It will even appear in your Computer file browser. You can use the CD like you would any other!
Advertisement
Be aware that using this method can be illegal in some contexts so be careful what you choose to copy. Most likely if you use this method only for your own personal use with a program you have already purchased it is within the software license agreement that comes with its purchase.
For more information on ISOs see our article about ISOs .


