Do you have a wireless router with which you have set up a home or small office network? If so, you can add a printer to the router or to a computer on that network so that everyone accessing the wireless network can work with the same printer.
Overview
There are essentially three steps required if you want to connect the printer to one computer and then work with it using a wireless router. First, you must install the printer on one of the existing computers on your network. Then you will need to change the properties of the printer so that it can be shared. Finally, connect with the printer wirelessly on other computers in your network.
Aside from sharing a printer installed on one computer in your network, you can also connect the printer directly to the wireless router. This can be done wirelessly with the help of a wireless adapter, or using a USB cable.
Read on to learn about these different methods and how to implement them so you can work with a printer using your wireless router.
Install the Printer on a Computer
If you want the printer to be connected to one of the computers in your network and then access it wirelessly from other computers using the router, start by installing the printer onto a computer that will be powered on whenever someone needs to print. No matter what version of Windows you are using, you will first need to physically connect the printer to both the computer and the power supply using the cables provided. Make sure both the printer and the computer are powered on. When you have completed this, it is time to install the printer onto the computer.
Install a Printer in Windows XP
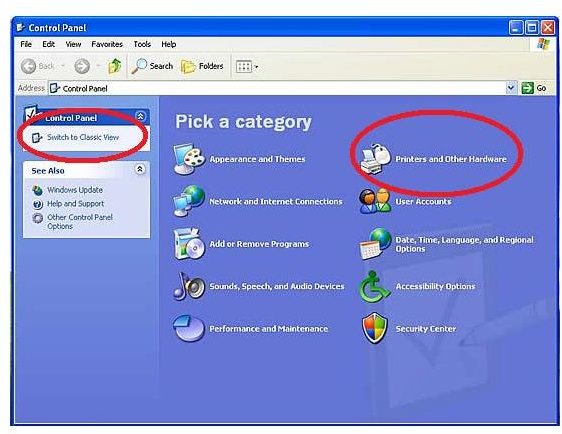
If the computer onto which you want to install the printer is running Windows XP, click Start and open Control Panel. Make sure the Control Panel is in Category View (if there is a link in the left pane that says Switch to Classic View, you are all set; if it says Switch to Category View, click that link). Click on Printers and Other Hardware.
Under Printer Tasks, click Add a Printer. The Add Printer Wizard will begin. Follow the steps in the wizard to complete the installation of the printer.
Install a Printer in Windows Vista
If the computer onto which you want to install the printer is running Windows Vista, click Start and type Printers into the Start Search field. Click on Printers in the resulting list of programs.
Click Add a Printer at the top of the Printers window. An Add Printer window will open with two options. Click on Add a Local Printer and follow the steps to install the printer onto your computer.
Install a Printer in Windows 7
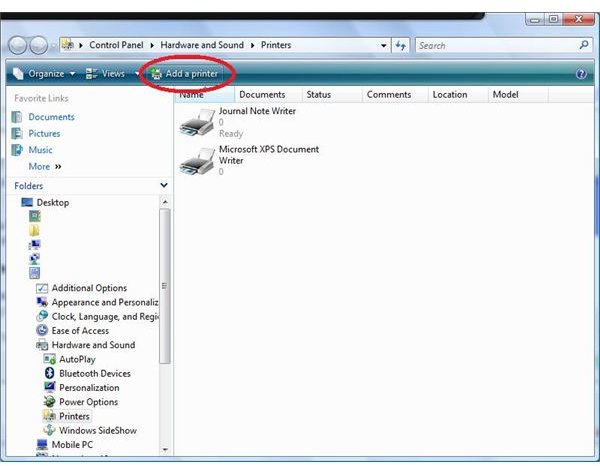
If the computer onto which you want to install a printer has Windows 7, click Start and select Devices and Printers in the right pane of the Start menu. Click Add a Printer at the top of the Printers window. An Add Printer window will open with two options. Click on Add a Local Printer and follow the steps to install the printer onto your computer.
Share the Printer
The next step required if you want your printer to work with a wireless router is to allow the printer to be shared. This means that other users on your wireless network will be able to view and connect to the printer on the main computer via the wireless router.
Share a Printer in Windows XP
If the printer is installed on a Windows XP computer, open Printers and Other Hardware in the control panel and then click Printers and Faxes. Right-click the printer you want to share and select Sharing. Go to the Sharing tab of the printer’s properties dialog and select Share this Printer. You can enter a new name for the printer in the Share Name box, if you wish. This will help others on your wireless network distinguish the shared printer. Click Apply and OK.
Share a Printer in Windows Vista

If the printer is installed on a Vista computer, click Start and type network into the Start Search field. Select Network and Sharing Center from the resulting programs list. Click the drop-down arrow to the right of Printer Sharing. Select Turn on Printer Sharing and click Apply. If prompted for confirmation or a password, click Continue or enter the password required.
Share a Printer in Windows 7
If the printer is installed on a Windows 7 computer, click Start and open the Control Panel. Select All Control Panel Items and open the Network and Sharing Center. Click Change Advanced Sharing Settings.
Under File and Printer Sharing, select Turn on File and Printer Sharing. Click Save Changes.
Connect to the Printer
Now that you have the printer installed and shared, other users can work with it via the wireless router. To connect to the shared printer from a Windows XP computer, go to Printers and Other Hardware in the Control Panel, click Add a Printer and click Printer Connection. Browse to find the printer connected to another computer on your wireless network.
To use the printer on a Vista computer working with a wireless router, click Start and type \\ComputerName into the Start Search box, with ComputerName replaced by the name of the computer on which the printer is installed. Press Enter. A new folder will open. Double-click Printers and then double-click the printer you want to use via the wireless router. Windows will then add the printer to your computer and install the driver. Click Next when finished.
To work with a printer shared on your wireless network if you are using a Windows 7 computer, click Start and then Devices and Printers. Click Add a Printer at the top of the window. Select Add a Network, Wireless or Bluetooth Printer. Select the printer, click OK and then click Next. Click Install driver, click Next and then click Finish.
Connect the Printer to the Wireless Router
If you would rather not connect the printer to a specific computer, you can connect it directly to the wireless router in one of two ways. If your wireless router has a USB port for a printer and your printer has remote printer setup utilities, you can plug an Ethernet cable directly into the printer and the wireless router. Follow the instructions provided with your printer for complete setup.
Another way to connect a printer with remote printer setup utilities is by using wireless print server hardware. Read Connecting a Printer to a Home Network for complete instructions on this method.


