Many enthusiasts get the itch to build their own PC case, and wood is one of the better materials for it. It is easy to work with, requires inexpensive tools, and is cheap to purchase. What, then, do you have to consider before building your own wooden PC case?
Non-standard Materials
Building a PC case is a project that many enthusiasts think about, but never embark on. It can be a daunting task. Laying out a case so it is easy to use and provides sufficient cooling is more difficult than it looks. There is also the question of materials. Most cases are made out of metal, and metal-working is out of the arena of those who do not own or have access to a well equipped workshop. Metal itself is also expensive and good-quality raw materials can be difficult to acquire if you are not already familiar with where to buy them.
Making a case out of wood resolves these issues. It can be worked with just a saw and a drill, it is cheap, and it is easy to acquire. Wood also provides a case with a unique look and is particularly appropriate for a home theater PC. This brief guide covers the basics of how to build a case using wood.
Designing the Case
Imitation is the highest form of flattery. While it is fully possible to design a case using an exotic plan built with a 3D rendering tool or even CAD program, this is a basic guide. For people building their first case it is advisable to find a case that you like and then copy what is attractive. Take note of where the PSU mounted, where the drive bays are located, and where the fans are placed. If you don’t mind spending the extra dough its even possible to buy a case, partially disassemble it, and use portions of it in the design of the case being built. Is it cheating? Kind of. But it is difficult to build a hard drive mount that is better than what Antec and Coolermaster have already come up with.
Once you’ve designed a basic layout its time to start measuring so it can be fine-tuned into a workable plan. Open the PC’s current case and measure the size of all components inside. This includes length, depth and height. Remember to add about a quarter of an inch to the height of anything mounted to the motherboard because the motherboard is in fact suspended a quarter of an inch in the air by the motherboard spacers. Also remember that hard drives and optical drives must be mounted to something besides the walls of the case, and so the space of their enclosures, be they custom ones or ones ripped from another case, must be compensated for.
Getting Around the Problems of Wood
There are two major issues with using wood for a PC case. The first issue is heat. The second issue is vibration.
Heat can become a problem because a wood case is not going to transfer heat from the inside of the case to the outside in the same way as a metal case. It is not entirely inaccurate to think of a metal case as a kind of heatsink. The metal is thin and transfers heat well. Heat inside the case transfers easily into the room. Wood does not have this characteristic. Airflow is therefore critical. Make sure that there is an exhaust fan for both the GPU and CPU, and make sure that intake fans provide proper airflow over the hard drives.
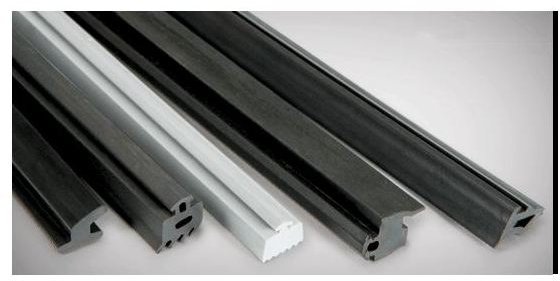
Vibration can be an even trickier problem. Wood tends to resonate, which means that a vibration can cause very annoying sounds. Dealing with vibration requires that parts which vibrate be isolated from the case in some way. This includes the optical drives, hard drive, and all fans. One way is to rip out the internals of a case with good vibration isolating qualities and mount those components into the wooden case. A custom approach is to use rubber spacers in areas where components are being screwed into wood. Foam can be packed around fans. Rubber strips, like those used around windows to plug drafts, are also extremely handy. They can be placed around components. If you’re very precise, you can glue them to a fan and then slip the fan into a precisely cut fan mount, mounting the fans without any screws at all. Be careful with the glue, however, as many types of glue react badly with rubber.
Assembling the Case
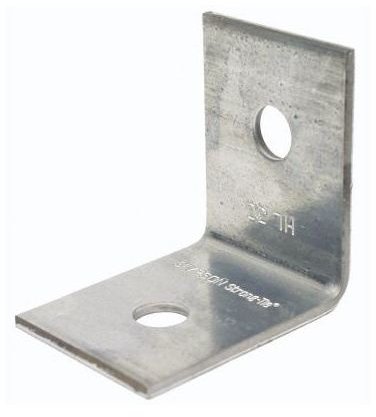
There are two basic ways to assemble the case. One is to use metal joints to attach pieces of wood together. The other is to simply drill screws directly through pieces of wood that join together.
Using metal joints is probably best for beginners. It is easier to drill using small screws and metal joints because if something is messed up, the joint can be removed easily and the holes can be plugged with wood putty (if they need to be plugged at all). Metal joints are cheap, and the smaller screws needed are also cheap. The disadvantage to this method is that it often results in a case that feels a little less solid than expected.
Putting a case together by screwing together the panels directly is also possible. Usually one piece of wood will be used as a base, and four sides will be screwed directly to it by drilling through the base piece, into the side panels, and then attaching everything with long screws. This method results in a solid feel, but it is also a lot easier to mess up. It requires very precise measurements. It is also easy to split the wood when drilling in the longer screws.
The Details
Obviously, the layout of a custom wood case will vary. But there are some specifics to watch out for when building it.
First, make sure that the motherboard is attached with spacers! This is both for reasons of heat and to ensure that there is no possibility of the motherboard being shorted out. Screwing the motherboard directly into the wood just isn’t a good idea. Using rubber spacers is a good solution, but it may also be possible to use spare spacers that are laying around from previous PC builds.
If you’re using components from a previous case, it is often possible to attach those pieces directly to the case without spacers, but do use your judgement. If the hard drive enclosure you’ve salvaged is merely a lump of metal with slots for hard drives, use a rubber spacer or something else to decrease vibration. If you’re building your own custom hard drive case out of strips of wood, I recommend doing an out-of-case experiment first. Assemble the PC on your workbench, place the drives into their custom home, and turn it on to see if there are any issues with vibration.
Power supplies can be tricky. They normally attach to the rear of the case using four small screws. The wood you’re using, however, will likely be too thick to use those screws. There are two ways around this. One is to spend time in a hardware store with a PSU in hand trying out screws until one is found that fits. The second option is to secure the PSU by building a wooden cage to put around it and then mounting the cage to the case. In any situation, be sure that the method being used to mount the PSU is secure if the PSU is at the top of the case. Dropping the PSU onto the motherboard is bad for your PC’s health.
Good Luck!
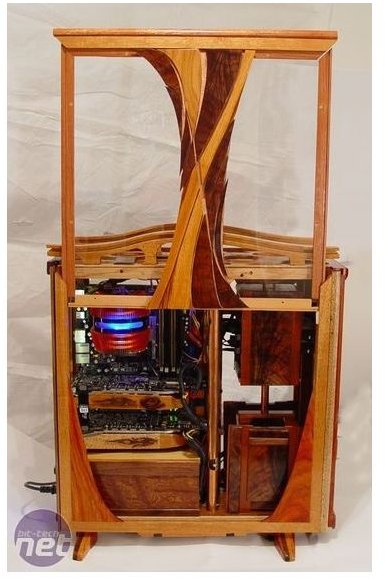
These are the basic factors that one must consider when building their own wooden case. I don’t expect anyone reading this guide to do much more than assemble a case that is simply a wooden box, and I encourage readers not to over-extend themselves by trying to design a fancy case with a custom exterior, glass window, or other such features . This will likely be an exercise in frustration.
Instead, keep it basic and take it slow. It is almost certain some problems will arise while building the case, but by keeping things basic these issues should be easy to overcome and should not require the entire layout of the case to be changed.


