Need more space in your computer to hold your millions of pictures and videos? Here is a guide to installing a second hard drive, known as a “slave drive,” on your computer.
Introduction
Installing a second hard drive is a quick and easy way to upgrade your computer, increasing the space you have to store all of the files you hold dear. While external hard drives are incredibly easy to install–normally as simple as plugging in a USB–internal hard drives are cheaper, won’t take up valuable desk space or external ports, and be much safer inside the PC, but are only a bit more difficult to install, particularly since SATA hookups have become ubiquitous.
For the sake of this article, I’ll have brief instructions on how to set up a slave disk drive for both a SATA and an IDE hookup. However, the concept of a “slave disk” is somewhat outdated. Unless you have an old motherboard you probably won’t have to do anything complicated.
Getting the Right Supplies
The first step to installing a slave disk is to buy the hard drive. Before you do this, make sure your computer has enough space and hookups for it. Start by unscrewing the sides of the computer and removing the side panels. Check to make sure that you have enough space in there for a second hard drive. The hard drive is normally located towards the front of the computer, screwed between two panels, somewhere below the cd-rom drive. Most computers have plenty of space here to add more hard drives, but some smaller computers do not.
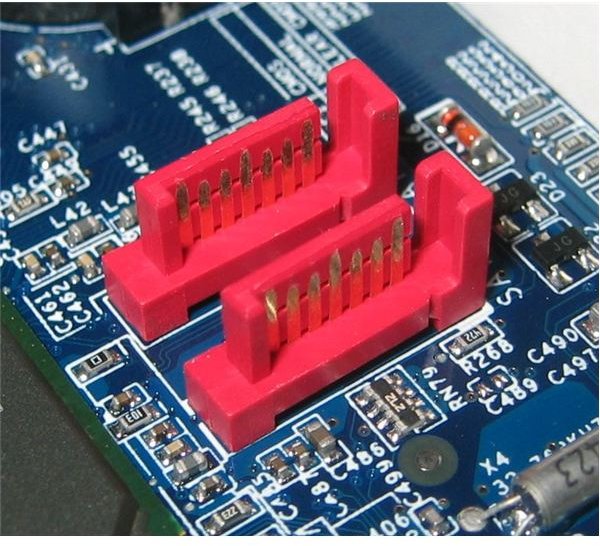
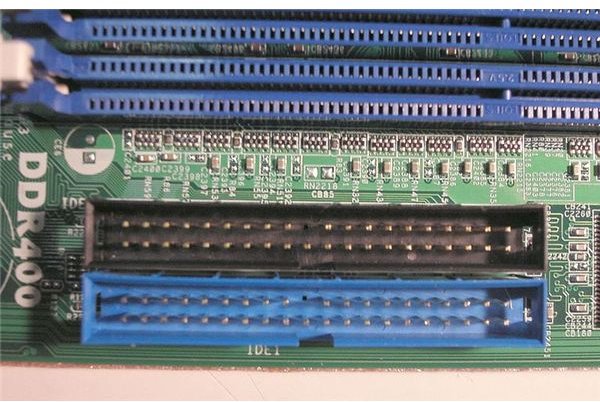
Once you have made sure you have enough room, check to see what hookups you have available on your motherboard. The easiest way to find where these hookups are is to follow the cord from the back of your current drive down to where it is connected to the motherboard. If this is a ribbon it is a IDE connector. SATA connectors are normally solid black cords with red connectors. If you bought your computer within the last five years, you are most likely using SATA. Even if your not, you may have SATA connectors on your computer.
SATA ports look like the picture on the left. IDE ports look like those on the right. You need to make sure you have at least one of these available to plug in your hard drive. If you have a SATA drive, I strongly
recommend you buy a hard drive with a SATA connection. When you go to the computer store or buy online check to make sure it is a SATA connection. Most will be nowadays.
Also, keep in mind that you will need to have connectors for these as well. Some hard drives come with them but just to be sure I would pick up a corresponding cord (SATA or IDE) with your hard drive. Also, you’ll need to make sure you have a power connector. These are the cords coming out of the powersupply. These are either large white connectors (Molex) or small black ones (SATA power)-Refer to this power supply connector guide to see which ones you have. Make sure you have a free one that can reach the place you plan to install the hard drive–if you are getting an IDE hard drive go ahead and make sure you have a Molex power connector. If you have a SATA hard drive it’d be a safer bet to make sure which one it uses, though they almost all use SATA plugs. If you do not have free connectors of the correct type, you can pick up an adapter for only couple dollars at the computer store.
Installing a SATA Hard drive
Installing a second SATA hard drive is incredibly easy since it does not require that you modify anything on the hard drive to set it as the slave disk. Here is all you need to do:
-
Open up the sides of your computer (turn it off first)
Advertisement -
Mount the hard drive above or below the Master hard drive
-
Connect the SATA connector to the back of the hard drive–it only has one place it can fit
Advertisement -
Connect the SATA connection to the mother board.
-
Connect the hard drive to the power supply
Advertisement
At this point, turn on your computer. Your hard drive should now automatically show up in your BIOS and be recognized by the computer, which will assign it a letter. Since it doesn’t have an operating system on it, the computer will automatically give it the slave status and use your primary hard drive to boot from.
If your computer does not recognize the hard drive, restart it and run the BIOS or setup. In this menu there should be some place you can instruct the BIOS to auto-detect new hard drives. Make sure this is selected, save, and exit. The hard drive should now be online.
Installing and IDE Hard Disk
For those who are still using IDEs, take a look at the hard drive and follow these steps.
-
Prepare the Hard disk: This involves setting the jumpers on the hard disk so that the hard drive is designated the slave disk. If you look at the connectors of the disk you will see little plastic pieces stuck onto some of the wires. These are the jumpers. Above this should be a display printed to show you what order of jumpers indicates master and slave. If your hard drive shows some sort of configuration like “Cable Select” then you don’t need to change anything (they should already be set to this). But if it only shows master and slave, get some needle-nosed pliers and move the jumpers so that they match the “slave” pattern.
Advertisement -
Now mount the hard drive in the bay.
-
Connect the IDE cable to your hard drive and your motherboard. These cables will have a notch in them to ensure you put them in the right way.
Advertisement -
Connect your power supply to the hard drive
- Turn on the computer and enter the BIOS or setup to ensure that the computer is detecting the new hard drive or, as we did before, that it is set to Auto-detect new hard drives.
At this point the hard drive should be set up.
Conclusion
If you have problems, make sure that everything is connected up properly. We have pictures and more details of SATA and IDE device installation here . See if the hard drive turns on with the computer. If it does not you may not have the power plugged in or might have a defective drive.
As long as your computer is running XP or later versions of Windows, there should be no software configuration necessary.
And that’s it, nice and easy!


