Since the dawn of USB technology, the questions and confusion about “safely removing” such hardware has been heard, especially for the storage devices. Is it safe to ignore this warning? Read on to find out.
Unplugging A USB Device
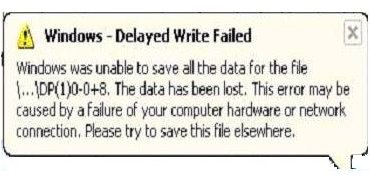
Plugging and unplugging USB hardware while the computer is on could be dangerous because it can crash the operating system, damage the file system, or could cause loss of data from a USB flash drive or USB attached hard drive. Although most USB devices are designed to be hot swappable, care must be taken especially when unplugging the device.
A USB flash drive is probably the most commonly used USB device and also the device that is very frequently plugged in and unplugged every day. Pulling out the USB drive is not recommended because it might prove to be deleterious for the life of the drive. Also, many people have lost valuable information from their USB drives because they did not follow the safe removal method and suffered lost time and effort as a result.
Using the “Safely Remove Hardware” function of Windows ensures that the device is not in use so that it can be unplugged safely without causing any data loss or crashing of Windows.
The reason why there is a risk of data loss when pulling off the pen drive is the enabling of the write caching, which means that if you write something to the pen drive, it will first get written to a cache and then to the pen. So if you pull it out but the data has not yet been written to the pen drive, you will end up with data loss, file system corruption, or both.
Therefore, it is recommended this method of device removal is always followed for all USB storage devices, i.e. a pen/flash drive, external hard drive, etc.
Those pen drive users, who plug and unplug their drive many times a day can take advantage of accessing “Safely Remove Hardware” by the following methods, too.
Method 1) Right-clicking the flash drive in My Computer or Computer and choosing Eject.
Method 2) In the RUN window, type in: RunDll32.exe shell32.dll,Control_RunDLL hotplug.dll (Ok). A batch file (.bat) can also be created with this command and placed on the Desktop for quicker access.
Some people might get frustrated with the “Safely Remove Hardware” method, but there is good news for them. With a quick setting, we can configure the USB drives for either performance - or quick removal. To be able to remove the USB drive safely, without going through annoying “Safely remove hardware” method, do the following:
-
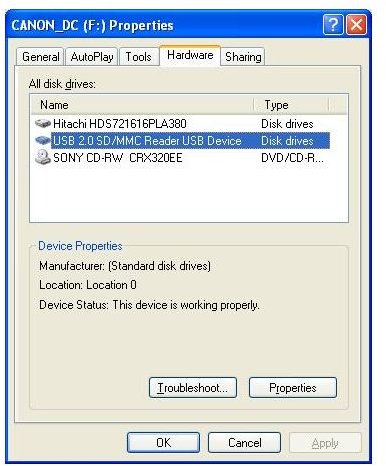
Open My Computer.
Advertisement -
Right-click on the USB drive icon.
-
Go to the Hardware tab.
Advertisement -
Select your USB drive and press the Properties button.
-
Now go to the Policies tab.
Advertisement -
Select “Optimize for quick removal” (if not already selected) and press the Ok button.
You can always change the setting back to “Optimize for performance.” It slightly increases the write performance, but if you don’t want to comprise quick removal with performance just leave it to the quick removal setting.
Still taking a little performance issue into consideration, it would be more appropriate to wait for a few seconds to unplug the device after Windows says it’s safe to remove the device, to make sure that the read/write light on the drive is not flashing and that no data is being read or written to the drive.


