The computer world is abuzz with talk of GPGPU computing and Intel’s upcoming Larrabee GPU, but you can’t figure out where your going if you don’t know where you are. We look at the graphics pipeline, the traditional process by which a computer makes an image.
Recently, we discussed how the first step in creating an image on your computer screen is on creating a 3D model of the area and objects in it, using vectors . We also discussed how lots of cheap, small, SIMD (Single Instruction Multiple Data) processors are perfect for dealing with all the vectors.
We stopped short, however, of explaining how the 3D model made up of hundreds of thousands lines becomes a full colour image on your 2D screen. Like most computing topics this has changed recently, and will change again shortly.
The Old Way: The Graphics Pipeline
In the 90’s, graphics were processed in a pipeline. Similar to an assembly line, specialized bits of hardware would go to work performing a certain step and hand off the result to the next specialized bit, then get to work on the next frame’s worth of data.
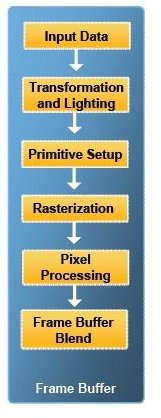
This was accomplished with one piece (or several in parallel) of fixed function hardware after another. First, the transformation of the raw numbers into a 3D, wireframe model (don’t confuse this wireframe model with a ‘frame;’ a 2D image shown on screen which creates the illusion of motion when many are showed in sequence (animation)). Then, establishing a lighting source and how much light gets on to each ‘wire’ of the wireframe.
Then we figure out primitives, meaning we start to think of the objects as made up of surfaces instead of lines. We can also figure out which way the ‘camera’ is looking, and clip elements that would appear outside the screen. Doing this now saves having to perform all the later steps on things you won’t see anyways.
Part of a slide from Intel’s Larrabee presentation. It shows the traditional graphics pipeline, from which Larrabee is quite different. But how different is it from the current Unified Shader Architecture?
Rastafari!!! …ize
Next we rasterize, or project surfaces of the 3D model onto a 2D surface to get it ready to send to the screen. That requires knowing what is in front of what, which is based on information in a z-buffer. It records numbers for parts of the model indicating how far they are from the viewpoint. Lower numbers are closer; higher numbers, further, and we drop the surfaces that will be hidden behind something or facing away from the viewer. Again, that means we won’t waste time on processing them any further.
That gives us something quite similar to a picture like one would see in a colouring book, but with the paper being light or dark based on the scene’s lighting. So let’s colour the picture. We add textures: colour patterns that make the object look a certain way. The surfaces of a shiny metal object would have one set of textures, a dirt road would have another, human skin, alien skin, so on and so forth.
Send the picture to the monitor, and you’re done. Send sixty of them (frames) per second, and you have smooth real-time video for gaming. Getting all of these things happening that quickly takes a lot of hard work by a lot of very clever hardware engineers, programmers, and artists.
The hardware has to deal with things very quickly, the programmer has to know how to get the most out of the API and the hardware, and the artist doesn’t just draw something and scan it in. They have to create textures that can be used almost like wallpaper and just get stretched over a shape.
So Why Is This Changing?
Despite everything the graphics pipeline can do well, there are some things it can’t. It is rather inflexible and has trouble with effects like transparency and multiple lighting sources. Thus, the modern crop of graphics processors use the far more flexible Unified Shader Architecture, described here .


