Most people know that adding RAM (memory) to your computer makes it faster, but how can you know what memory to buy and how to install it?
Finding Out What You Need
If you have followed the previous steps to help make your computer run faster and are still experiencing the slowpoke woes, then you may be in line for a memory upgrade. Adding memory to your PC is not very expensive if you do it yourself, and can keep even an older computer up to par for at least a couple more years. However, there are dozens of brands, speeds, capacities, and types of RAM (memory) out there. How do you know which to buy?
https://www.crucial.com/ has a computer scanning tool that will recommend upgrades for your computer. Alternatively, you can also browse for a memory upgrade by selecting your computer or motherboard manufacturer and the model. The maximum RAM a 32-bit Windows operating system can support is 3.5 GB. If you use 64-bit Windows, you don’t need to worry about it. 2GB is a sufficient amount of memory for most things. If you do a lot of high end gaming then you may want to consider 4GB.
Where to Buy Memory?
Once you have determined how much and what type of memory you need using the tool at www.crucial.com , you can buy directly from Crucial. They are a dependable brand. You can also purchase memory at a local BestBuy, CompUSA, or Circuit City. Also, www.NewEgg.com is a computer hardware retailer that has tremendous deals.
Installing More Memory Yourself
You may be surprised to learn that you do not need to hire a computer technician to do a memory upgrade for you. The process is extremely simple! The only tool you’re going to need is a medium sized Phillips-head screwdriver. Find the latch that holds the side panel of your computer on. If there isn’t a latch, then there is likely two screws on the back that hold it in place. Most either slide or rotate off. Once you have the side panel off, you might get a little bit overwhelmed - don’t panic!
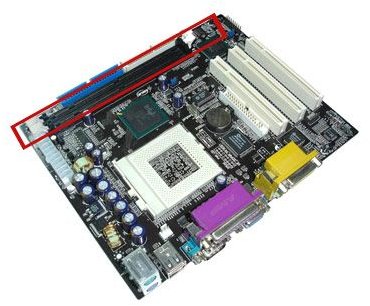
The first thing you need to do is ground yourself out by touching some exposed, unpainted metal on the case. Do this frequently to prevent the build up of static on your hands. In the image to the right, the slots that memory is installed in are shown inside the red box.
What you will see when you look in your computer may be a little bit different, but you should be able to easily recognize the memory sticks. Press down on the white tabs and pull on the sticks to remove old memory. If you are simply adding more, press down on the white tabs to prep the slot to have memory added to it. Insert your new memory stick(s), making sure to notice where the notch is. Press it in firmly, ensuring that it is aligned properly. When it is in all the way, the white tabs will snap into their closed position. Congratulations! You just single-handedly added years to your computers usefulness.
This post is part of the series: Make Your Computer Faster
Quick, easy tips to making your Windows computer run like the day you bought it. Speed up your computer with these do-it-yourself suggestions and step-by-step guides.


