
Replacing the keyboard on a laptop is a hassle, but it’s an important skill to know. Here’s how to remove your Toshiba Portege 4010 keyboard.
If your laptop keyboard stops working without reason one day, you’ll probably be left with many questions: Why is this happening? What can I do to fix it? Is it even fixable? If you want to avoid this scare and the hassle of stress later on in your computer’s lifetime, it’s important to learn the skills required to replace a laptop keyboard. If you have a Toshiba Portege 4010, you’re in luck, because I can show you exactly how to take care of this problem quickly and quietly, all at little to no labor cost to you.
But what if your keyboard isn’t totally broken? Is there any point to removing it then? Actually, there is. Removing a keyboard allows you to learn the insides of your computer so if something else goes wrong, you can fix it, and you can clean the keyboard, replace keys, or dust out the inside of your laptop without risking any harm to it. All of these are great reasons to do it.
Step 1) Material Gathering
Like any computer project, the first thing you need to do is gather the proper materials. For this fun activity, you’ll need a small Phillips head screwdriver, a thin metal object that can be used for prying things apart, a screw tray (optional), a towel, and about fifteen minutes of time. Not too much to ask, right?
If you’re confused on what to use as a “thin metal object”, I recommend things like spudgers (plastic works fine too), knives (but be careful not to hurt yourself!), and flathead screwdrivers. Don’t limit yourself to these three types of objects though, because you’re allowed to use anything that you would consider a suitable alternative to these.
Step 2) Don’t Electrocute Yourself
After you’ve gotten all of the necessary materials together, it’s time to take all the safety precautions to ensure you don’t damage the computer or yourself in the process of removing the keyboard. First, make sure the computer is turned off and unplugged, then flip it over and remove the battery. This will ensure that there is no power - consistent or residual - within the computer so you won’t damage any thing or shock yourself while working.
Step 3) Onto the Real Stuff
Once you’ve gotten all those safety precautions out of the way, flip your laptop back over, open it up as far as it’ll go without stressing it, and cover the screen with the towel you got in step one. This will prevent any residual scratches and things from scuffing up the most important part of using the computer. Now, it’s time to get the keyboard ready to remove.
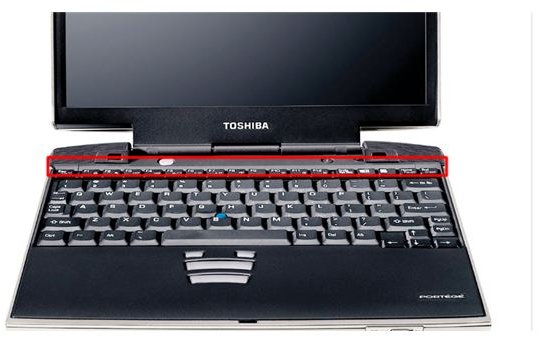
Take the flat metallic thing (whatever you chose) and insert it beneath the “securing strip” that is located at the top of the keyboard, above the function keys. If you can’t locate it, know that it’s not something particularly special; you should look for a plastic black strip that runs along the top of the bottom half of the laptop, as seen in the picture on the left. After you put the device (herein referred to as the “pryer”) underneath the strip, gently put pressure on it and pop the strip out. When the first section pops out, remove the rest with your fingers, carefully removing all the pegs from their places one by one. Set the plastic strip aside.
Step 4) Screw Removal, Keyboard Removal
After you finish with the securing strip, underneath you should see two screws holding the keyboard in place. Using your Phillips head screwdriver, remove them and place them in separate sections of the screw tray so as not to screw up the replacement process, and then gently lift up on the entire keyboard. You’ll notice that the keyboard is still connected to the base of the computer via a thin strip of cable. You’ll need to flip the latch on the connected end, and pull out of the base carefully. Set aside this keyboard.
Step 5) Putting in a New Keyboard
Now comes the fun part. Remove your new keyboard from the box it (hopefully) came in, and take a look at the back of it. You’ll see that, like the Toshiba Portege 4010 keyboard you just removed, this one also has a thin strip of cable running out of the back of it. You’ll need to flip up the latch inside the laptop, slide this ribbon/cable into it as far as it’ll go, and then close the latch to ensure it’s nice and secure. Be very careful because those strips can be fragile.
Step 6) Putting it Back Together
The “putting it back together” process with the Portege 4010 is fairly easy, and pretty much just requires you to follow these steps backwards. Put the keyboard back in the base, screw the screws back in, clasp it down with the black plastic strip you removed, then plug the battery back in and you should be set to go.
If, however, you run into trouble, feel free to ask for help in the comments section below.
References
[Information] Author Knowledge
[Information] Disassembling the Toshiba Portege 4010, IrisVista, https://www.irisvista.com/tech/laptops/Toshiba4010/portege4010 _1.htm
[Image] Product Page, https://www.amazon.com/TOSHIBA-PORTEGE-933MHZ-WIRELESS-LAPTOP/dp/B0037BCN8Q
[Image] Edited Image of Toshiba Portege Keyboard, https://srv.vnexpress.net/FileStore/Raovat/2011/03/16/wda6bu79 __toshiba_portege_4010.jpg (Edited by Article Author)


