Don’t be limited by the capacity of your external hard disk drive - by learning how to open the case you can install a new drive, and use the enclosure as a means of recovering data from damaged disk drives!
Have you ever looked longingly at an external hard disk drive and wished that it worked faster? Or better still, wished that you could strip it down, remove the disk and install this into your PC?
Well, guess what – you can. But better still, you don’t have to put up with an empty external hard disk enclosure cluttering the place up, as by gaining access to the insides of the device you can add and remove disks whenever you please. So you might swap your current internal 80 GB hard disk drive for the 500 GB disk drive currently in the external enclosure.
Better still, all of this means that you can use the USB external hard disk drive as a useful recovery device for copying data from a storage device that can no longer run with other hardware (perhaps due to an IDE cable issue or conflict).
Stripping down your external hard disk drive isn’t easy, however, and they’re not all suitable for this task. The example shown here is with a 300 GB Maxtor One Touch III drive; for details on your own drive model, you will need to check out a few locations online, but the general principles shown here apply to all devices.
One word of warning before proceeding: note that this action will invalidate the warranty on your hard disk enclosure!
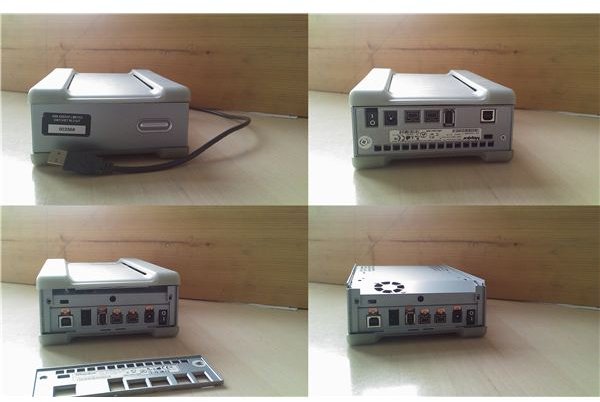
Stripping Down the Maxtor External Hard Disk Enclosure
Before starting, make sure you have your external HDD on a solid surface in an anti-static environment, and that you have taken any relevant static-management steps.
To begin, remove the mains power connector and the USB cable from the back of the drive, and with a screwdriver loosen and remove the two screws which are found either side of the product ID label. One of the screws will be under the warranty sticker. Next, remove the plastic plate.
You should then turn your attention to the two rubber surfaces that have “Maxtor” embossed in them. These are in place purely thanks to four clips, one at each corner and some poles that fix the surfaces into the interior chassis, and thankfully as they are quite flexible you can remove these without too much manipulation.
Don’t use excessive force, however, as this will break the clips and make putting the enclosure back together a bit of a pain. Instead, use a flat edge to slide between the rubber surface and the metal chassis to persuade the clips to come loose.
The next stage is trickier; the interior chassis is surrounded by a three-sided strip of plastic which hooks into the chassis on the two long sides. This can be removed by pulling it away from the chassis at the loose end (one side at a time) and with pressure applied to the plastic strip to keep it flat against the chassis, push towards the back of the device.
Removing the Hard Disk Drive
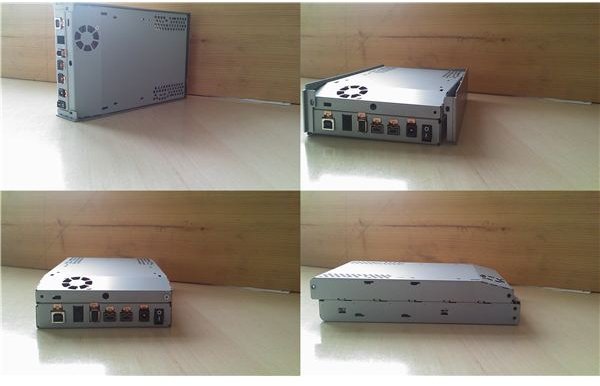
With the chassis now exposed, you will be able to remove the hard disk drive. However, it is currently secure within the metal cage, and must be released by unscrewing two screws. One is found above and to the left of the USB port, while the other is above and to the right of the power switch.
With these removed, the chassis can be opened. This is done by holding the bottom half in one hand and the top half in the other. You should notice a line running around the circumference of the cage, and this features some clips that slide in and out of position when force is exerted. The top half, where the fan can be seen, will slide away from the bottom half; you should end up with a half-centimeter gap where the fan and the connector panel are situated.

Open the drive by laying the top side face down with the fan positioned next to the connector panel (or disconnect the fan cable from the mainboard).
You will then be able to see the interior of the external hard disk enclosure, where the disk is held in place with rubber clips. To remove your hard disk drive, disconnect the cables, lift the device out and then remove the clips. The drive can then be connected to your computer as an internal device!
(Note that some drives have been modified to prevent their use in other situations. If this is the case, you can consider modifying the enclosure to allow you to use a SATA to e-SATA adaptor for faster data transfer.)
Installing PATA and SATA Hard Disk Drives
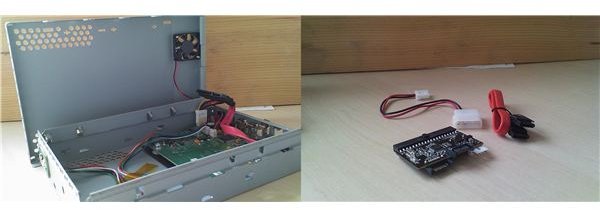
With the majority of external hard disk enclosures using SATA hard disk drives, you might be forgiven for thinking that you can only connect a SATA drive. However, thanks to a quick search of eBay you will be able to find a two-way SATA to PATA (also referred to as IDE) adaptor, allowing you to store any type of 3.5 inch hard disk drive in the now empty enclosure.
This flexibility can come in handy if you are regularly called upon to retrieve data from hard disk drives. Rather than plug the device into a spare bay on your PC, you can install it within your disk enclosure and connect it via USB!
References
- Author’s own experience.
- Photos provided by author.


