Some motherboards still rely on jumpers, small plastic-coated pieces of metal that sit across two pins, in order to perform some tasks that might otherwise be controlled via the BIOS.
What Are Those Pins on My Motherboard?
Computer motherboards can be a mystery. While appearing to be large pieces of plastic and metal and sand soldered together in very specific patterns, it is true that motherboards are the type of hardware that you take care of. However there is no need for any mystery – the parts that comprise a motherboard are all there for a reason, and positioned in a logical manner to improve efficiency.
In most cases, none of this matters as there are very few times in which we need direct interaction with the motherboard. Where physical interaction is required, however, small switches called jumpers are provided, and these can be used to enable or disable various optional motherboard functions that cannot be activated in the BIOS or operating system.
(Image via pcbuyerbeware.co.uk)
What is a Motherboard Jumper?
Found on motherboards and IDE drives , a jumper is a small connector that when linked to a pair of pins forces a particular behavior. For instance on an IDE hard disk drive it might determine whether the drive is a slave or master device.
Jumpers are made from a conductive metal and housed in a tough plastic sleeve, suitable for handling manually or manipulating with tools.
Over the years, motherboards have featured fewer jumper blocks, the term given to pairs or groups of jumpers. There has been a concerted effort in recent years to move away from jumpers in favor of adding options to the BIOS, facilitating a quicker system setup.
However a jumper-free system doesn’t necessarily mean a safer system. Jumpers need only be set once, while software settings can be destroyed by a virus or power failure.
Typical Motherboard Jumper Controls
Although all motherboards are different, there are certain jumper settings that are quite common. Older systems would have jumpers that enabled or disabled certain parts of the motherboard (and as such controlled resources to and from these areas) although commonly there are only one or two jumper switches found on modern motherboards.
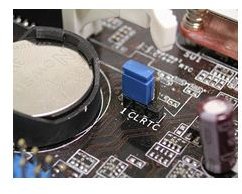
These are the Flash BIOS jumper and the Clear CMOS jumper. Each must be in the default position to use your system normally, and should be changed only in specific circumstances. For instance you would change the setting of the Flash BIOS jumper with a new BIOS software ready to install from a floppy disk, whereas the Clear CMOS jumper might only be used when the BIOS password has been lost.
What Are the Correct Motherboard Jumper Settings?
If you need to configure your motherboard jumper settings correctly, you should first consult your motherboard manual, where details of the various jumpers (their position, settings and the expected behavior) will be found.
Due to the considerable differences in the design of motherboards, it is impossible to provide information on what pins are present on a specific motherboard and what behavior the addition of a jumper would prompt.
Missing motherboard manuals can usually be found online, most commonly at the support pages on the motherboard manufacturer’s website. If this turns up a blank, try searching Google for your motherboard make and model, as per the text printed on the hardware.


