Adobe After Effects: How to Brighten a Dark Video and Adobe After Effects Tutorial
Levels Tool
Adobe After Effects is one of the premier video editing software programs, and it allows you to add effects to and clean up your video clips. One of the major problems that people have when recording video is that it can be too dark. So you run into this problem, and then turn to Adobe After Effects — how to brighten a dark video? Well, this Adobe After Effects tutorial can help.
The first tool that you want to try is the Levels tool since this tool is on nearly every version of After Effects. The tool generally consists of five controls: Gamma, Output White, Output Black, Input White and Input Black. You can adjust these tools to brighten or darken a clip, or manipulate the overall color of it.
You can manually change the percentage of these tools, or use the adjustment sliders. You should make incremental adjustments until the video looks brighter. But, the problem with this tool is that increases the contrast on either end of the scale, forcing certain pixels into extreme white or black. So, you’ll have to be careful when using this tool.
Brightness and Contrast
Another similar tool is the Brightness and Contrast tool, which is found within the Adjustment drop down box. This tool changes the
contrast of an entire layer as opposed to individual channels. There are only two adjustments for Brightness and Contrast, and there are no amount sliders for tool. So, you are going to have to play around with the numbers until you get it right. But, you can always reset the adjustments if they don’t look like.
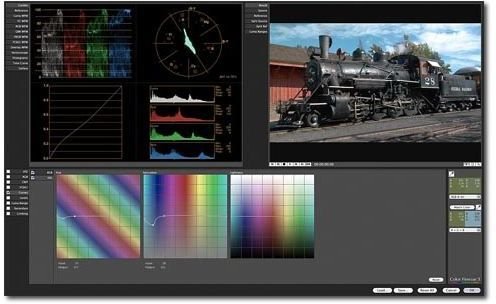
Color Finesse
One final option is the Synthetic Aperture Color Finesse 3.0 Plug-in. This plug-in allows you to adjust everything about the look of a clip, including color, contrast and brightness. It has a Highlight Recovery tool, which allows you to fix over-bright areas, and you can use this tool after manipulating the video clip with the previous two tools.
You can also correct color with vectors and fix over-saturation problems with the Vibrance tool, and you can see all of your changes in real time. The major downside to this program is the price. As of 2010, this product costs $575. This product is included with After Effects 6.5 and Adobe Creative Suite (CS5). If you do not have either one of these versions, you will have to purchase the plug-in separately.
Be Prepared to Start From Scratch
Whatever tool that you decide to use, the overall result may still not look right. Unfortunately, you are only making the adjustments after the video has been shot, and these tools may not fully correct the problem. Your contrast may be very off after your make the clip brighter. For example, a white object may appear too white, making it look over-exposed.
If this does occur, your only recourse may be to reshoot the video if possible. And, if you do decide to do this, bring extra lighting next time to compensate for the low lighting.