OpenOffice Draw Tutorial: Create Basic 3D Boxes
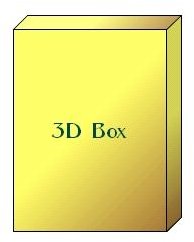
Basic 3D Box
With OpenOffice’s Draw program, you can create 3D boxes. If you are in need of a 3D box for your product, or just want to play around with creating some, continue with this tutorial. You can make these 3D boxes as simple or as fancy as you want them. The fancier you want to get with these boxes, the more time you will need to spend with them. To begin using this tutorial, load your Draw program.
Drawing Your Box
You will need to start with drawing a box. At the bottom of your Draw window, you will see the Shape toolbar. Look for the 3D Box icon and click it to select it. Next, click your mouse on the document and draw your box. Draw the box the size you want it. Don’t worry, if you

let go of the mouse by accident, you can resize it at any time.
If you need to resize your 3D box, you will need to use the blue squares. Which square you grab will depend on how you want to resize the box. You can play around with the squares to get it like you want it. If you make a move you don’t like, press the CTRL Z keys and it will undo your last move.
After you have resized your box, you will probably want to make it thinner. You can do this by dragging the yellow dot up. You will definitely have to play around with the yellow dot to get the size of the box you want.
Designing Your 3D Box in OpenOffice Draw
Once you have the outline of the box the way you want it, you can move on with designing the box. You will probably want to change the color of the box. You can use a gradient color, or you can use a solid color for the box. You also have the option of using an
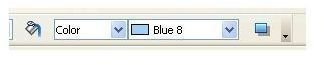
image. Let’s start with the colors. Decide on using a solid color or a gradient color. Then go to the top of Draw and drop the color filling box down. If you want to use a solid color, the settings should already be correct. You will see the word “Color” in the box. If you want to change it to a gradient, drop the box down and select the Gradient option.
Now, you will need to select the color or gradient you want to use. Beside the Color or Gradient box, you will see the Color box or the Gradient color box. Opening this box will show you your options. Go through and select the color or the gradient you want to use by clicking it. Once it is clicked, you should see the changes applied to your box.
If you want to use an image, you will need to click Insert > Picture > From File. Then select your image and it will open in Draw. You will
then need to resize it to fit on your box and drag it to the box.
If you want to change the outline color of the box, change the border color. You can also change the border style of the box by opening the Line Style box at the top of your program. Then click the style you want to use.
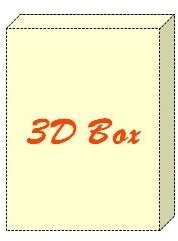
When you have finished with that, you can add text to your box. Click your Text icon at the bottom of Draw and draw a text box on your box. In the text box, type what you want. Then change the font, color, and size to what you want. You can then play around more with your box to create the 3D box you are going for.