A graphic organizer lets you put down and categorize thoughts visually. It’s a tool commonly used in elementary classrooms, but can also be used in business and project management tasks. Here are four graphic organizer templates you can download as well as directions to make your own in MS Word.
Graphic organizers can be helpful tools for students, writers, project managers or anyone seeking a way to collect and analyze their thoughts or ideas. They can be exceedingly simplistic or more intricate, depending on your use and preferences. You can design your own in Microsoft Word and save it as a template to use again and again, or you can download any of the following ready-made templates to utilize as needed.
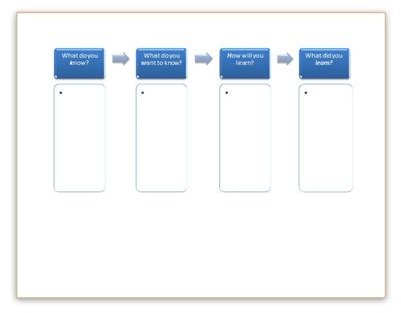
KWHL Chart
KWHL charts are popular teaching tools, as they allow students to determine what they know (K), what they want to know (W), how they will learn (H) and what they learned (L).
This graphic organizer template was made using SmartArt in Microsoft Word. You can customize it by changing the colors or style. Click anywhere on the graphic to select it and click the Design tab under SmartArt Tools. Choose Change Colors to select a new color scheme or select an option in the SmartArt Styles Gallery.
To add text to the boxes, click inside of a box to open the Type Your Text Here pane. Type into the appropriate section of the pane and then close it when you are finished.
Cycle Diagram
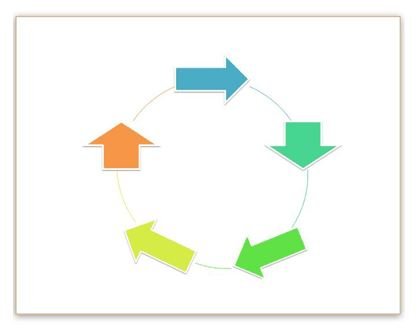
A cycle diagram displays a series of steps or events that work together in a repeated sequence.
This graphic organizer template was also created by modifying a SmartArt option in Word. To add text to one of the arrows in the cycle, simply click on the shape and begin typing. You can also change the colors or format of the shapes by clicking anywhere on the diagram and choosing from the options on the Design tab under SmartArt Tools.
Cluster Diagram
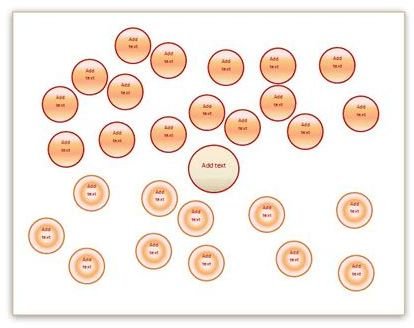
With this graphic organizer template, you can organize and visualize different approaches based on a central topic or brainstorm the direction of a story or project.
This template was created using individual shapes. You can type over the sample text on each circle or delete it if you want to print the diagram and write onto the circles.
You can add more shapes by clicking on one, pressing the Ctrl key and dragging an identical shape to the desired spot on the form. You can also click on and delete any unwanted shapes. Change the appearance by pressing and holding the Ctrl key, clicking on the shapes you want to change and selecting an option on the Format tab under Drawing Tools.
Compare and Contrast Organizer
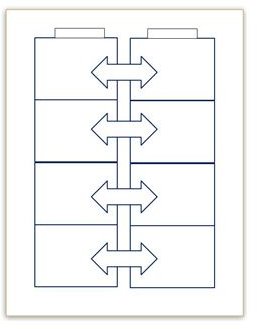
Discover similarities and differences between two objects using this graphic organizer template. The template uses basic shapes and text boxes to which you can add text, color or other customizations.
Use the two small text boxes at the top to label the columns. For example, if you wanted to compare and contrast two students, you would put each of their names in one of these boxes. Click inside the double arrows to type characteristics you want to compare or contrast, such as height and eye color. The large boxes contain text boxes as well, so you can type your findings directly into them. Alternatively, the black and white design is ideal for printing and writing on.
Making Your Own
There are dozens of other types of graphic organizers. If you want to try your hand at designing your own in Word, start by checking out the available SmartArt graphics. Many of these are similar to graphic organizer styles, and you can modify them to look just the way you want them to. When you insert a SmartArt graphic and select it to display the SmartArt Tools tab, you will see many options. For instance, on the Format tab in the Shapes section, you can change the shapes or alter their sizes. Go to the Design tab to find alternate layouts, color schemes and styles.
When you are done, save your custom design as a template by selecting the File tab and selecting Save As or pressing the F12 key to open the Save As dialog. Choose Word Template in the Save as Type box, give the template a name and save it in a convenient location. Now you can use it as often as you need without starting over from scratch.


