Tutorial on How to Make a Free Printable Blank Calendar
Calendar templates can be found across the Internet. However, the calendars you find often resemble each other, and they allow virtually no customization. In this tutorial, we will discuss creating a printable blank calendar. It is easy to make any year or an academic calendar spanning multiple years. Other options are also customizable once you create the blank calendar.
Using a Spreadsheet to Set Up the Grid
The directions I am giving are using Excel 2010 on my computer. However, this can easily be done in the spreadsheet application from any office type suite, including Open Office or Google Docs.
Open a workbook. We will be setting up a template for a custom calendar. The calendar will have a space in each day of the month for additional information. This could be the actual number of the day during the year, the countdown to the last day of the year, a date in another type of calendar or a note.
Now we are going to set up the cells for the calendar. It will be sized to fit an 8.5 x 11 inch sheet of paper for each month.
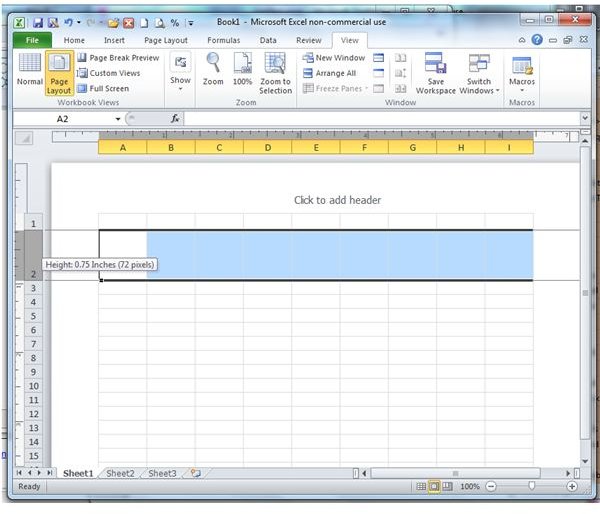
Grab the edge of row 1. Move the row edge so it is about 1/4th inch deep. If you have trouble getting the edge in the right place, highlight the row and go to format row. Set the row height there. Set row 2 height to ¾ inch. These rows will be the calendar’s heading.
Creating the Rows and Columns
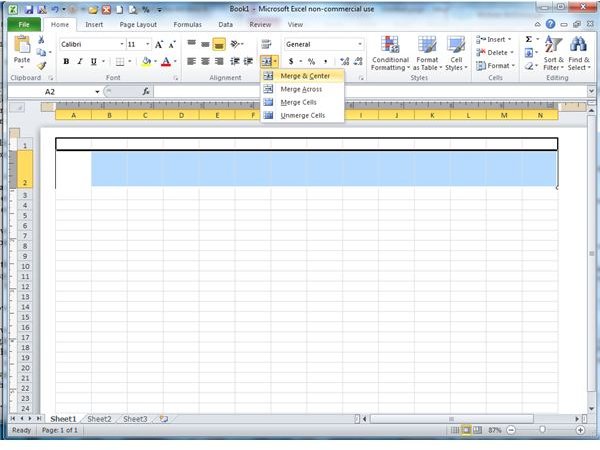
Highlight row 1 and 2 and columns A to N, and format the cells to have a border on the edge. Then merge and center the ce
lls across row 2 for the space for the name of the month.
Set row 3 height to ¼ inch. This row will be for the names of the days of the week. Highlight A and B, put a border on the outside, and merge and center the cells. Repeat across to N, so that you have 7 boxes for the days for the week.
Now we will make the cells for the days. Set row 4 to a height of ½ inch. Set row 5 to the same height. Make six sets of double cells in total. These will be rows 4 through 15, which allow space for 6 weeks each month. By using two rows for each day, we will have a space to put additional information in the day square.
I originally created my calendar template with spaces for 5 weeks a month, but 2011 is unusual, and has months with dates in six weeks in a month, so this example shows six rows. When that is not necessary, the calendar will appear slightly larger when printed.
Now we will set up the columns for the day of the week. Each day will also use two columns, which makes a small box in the corner for each day. This will be easier to see once cell borders are in place.
Set column A to a width of ½ inch, Set column B to the same. This gives you a perfect square of 1 inch for each day, with an inset square box. Repeat the spacing for columns A and B across the spread sheet, for a total of seven sets. This will be columns A to N. Rather than setting the width for each column, highlight columns A and B and then click on the paste format option. The icon for this is a small brush. Highlight across to row N, and paste the format. Now you have set up the days of the week.
Days of the Week
Go to row 3 and select from A to N. This is the space for the days of the week. Format it so that it is outlined in black. Now select row 3, columns A and B. Merge cells A3 and B3. Do the same for the rest of the seven days of the week.
Select row 3, A to N, and go to format cells. Click on the thickest black line, and then the icon for inside lines. Now add right and left sides to the cell format. This will show up as a black line down the middle of the example - giving it borders on all sides. Click OK and then enter - and then start adding the names of the days to row 3. I have set this calendar up starting with Sunday on the left, but you can start with another day if you want.
The Header Row
Go back to the home tab. Select row 1, cells A to N. Go to format cells again, select the second lightest gray for a color, and then click on the icon for the bottom bar. This should now show you an outline with the bottom gray instead of black. Click on the icon for merge cells. This is in the alignment section of the Home tab, on the ribbon. You want to merge and center the cells.
This section will be information about the calendar. If you are not going to enter extra information in the secondary box for the day, just type the name of the calendar. If you are going to use the box for another number of some sort, this part takes a little tweaking when you are ready to put the information in.
Setting Borders
The next step for the calendar template is to set borders to indicate different spaces. The first step is to highlight the space row 1 to 15, and then all the columns through column N. This will be the print area, and needs an outside border. In Office 2007 and 2010, go to the page layout tab, and click on print area, and set print area. Then go to the home tab. Here you want to select format cells, and then border. Highlight the icon for outlining multiple cells, and then the thickest black line. You have outlined your calendar.
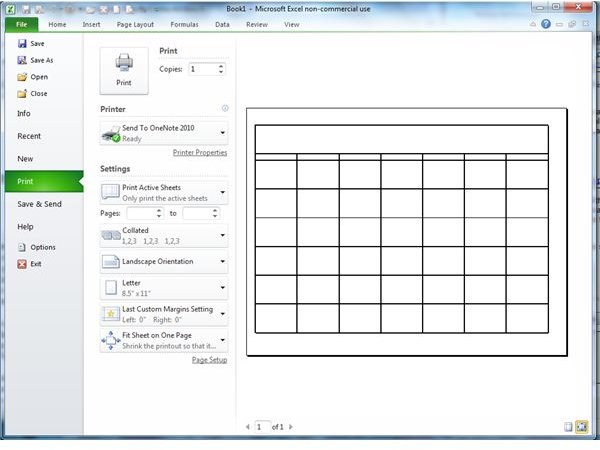
At this point click on print in the file tab. Here we will set the sheet up to print correctly. The calendar outline will be on two pages in portrait mode, so select landscape mode. Then select fit to page in scaling. At this point, the black outline should fit on one page.
Getting the Spacing for the Calendar Name Right
Type the type of calendar you are creating, then a few spaces, and the name for the info in the smaller box. Hit return. Right now, the name will be near the left side, and the secondary name will be a bit right of the center. You will add spaces before the calendar name and between the two names, to have the calendar name in the center, and the secondary name ending just before the right border.
The G and H columns are the center of the calendar, so add a number of spaces before the calendar name, and hit enter. This allows you to see the current spacing. Add more spaces or back space until the calendar name is above the G and H columns when you click enter. Add spaces until the secondary name ends just before the right hand border.
The reason for these imprecise directions is to allow you to enter in any length of calendar name. I selected the primary calendar name and made it font size 16, and left the right hand name at the default for my spreadsheet - 11. You should tweak the size if you use a special font - not all take up the same amount of space.
Name the Month
Now set up the name of the month. Select row 2, A to N. Go to format cells, click on the number tab, and select text. Otherwise, your spreadsheet will reformat the month and year to its default date mode. You can add a space holder Month and YEAR if you want. I set the font to 40 for this space in the template
Create a custom date format if you want a number format which shows the month and full year. Go to format cells, number and custom. The format you want is mmmm yyyy, which will show as January 2011 in this example.
More Formatting - for the Date Space
Now we will format the spaces for the dates. Select row 4, columns A and B. Merge the cells. Do this for each day space over to row 4 columns M and N. Now select rows 4 and 5, columns A and B. Format it with a border around the outside.
Select space B5, which should be the small box inside the first date. Go to format cells, and then the border tab. Select outline, and then go to line thickness and pick the middle thickness solid line. Go to color, and pick a medium to dark gray. Click to surround and give the left and top sides a gray border. The right and bottom should show as a thick black line already.
Next format the numbers giving the date. In A4, select the date format which just shows the day of the month. In B5, you should select a format depending on your planned use for the calendar. If you are counting up or to the end of the days of the year, all you need is an integer with no decimal places. If you are adding dates for another date system, for a religious or non western calendar, you will want to select the 14-Jan format.
If you intend to put text or something longer in the box, you can select a small sized font - use a san serif font for easier readability. You may need to adjust the width of your calendar - which could mean the calendar you eventually print will be printed in a smaller scale to fit 8.5 x 11 inch paper.
You can copy this across the week to save work, and then copy rows 4 and 5 down the page until you have six rows set up.
Format Type of Dates
Next format the numbers giving the date. In A4, select the date format which just shows the day of the month. In B5, you should select a format depending on your planned use for the calendar. If you are counting up or to the end of the days of the year, all you need is an integer with no decimal places. If you are adding dates for another date system, for a religious or non western calendar, you will want to select the 14-Jan format.
If you intend to put text or something longer in the box, you can select a small sized font - use a san serif font for easier readability. You may need to adjust the width of your calendar - which could mean the calendar you eventually print will be printed in a smaller scale to fit 8.5 x 11 inch paper.
You can copy this across the week to save work, and then copy rows 4 and 5 down the page until you have six rows set up.
Adding Other Months
Highlight your sheet and click on copy format. Open the next sheet in the workbook and paste the copied format in.
Open print preview, and tweak the page setting, which does not carry through. Select the formatting needed to make the page print properly - no margins, portrait mode, and fit to page. Make as many pages as you need and save your workbook.
Fun with Customization
Now comes the fun part. After you save your calendar - either as a template or as a spreadsheet you will rename when you open it, you need to put dates into your calendar. The template has January 2011 dates in it.
In the Bright Hub media gallery you can find a PDF of a printable blank 2011 calendar. There is also a spreadsheet for a blank printable calendar saved in .xls format, which you can customize as you want. Start the days of the week on Monday, with the weekend at the end, or make enough sheets to create a 16 month academic calendar.
If a specific month does not need six rows for dates, set the print area to cut off the bottom row or hide the row, as this allows the calendar page to be larger when printed.
References
- Calendar tutorial based on the author’s experience and trial and error.