Whether you’re looking for a tool to help you create nature-based textures or you want to dress up bland skies in your digital photos, NatureArt is worth checking out. In this review, we’ll take a deeper look at some of the many different capabilities of this great little program.
How Did I Miss This Plugin Before?
I thought that I was already very familiar with the entire line of image editing plugins developed by AKVIS – with Coloriage being my favorite. But, it seems that NatureArt somehow managed to get past my radar, and I only found out about it a few weeks ago. Since that time, I’ve been experimenting quite a bit with NatureArt, and it’s just possible that it may be my new favorite.
Basically, this application is a tool for adding various natural phenomena – like rain, fire, lightning, clouds, water waves and even stars – to digital images. AKVIS touts NatureArt as a program for livening up a dull photograph, but I’ve found that it actually has a lot more uses than just that.
Before going any further, it’s probably a good idea to mention that NatureArt is available as either a standalone application or a plugin compatible with Photoshop, PaintShop Pro, PhotoPlus and a host of other image editors. There are also versions for both Mac and Windows as well as broader licenses that cover commercial usage. I’ll talk more about the different licenses available later in this review when we get to the pricing details.
Variety of Effects (5 out of 5)

There are definitely enough effect variations in NatureArt to keep you busy for a while, especially if your real goal is to use the plugin to create textures and patterns. (Even if that’s not your goal right now, you may get hooked once you see all the possibilities.)
Here’s a quick breakdown of the different options:
- Rain – Also includes snow and other precipitation.
- Sun – Can also be used to create stars and moon objects.
- Water
- Lightning
- Clouds – Also for mist, fog and smoke.
- Frost
- Ice
- Fire
A couple of these options, such as Clouds and Ice, have several presets that mimic a variety of effects. Others, like the Water option, are more limited in general appearance but still include several tools for adjusting certain parameters, including size, transparency and color.
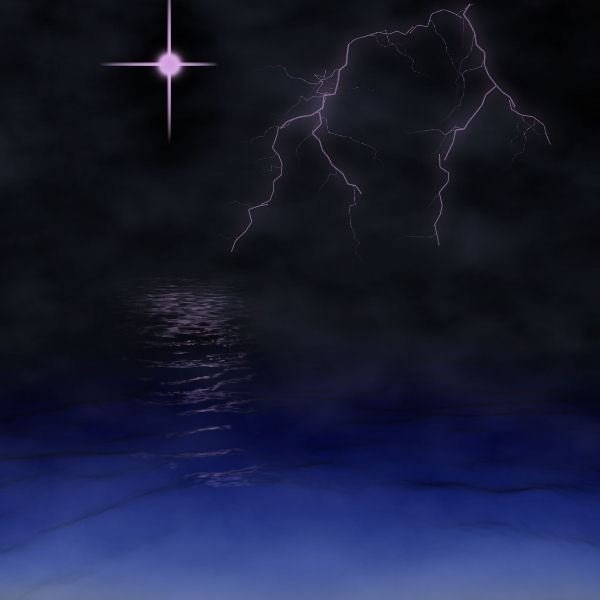
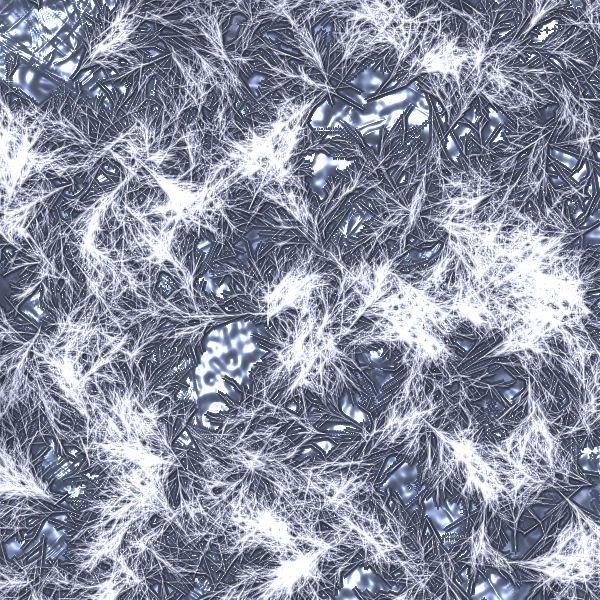
I’ve included a couple of images here that show certain Fire and Ice effects applied to a plain black background so you can get an idea of what’s possible. In the next two sections, I’ll show a couple more examples that highlight how the Water and Clouds effects can be used to modify digital photos.
Adding Water: Before and After
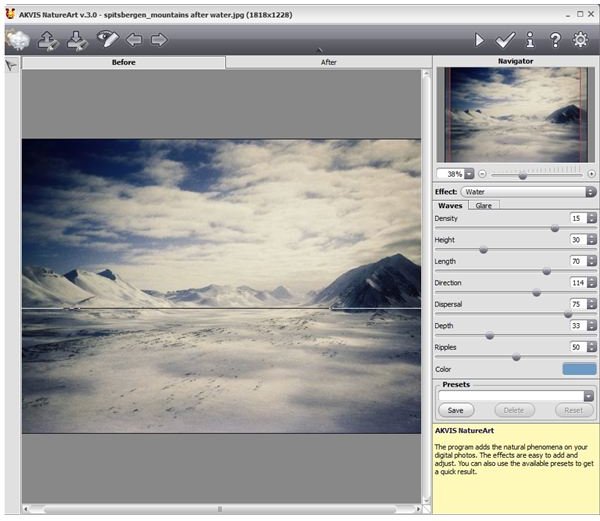
Although it’s somewhat limited in terms of usage, I’m particularly fond of NatureArt’s water effect. Even if you just start with a blank canvas, you can take this filter and create some amazing texture images. But, it can also be used for some stunning transformations when applied to digital photos.
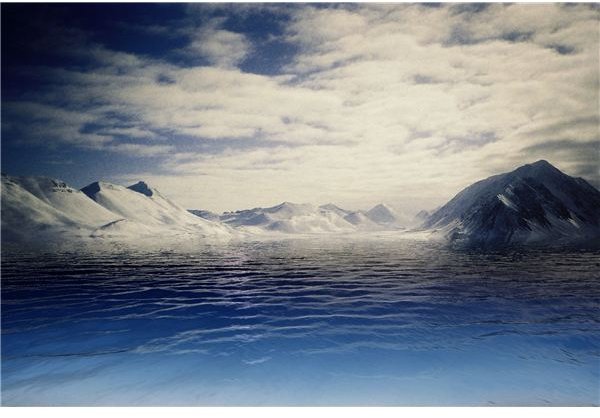
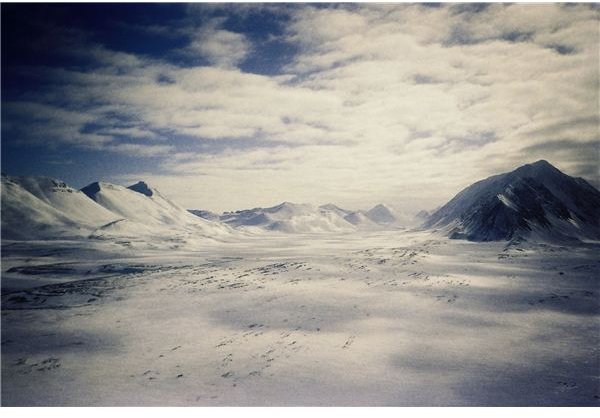
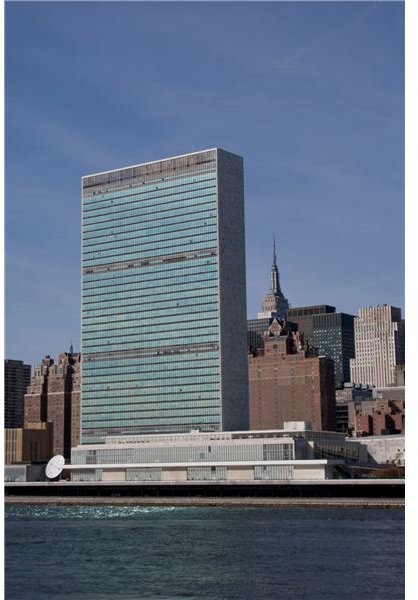
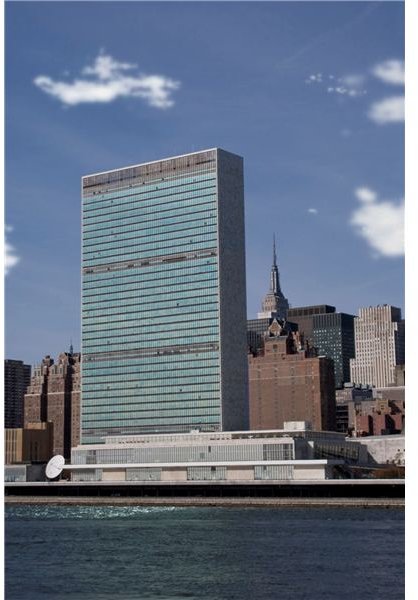
For example, I found a stock photo of a snowy mountain scene on morgueFile – the original photo is shown to the left (click any image for a larger view). Even though I like the depiction of distance and solitude in the photo, all of the snow and the extremely heavy cloud cover make the image a little too “white” for my tastes.
However, with a couple of clicks, I was able to use NatureArt to change the snowy plains in the forefront of the image to a “cold” blue body of water, as seen in the image to the right. Considering the transformation only took a few seconds, the end result came out looking pretty natural.
Options for Adding Clouds
Although NatureArt doesn’t offer very many preset configurations for most of the effects, there are several options for cloud cover that you can use for a starting point and then adjust. These options range from dense “thunderstorm” clouds to a light scattering of clouds on an otherwise sunny day to various degrees of fog and haze.
Again, I took a stock photo (this time, from stock.xchng) and applied a couple of variations to demonstrate the possibilities. The first image shows the original photo, the second shows a few scattered clouds and the third shows a foggy haze applied to the entire image. One note here – there is a selection brush you can use to choose exactly which areas of the image you want to apply the effects.
Features and Performance (4 out of 5)
For the most part, NatureArt is extremely easy to use, and the interface is very intuitive. Every effect has at least one preset configuration, so it’s very possible for beginners to get started right away with “one-click” alterations. However, most effect applications will require at least some adjustment of the various parameters – but this is also fairly easy to learn.
Each parameter is controlled by a slider that you can manually adjust, with different effects governed by different types of parameters. What’s really nice here, is that if you hover your cursor any of the various parameters, a basic explanation of that control will be explained in the yellow box found at the lower right corner of the screen. Still, I think the easiest way to figure out what each slider does is to play around a bit with the different settings and see how changing one affects the entire image.
My only real complaint here is the lack of a preview window to give you a basic idea of how the image will look without actually applying the changes. If you’re working with small images, this isn’t too big of a deal since you can just apply the changes and “undo” them if you don’t like the result. However, larger images require more time for processing, and it can be a little frustrating to wait for the processing to finish whenever you just want a general idea of what a certain setting will do.
Also, I wouldn’t mind seeing a few more presets built into the software, especially for the Sun and Lightning effects. Although, I do love the fact that you can save your own configurations, so when you do find a look you like, you can use it in later projects without having to recreate it from scratch.
Price to Value (4 out of 5)
As mentioned before, NatureArt is available as either a plugin or a standalone application with each option running $72. However, if you’re interested in both versions of the program, you can receive a substantial discount by purchasing the Home Deluxe license for $129 and have access to the plugin and the independent app. If you plan to use the software for commercial purposes, you’ll have to spend a little more for the Business license – this latter option is priced at $189 and is valid for both the plugin and standalone program.
Considering the range and versatility of NatureArt, these pricing options are more than fair. If you’d like to try before you buy, you can download a fully functional 10-day trial version from the AKVIS website.
There are also substantial discounts available for students and teachers as well as for bulk purchases. If you fall into one of these classes, contact AKVIS for pricing details.
Overall Rating (4 out of 5)
I definitely recommend taking advantage of the 10-day free trial and testing out NatureArt for yourself. With such a wide range of possibilities for its use, the application is quite reasonably priced and will certainly fill some gaps in your collection of image editing tools. In fact, if a preview window and a few more presets were added to NatureArt, I think it would be pretty close to perfect.
References
-
Image Credits:
1. Spitsbergen Mountains, morgueFile/mettem
2. United Nations Building, sxc.hu/ericortner
All other screenshots taken by author.
-
AKVIS NatureArt Official Site, http://akvis.com/en/natureart/index.php


