This tutorial will teach you how to turn your photograph into a puzzle using Adobe Photoshop CS4 on your Windows computer.
Preparing Your Photo
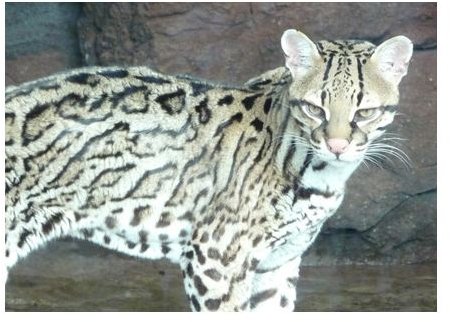
Perhaps you are looking for an interesting technique to add more interest to your digital photos. Or maybe you’d like to create a unique gift for the puzzle fan in your family. By following these steps, use the digital magic of Photoshop to turn a favorite photo into a puzzle.
- Open your image, crop and resize it for printing, if necessary. Many digital cameras save at a lower resolution to save space on their memory cards. For printing photos, the resolution needs to be at least 300dpi. For more information on printing photos, consult this article: Printing Digital Photos - What Is Your Best Option?
- Duplicate the background layer. Photoshop always opens the photo with a locked background layer which doesn’t allow any changes to be made. Creating a duplicate layer gives you a layer to work with. You can keep the background layer, and uncheck the view box, if you want to keep it as a reference, or just delete it after you have created your duplicate layer.
Using the Texture Filter
3.
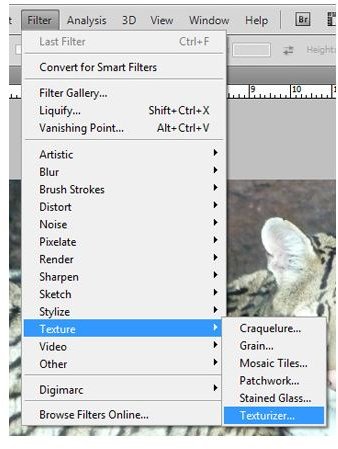
Select the Texture Filter. With the duplicate layer selected, choose Filter on the menu bar then select Texture, then Texturizer.
Selecting a Texture File
4. Choosing the puzzle texture. In
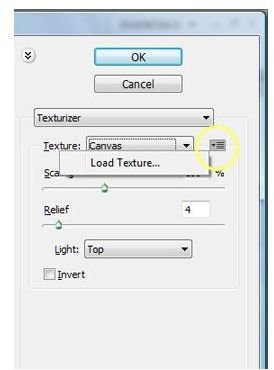
the texturizer menu, you will see a drop down box with a symbol next to it. It is circled in yellow. Click that symbol, and a Load Texture button will show up. Press this button and then you will need to choose the folder in which your Photoshop textures are stored. Usually this can be found under Program Files>Adobe> Adobe Photoshop CS4>Presets>Textures. If you installed Photoshop somewhere else, you will need to look there. Choose the Puzzle.psd file, and press the Open button.
Troubleshooting - What to Do if You Can’t Find Puzzle.psd
The Puzzle texture came standard in Photoshop CS3, but it wasn’t included in CS4. There is a download from Adobe that contains this texture as well as other enhancements removed in Photoshop CS4. They call these “Legacy Textures.”
To install the Legacy Textures:
Go to the Adobe page which contains the download file named PHSPCS4_Optional_Plug-Ins.zip.You can find that here .
Extract that file, then run the PHSPCS4_Cont_LS1.exe file that is extracted.
This action will extract all plug-ins into the folder indicated when you run the file.
To install the legacy textures to be used with the Texturizer filter, drop the /Goodies/Presets/Textures folder that was created when you ran the .exe file into the //Adobe Photoshop CS4/Presets folder. As a default, this can be found under Program Files>Adobe> Adobe Photoshop CS4>Presets>Textures. If you installed Photoshop somewhere else, you will need to look there.
Restart Photoshop.
Using the Texturizer Options
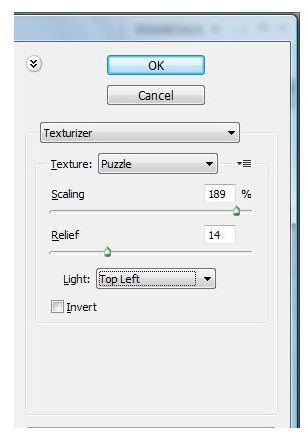
5. There are three options to choose from in the Texturizing menu. Scaling is controlled with a slider bar that changes the sizes of your puzzle pieces. Relief, also controlled with a slider bar, changes the opacity and thickness of the border on each puzzle piece. Light refers to the direction of light the image is lighted from. Click OK when you are done selecting your options.
Finishing Your Puzzle
6. Your photo with the puzzle texture will appear. If you don’t like it, just press Ctrl+Z to undo the texture and try again until you get the results you want.
7. If you want the photo to be an actual puzzle, you can print your photo from Photoshop. Glue it onto some cardboard or bristol board using dry mounting spray, following the manufacturer’s directions. Then carefully cut out the puzzle pieces with an exacto knife. Be sure to place a self-healing cutting mat or old phone book under your project to protect your work surface as you cut.
Before and After Images