
Here’s a tutorial on how to turn a person into stone using GIMP. This cool effect lets you create a statue out of any person’s photograph. It’s not as daunting as it may seem. Try it out and let your creativity flow.
How to Turn a Person into Stone
Yeah, you can now petrify anybody you like, and it won’t take you more than an hour to do so! Learn how to turn an image of a person to stone with this simple GIMP tutorial.
Because this tutorial uses GIMP, you need to have either the Windows or the Linux version of GIMP installed. I did this using v2.3, though I guess the basic steps would remain the same irrespective of the version you have installed.
Step 1: Choosing the Image
It’s not that easy to convert every possible image using this method. The best images are portraits with consistent background. If you don’t have such an image, you can try removing distracting elements from the background and then apply this technique for the statue effect. The above image has been sourced from Lina’s photostream .
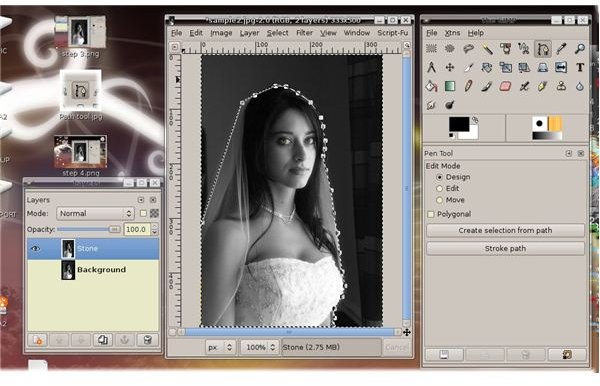
Step 2: Layers

Open your target image and duplicate its background layer. You can call the new layer ‘Stone’ or ‘Statue’ or something similar.
Step 3: Desaturate
This means to turn the image into a grayscale one. To do this, click on Colours>Desaturate. You can choose between the various options and pick the one which gives best contrast. Contrast can then be altered by Colours>Levels. Tweak it until you’re satisfied with the way the image looks. This step is not necessary if you choose a grayscale image to start with.
Step 4: Draw a selection path

Now we need to draw a selection path to select only the subject. Take care to leave out all background element
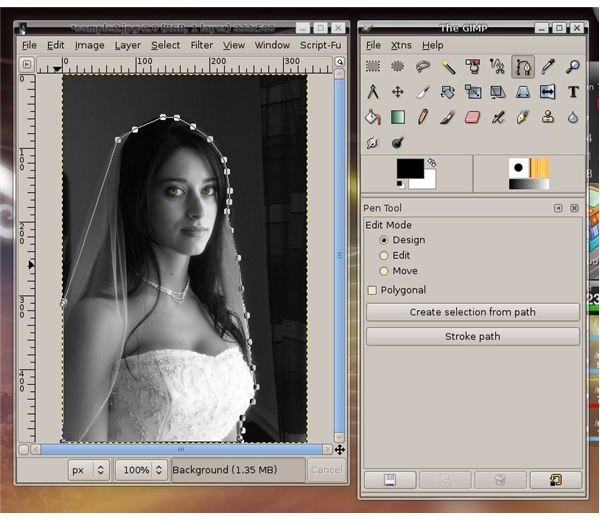
ts in this step. To do this, the Magic Wand tool from the toolbar can be used. If there are areas where the colours are similar in the background as well as the subject, use the path tool to select only the subject. Here you’ll have hold down CTRL and click to set points all along the path you desire and finally join the last point to the first one and hit ENTER.
Once the path is drawn, use Select>From Path to turn it into a selection.
Step 5: Invert
Next invert your selection (Ctrl+Shift+I) and delete to remove everything else except your subject.

Step 6: Applying the Stone Effect
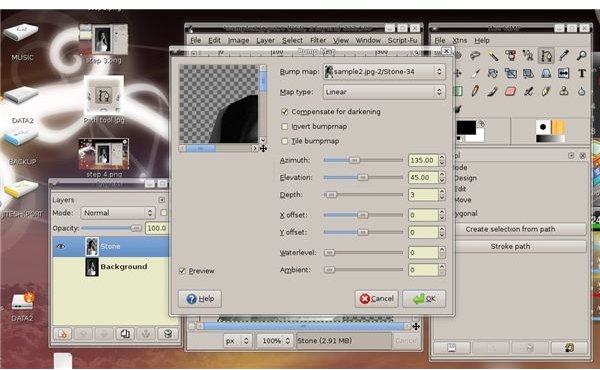
Finally we will apply the stone effect to the image. This is done using the ‘Bump Map’ filter. Go to Filters>Map>Bump Map. A dialog box with a preview window and lots of sliders opens.
In the Map Type drop down box, select either the Sinusoidal or the Linear Maping mode. Move the slider for ‘Depth’ till you’re satisfied. the ‘Azimuth’ and ‘Elevation’ sliders control lighting and you can play with that to alter the shadows and lighting in your statue. Try out various combination and apply them till you’re satisfied with the effect you get. The previews sometimes may be brighter than the actual photo, be aware of that.
Step 7: Final touches

Go to the Path pane and select ‘From Path’ and ‘Magic Wand’ to again select the subject. Create a new layer, setting its mode to ‘Overlay’.Fill this layer with a stony colour, either grey or dull brown, depending on the effect you want.
Sit back and enjoy your art!!


