Camera shake is a universal problem for photographers, yet many find the traditional tripod to be too cumbersome for everyday use. Enter the string tripod, an easy to make, easy to use little knickknack that might just solve your camera shake problems.
How Does a String Tripod Work?
As stated in the teaser, camera shake is the nemesis of many photographers, yet the traditional solution of a tripod is often too much of a bother for many photographers. Tripods are often bulky, require an elaborate set up, and are extremely conspicuous, all of which require a change in photographing style that many aren’t too keen on.
Here’s where the string tripod comes in, one of many tripod alternatives .
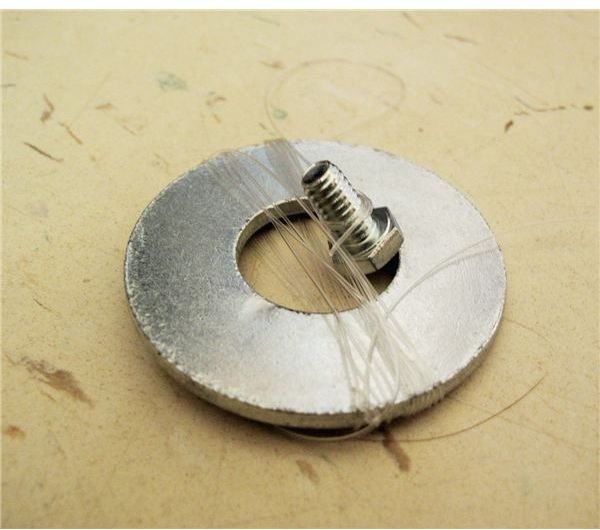
For starters, the name is a bit of a misnomer. The string tripod is really just a string, on one end a large washer, and on the other is a screw attached to your camera’s tripod mount. Holding onto the camera, one drops the washer end down and steps on it, pulling the string taut. Most camera shake, being vertical, is thus eliminated in one smooth, easy motion. The string tripod can be easily carried in a pocket, or even just remain attached to your camera for greater convenience. It’s also quite inconspicuous, the movement being a quick one, and the knickknack itself being small and near invisible.
The advantages are numerous, and it’s quick enough to make that there’s really no harm in trying.
Supplies You’ll Need to Make a String Tripod
-
One large washer. Make sure it’s large enough that you can easily step on it.
-
One ¼" screw. The shorter the better, so then you can even just leave it attached to the camera and not have to worry about it snagging on things. While 1/4" is fairly standard, if there’s any doubt at all as to whether this is the correct diameter for your particular camera’s tripod mount, then just bring it with you to the hardware store or garage and test some different sizes out.
Advertisement -
String. I would recommend fishing line, it being both clear and strong, though really, anything you happen to have will do.
How to Make the String Tripod
Probably one of the easiest DIYs out there. Tie one end of the string to the washer in a strong knot—nothing fancy, even the double knot you use to tie your shoes will do. Then, placing the washer down, draw the string taut vertically until it’s at the height at which you usually take your shots. Cut the string slightly above this mark, and then tie it tightly to the screw, preferably along the threads. That’s it!
String Tripod
How to Use Your String Tripod
It might take a few shoots to get accustomed to the movement of dropping the washer, stepping on it, drawing the string tight and then shooting. With practice, however, this initial set up will become fluid and natural.
The string tripod also allows for a lot of flexibility. The height at which you take your picture can be easily adjusted: keeping the string taut, you can wrap it around a wrist, or bend it to the side with your knee. To raise it higher, just attach the washer end further up your body, perhaps to a belt loop and then doubling back the string. Really, you can attach the string to anything; a lamp post, a tree, a chair, whatever you can think of, for unlimited angles and heights. All it takes is a little patience and a little creativity, and this easy way to reduce camera shake is yet one more tool at your disposal.
To prevent the string tripod from tangling, the best solution is probably to just wrap the string around your camera when not in use. If the build of your camera prevents this, then wrapping the string around a wrist or wallet or even around the washer itself between uses might help prevent tangles. However you decide to coil it, make sure that it can easily uncoil as well.


