It is a fairly common mistake to end up with missing files in a Pro Tools session copy. Pro Tools software provides a function that can help avoid this issue. The feature is called Save Copy In.
Besides the need to back up Pro Tools sessions as a safety measure, session copies are often needed for other purposes. For example, you may need to send the session to a guitarist to add parts or need to work on the session on another system. So what is a safe, near foolproof method to make a session backup? This Pro Tools tutorial is designed to show you.
Using the Mac or Windows standard drag and drop method may sometimes be sufficient for copying a Pro Tools session folder, but there can be issues. Any media files that reside outside of the session folder will be missing in the copy. A preferred method is the Save Copy In feature (Save Session Copy In for some Pro Tools versions). Save Copy In can help avoid the issue of missing audio or other media files in the copy.
Files residing outside the session folder are often due to changes (intentional or inadvertent) to the session’s Disk Allocation. The Disk Allocation refers to the destination Pro Tools uses for storing audio files and can be set for each track individually. By default, Pro Tools creates a folder named Audio Files within the project’s session folder. The audio files are stored in this folder when recording. A session that has never been moved is less likely to have issues with Disk Allocation. However, it is possible to import audio or video files without actually copying them into the session folder. In other words, Pro Tools can use a media file in the session from its original location. This feature has its benefits, but can be a gotcha when making a copy of the Pro Tools session. It is also possible to setup a session to use more than one drive for recording by choosing Round Robin in the Disk Allocation window. Therefore, there are several things that can cause media files to reside outside the session folder.
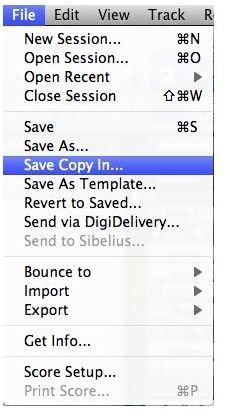
To use Save Copy In simply select it from the File menu while inside the Pro Tools session. A pop-up window appears that provides several user options.
For a stand alone session copy, you must select to copy All Audio Files under the Items To Copy section. Otherwise, Save Copy In does not duplicate the audio files into the new session folder. You may also choose to include video/movie files along with selecting other options.

Once you have selected the items you wish to include click OK. Choose a name for the session copy as well as where you would like the copy to be created. Press Save to begin the process. A pop-up window should appear showing the progress of copying the files. This process may take a few minutes depending on the size of the session. The size of a session is determined by its sample rate, number of tracks, length, complexity of the session settings and other media assets. By the way, an added benefit of using Save Copy In is that it only copies the files that are actually used in the session. Any abandoned files that happen to be in the audio files folder are not included. Therefore, using Save Copy In may provide a bit of clean-up, reducing the size of the new session compared to the original.
After the copy is finished, it’s a good idea to test it. If possible, eject (unmount) the drive that holds the original session. You can take it a step further and completely unplug and unhook the drive if you wish. Once the original session drive is disabled, open the session copy watching for any errors or missing files warning pop-ups. Briefly examine the tracks for any grayed out regions (which means Pro Tools can’t find them), then test the playback.
Alternately, manually check the session’s Disk Allocation from within Pro Tools. To do so, open the new session backup copy, then view the Disk Allocation under the Settings menu. Scroll through the tracks checking the path for audio files. You can also view the location of the audio files from the Regions Bin. Under the Show menu under the pulldown menu at the top of the Regions Bin, choose Full Path. Follow the system hierarchy (OS X or WIndows) to determine where the audio files reside. By the way, if the session has grayed out regions, you can use this method to find out where Pro Tools thinks the region’s audio files should be.
In summary, our Pro Tools tutorial explains how using Save Copy In can help ensure your Pro Tools session backup is complete with all necessary media files. Using this feature for session copies may also shrink the resulting copy’s folder size. As a third benefit, Save Copy In allows you to change the file type, sample rate and bit depth for the copy.
Note: Making a copy onto the same drive is not recommended as a safety copy. This may be useful for clean-up purposes, but if the drive fails you may lose both copies, even if the drive is partitioned. Session backup copies should be stored on an entirely different drive or other storage media.
References
-
Pro Tools Reference Guide
AdvertisementPro Tools® is a trademark or registered trademark of Avid Technology, Inc. or its subsidiaries in the United States and/or other countries.
Screenshots taken by author.
Advertisement


