Did you know that you can capture and record a podcast on a Mac using software that is included with all Mac computers? Using the popular audio editing and recording program GarageBand, you can easily record a podcast from start to finish, with a variety of creative tools at your disposal.
What You’ll Need
There are a few things you’ll need in order to learn how to capture and record a podcast on a Mac. You will be using GarageBand software to record and edit your podcast. Most Mac laptops come with a built-in microphone. You may use this to record your podcast if you wish, but it is highly recommended that you purchase a USB microphone which will increase the quality of your podcast tremendously. Grab a pair of headphones for monitoring and you’re ready to begin.
Setting Up GarageBand
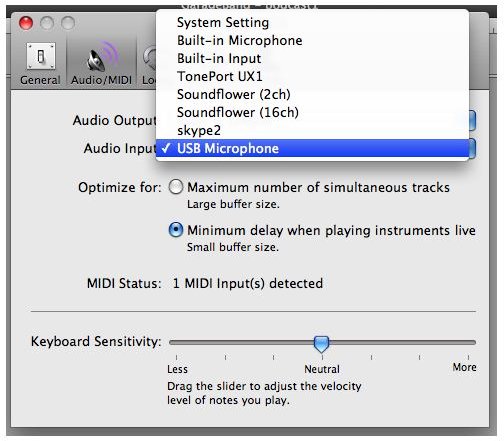
GarageBand needs to be configured properly before you can record your podcast properly. Create a new music project and save it. Click on GarageBand from the top menu and go to Preferences. Select the Audio/MIDI tab. Now you must configure your input device that you will record with. From the Audio Input dropdown menu, select your USB microphone . If you are using your built-in microphone, leave the input on Built-in Microphone. Close the Preferences window.
Recording Your Track
Now you will create new track to record onto. From the Track menu in the top bar, select New Track. Choose Real Instrument Track and hit Create. This is the track you will use to capture your podcast.

To rename your track, control-click on its title and enter in the name of your choice, something like “Podcast” to keep it simple. The metronome is by default turned on, though you will most likely not need it to record. To turn it off select Control from the top menu and click Metronome. You are now ready to record. Click the record button on the bottom control strip. When you are finished click the play button.
Editing Your Track
You should now have a track that looks something like this:

You can now edit your podcast any way you want. GarageBand offers a lot of great tools to aid in editing, and you will find which ones work best for you. To get you started, here are a few editing tips.
-
To cut the podcast, drag your playhead to the point you would like to split and hit ⌘ - T.
-
To add an effect to your podcast, open the details menu in in the right sidebar. Simple effects such as a Gate or Compressor can be added by checking the box next to the effect. More advanced effects can be added by selecting it from the dropdown slots.
Advertisement -
When using Visual EQ, remember that the vocal range is in the mid to high frequency range. It is okay to bring this up a little and bring down the high and low frequencies. As with all effects, use in moderation.
Exporting Your Track
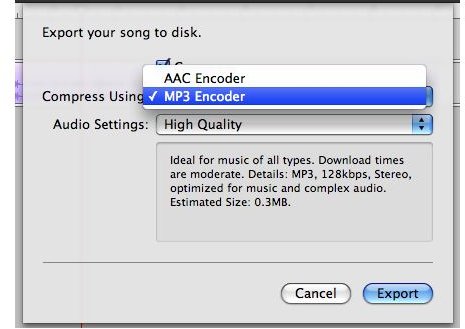
To export your podcast, simply click Share from the top menu and select Export Song to Disk… Make sure to choose MP3 encoder, then click Export. Choose a name for your file and GarageBand will mixdown and export the track. You can now either upload it straight to your Web server or to iTunes podcast database. Once this is complete, you will know exactly how to capture and record a podcast on a Mac.
References
Source: author’s own experience.
Images provided by author.


