
Want to sync any folder on your computer with a virtual one on your iPhone or iPod Touch? Well with this combination of the free Dropbox app and any free file syncing application, you can keep your files at home and still access them anywhere you go! Click for full instructions!
Mirroring a Folder on Your iPhone
I am constantly in need of certain files (like instructional PDFs) in my laboratory job. Now I could keep a million printouts floating on my desk, but that solution quickly turns into its own problem! Instead, I utilize free software apps to manage my files for me.
The objective here is to take a folder(s) from my desktop and access it directly on my iPhone. It only took me a few minutes of setup and now I have figured out the perfect solution. Even better, it never needs to be touched again unless you set up more folders or get a new computer!
What You Need
You’re going to need 4 things for this mirroring system to work:
- A personal computer such as a desktop or laptop with a “most of the time” internet connection.
- An iPhone, iPod Touch, or iPad (this has only been tested on the 3GS, but it should work on most of these devices).
- Download the free Dropbox app for iPhone/iPod Touch/iPad as well as the desktop Dropbox client.
- Download and install any simple file synchronization app (you can use Comodo BackUp , which is free).
To make things simpler, I’d get all of these ready before acting on the directions below.
Setup Dropbox
You’ll need to create a Dropbox account (which will give you 2GB of storage for free) in which to store your files. In reality the files will reside on your computer, in Dropbox, and on your iPhone, but the service makes it all feel very seamless! The process is very simple: choose a username and password that you will later use to sync up with your iPhone app.
Once you have set up your account and have the desktop client installed, you will have a “Dropbox folder” somewhere on your computer. During setup, the application should have prompted you to place that folder somewhere. You can put it anywhere, but make sure you know where it is.
Setup the Synchronization
If you wanted to, you could just take any file or folder and drag it into the Dropbox folder on your desktop and BAM, it would be shared across all of your devices through Dropbox. Personally, I find that option a bit limiting because I already have all of my essential files right where I want them. For this reason, I set up a free file backup program to regularly copy my lab notes from their normal location to a mirrored location in the Dropbox folder. Here’s how you do that:
- First, download and install any free backup software that allows you to directly control which files are sent where. Personally I like Comodo Backup , but you could also use something like SyncBack too. In theory, the software only needs to accomplish something you could easily do with Copy and Paste, so lots of apps exist to do the job.
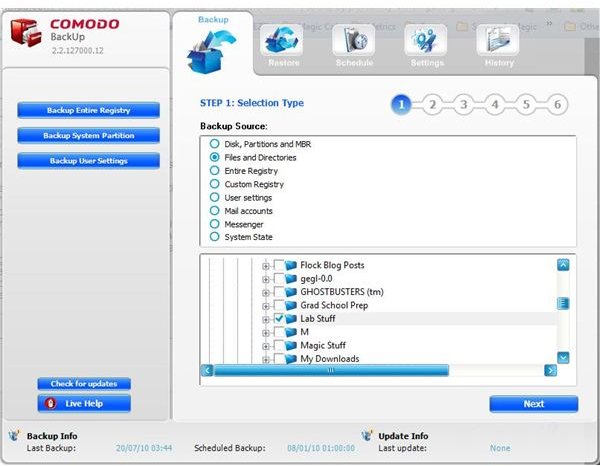
- After installation, go to the “Backup” window (the first window you see on startup, by default), and select “Files and Directories” under “Backup Source.
- Drill down in the file directory box below and select the folder you wish to share with your Dropbox (and consequently your iPhone). Click “Next.”
- On the “Backup Settings” menu, you’ll be asked for a lot of options. If you know what you want, feel free to activate any settings you like, but for the purposes of this demo, select either “Simple Copy” or “Synchronized Copy” under “Backup format.” The first will simply copy all of your files from the source to the destination. This makes the information “one way.” If you choose the second option, the files will flow both ways so you can add files to the source OR destination and the change will be reflected on both ends. I’m going with the second in this case, in case I take a picture in the lab and want to add it to my lab notes folder from my iPhone.
- If you choose to Synchronize, you’ll need to choose an interval of backup. I suggest 60 minutes…long enough not to work your machine needlessly, but short enough to catch any additions you might make to your shared folder. Hit “Next.”
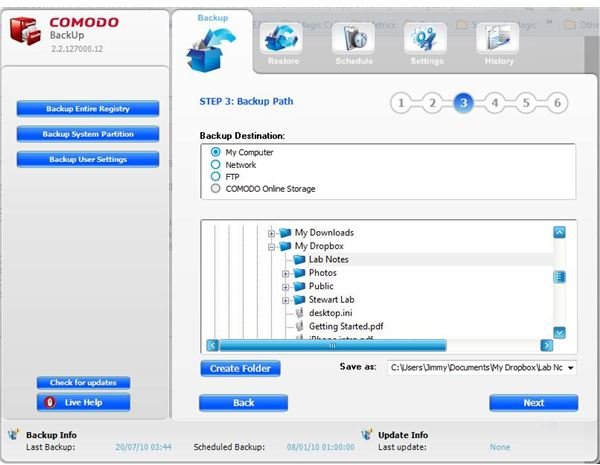
- In the “Backup Path” screen, simply choose “My Computer” under “Backup Destination” and then drill down in the file directory to where you put your “My Dropbox” folder on your computer (from the above installation). Create a new folder in “My Dropbox” with the same name as your synced folder and select it. Click “Next.”
- Skip the next menu about “Other Settings” entirely, click “Next.”
- Hit “Next” again and the backup/sync will begin.
Step By Step Screenshots

Setting Up Dropbox on Your iPhone
Once you have completed the previous steps, the iPhone part is quite simple. As I said before, go to the App Store and download the free Dropbox for iPhone app.
Once installed, open the app and select “I’m already a Dropbox user” (provided you registered on the desktop app as instructed before). Simply input the email address and password you used to register and click “Login to Dropbox.” As simple as that you’ll be shown all of your shared files, including the one we just set up above! If you don’t see anything, make sure you have given your computer time to sync over the files and given Dropbox enough time to upload them to their connecting servers.
Some Final Notes
There are a couple things to keep in mind with this technique:
- Remember that while you may share just about any file type, only those files that the iPhone OS (iOS 4 at the time of this publication) can read will be useful on the iPhone Dropbox app. This generally includes .PDF, .DOC, and .DOCX files (among a reasonably long list of others).
- You only get 2 GB of storage from Dropbox for free, so choose what you put in your shared file carefully. You can check how much storage you are using in the iPhone app.
- If you save a video or image to your iPhone memory, you can save that file to Dropbox through the app. No other file saving is permitted at this time.
I hope you enjoyed this tutorial and that you will find the technique useful every day (I know I do)! Please post any questions, comments, or suggestions below in the comment area. You can also reach me @loyaleagle on Twitter .


