In this article we are going to learn how to emulate an SD card to use it with our Android Emulator in Eclipse.
It’s probable that in the applications we are working on, a storage media type will be needed, or that if we want to test a video or audio application we will need files to test it. If we’re working with the real device, this is not a problem, because we can use the internal memory of the phone. But, what happens when we are using the Android Emulator? In this case, we have a tool to create and emulate an SD card. Let’s learn how to do it.
Emulation of the SD Card
First of all, we are going to create a FAT32 (this is very important!!!) disk Image (.iso) using the Android tool mksdcard. This tool can be find in the /tools directory of the SDK (Remember where you have download and unzipped it). To create the image we have to put the following line:
mksdcard
As easy as:
mksdcard 2048M mysdcard.iso
Tip 2048M → 2 Gb
If we want to add files to the sd card, we can do two things:
- Mount the image as a loop device and then copy the files to it
- Use an utility, called “mtools” to copy the files to the image.
Lets have a look to the first option.
If we are using a GNU/Linux system, we can mount the disk image as follows:
sudo mount -t vfat -o loop mysdcard.iso sd
where “sd” is a directory we have to create before, inside the /tools folder.
(To create a directory use the mkdir command)
Once we have done this, its time to copy the files we want (if we want to copy any) inside the sd folder. Its possible that you need administrator privileges to do this.
After doing this, just umount the image
sudo umount sd
Now, we can launch the emulator in two ways:
-Without IDE (Eclipse)
-With Eclipse
Without IDE → in the /tools folder, use ./emulator (emulator if we are in Windows) -sdcard mycard.iso
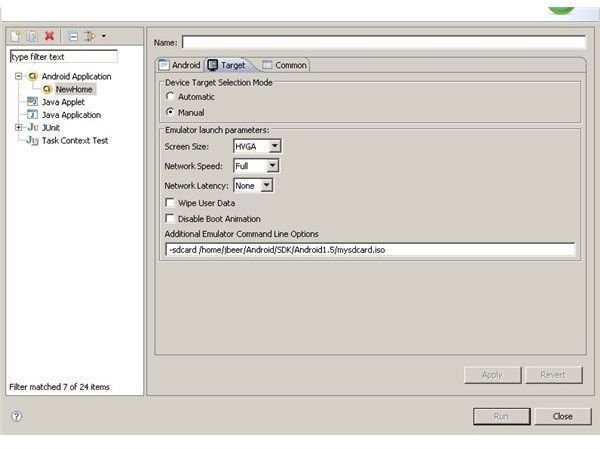
With Eclipse → We have to modify the running parameters. For that, left click on the proyect in Eclipse, click in “Run as” and then in “Run configuration”. The following image shows what have to be changed.
Want more?
In our next articles I will write more about the Emulator and its tools.
This post is part of the series: How-to develop applications on Android: The Emulator
In this serie of articles, we will learn a bit more about the Emulator.