Example HTML Table Code - Learn How to Create a Custom Table in HTML
The Usefulness of HTML Table Code
Use of an example HTML table is one of the best ways to teaching HTML table code. Although tables should no longer be used to create the visual layout for the content of a site, they still have their place when it comes to grouping certain types of information. A good number of data driven web sites still make use of tables to display dynamic content in an orderly and well defined format.
The HTML table code I present here is from an individual homework project I completed during my training in web development. I was required to use Cascading Style Sheets (CSS) to style the table and also to nest a table within a table. My professor gave the class an image of what the final visual result was to look like; our assignment was to write the HTML table code and CSS based on the image file she provided. This project is a good example HTML table because it demonstrates the flexibility you can enjoy if you understand the tags and attributes available to you. Please keep in mind that in actuality this is Extensible Hypertext Mark-Up Language (X)HTML table code.
HTML Table Code Based on an Image
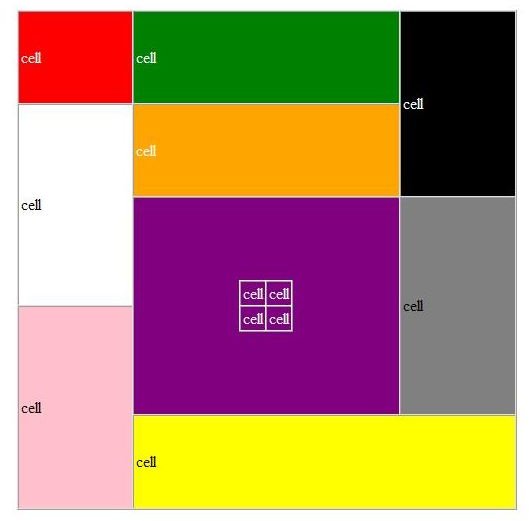
Below is the image of the table my professor gave to my class for us to code in HTML and style using CSS. Following are explanations of the tags and attributes I used to create what I saw in the image. You should already be familiar with the basics of creating a simple .html/.htm document without relying on a What You See Is What You Get (WYSWYG) editor because I’ll be explaining only the HTML table code itself.
Screen Shots of the Code
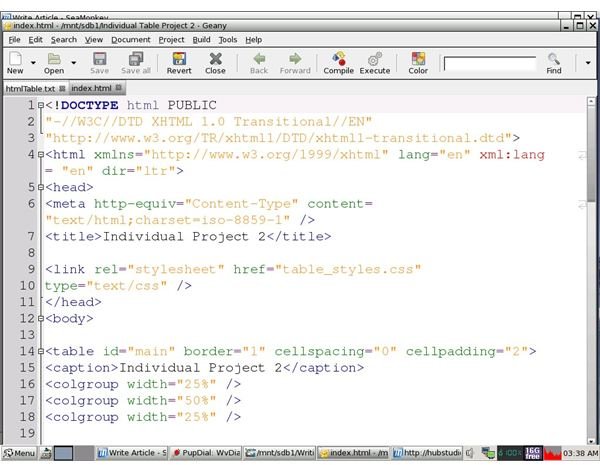
We now take a look at the actual code I wrote for the image of the table I was given. Again, CSS was used to style it so there’s a link in the head to the external style sheet I wrote. You can simply disregard this. Other things to observe is my use of the transitional document type. If it helps, you might want to make a few notes within your code to facilitate editing at a later date. (Click any image for a larger view.)

The Code Behind the Example HTML Table
HTML table code begins with the
element on line fourteen. You can ignore the id called “main” as it’s related to CSS. The border attribute is assigned “1”. This gives the table a thin visible border on all sides; you can increase the number for thicker borders. The cellspacing attribute controls the amount of vertical and horizontal space between individual table cells; it is set to “0” to ensure that no space appears around the cells. Omitting it would activate the default which shows a little space. Cellpadding specifies how much horizontal and vertical space should be between each cell’s borders and its contents. If you don’t want content to appear right next to the borders, you’ll want to set this attribute as I did.Line fifteen shows use of the
tag as an empty element if making the same specifications for all columns in a group. If you want to assign different specifications for individual columns within the same group, you must close the element with and make use of the element which you would nest inside of the tags. It’s okay for a column group to contain only one column. You can see that this example HTML table has three columns; the first takes up 25 percent of the table, the second takes up 50 percent, and the third spans the remaining 25 percent for a total of one hundred.Understanding Column Groups
Let’s say that we had a table with two column groups. The first contains only one column and the second group contains three. We’ll pretend we want to center the content in the cells of the first column in the second group while right aligning the content in the second and third columns of the second group. Our code would like the following:
Remember that the first group consists of only one column so the empty element was used. The span attribute is assigned “3” because the second group spans three columns. The
element is used along with its align attribute set to “center” to affect only the first column of the three that are in the second group. The second element has the span attribute set to “2” to cover the remaining two columns of the second group and the align attribute is set to “right.” Finally, you see the closing element for the second group because of the use of the nested elements.Spanning Rows and Columns
Returning to the screen shot, we have HTML table code on lines 22 thru 24 that includes the
(table row) and tags create your rows while the| (table data) elements. The | ||||
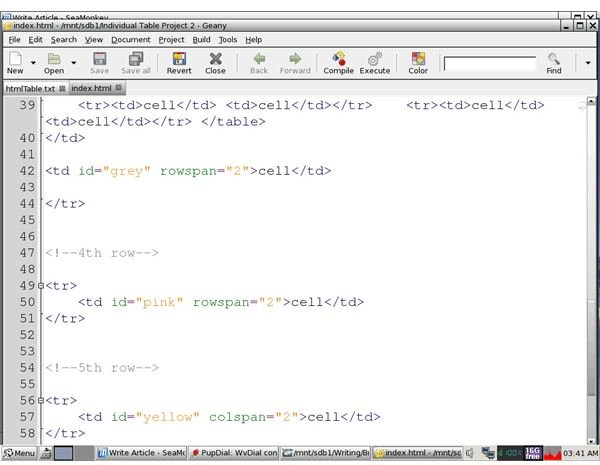
| tags build your columns by “stacking” one cell on top of the other. Notice that the third | element here has the rowspan attribute set to “2.” If you look at the table, you can see that the black cell literally spans two rows. Notice that the second row contains only two sets of | tags and that the first one spans two rows as the white cell actually spans two rows; the table has a total of three columns and five rows. This is hard to see unless you look at the middle columns made up of the green, tan, purple, and yellow cells. The purple cell spans two rows. Just as a cell can span multiple rows, it can also span multiple columns as seen in the fifth row with the yellow cell. The code shows that the | element has the colspan attribute set to “2.”
Putting It All TogetherThe elements seen in this example HTML table are not the only one used when coding for tables. You might want to learn how to use the useful | tag among others to give headings to your columns. However, the ones presented here should be thoroughly understood if you want to do web development. Unfortunately, some web design and development training programs emphasize the use of WYSWYG web page editors such as Microsoft Front Page or Macromedia Dreamweaver. I believe that working with these can hinder you from gaining the skill you need. Coding for complex tables and knowing how to insert a special character in HTML are among the things you should be able to do with nothing but a simple text editor. Remember also that CSS, not tables, is used for content presentation. In fact, CSS is the language of choice for styling tables. Again, as you learn, you might want to make be sure to make comments in CSS and HTML.
|
|---|