
This article introduces you to web development with Microsoft’s Silverlight framework. You’ll create a Silverlight program and learn tips about concepts and coding in the Silverlight framework.
Understanding Silverlight
What is Microsoft Silverlight 2? Silverlight is a framework for creating interactive Rich Internet Applications (RIAs). To get a grip on what Silverlight is, or hopes to be, look at one of its competitors: Flash. Knowing that Silverlight aspires to unseat Flash tells you that Silverlight is a tool for creating rich interactive multimedia content, mostly through your web browser.
Note these other features of Silverlight:
- Though it usually runs in your browser, it can run out-of-browser.
- Your main choices for coding in it are Visual Basic and C#.
- The XAML language (Extensible Application Markup language) is used frequently for Silverlight’s page layout. But, it can also be used for functionality.
A first application in Silverlight
Let’s do a first application in Silverlight, then explore how it works.
Download a copy of Visual Studio (VS), 2008 or later. Then, get the Silverlight SDK here. The installation order is important. Specifically, install VS 2008, service pack 1 for VS 2008, and then the Silverlight SDK. This sequence will make the Silverlight templates appear in VS.
After installing VS and Silverlight, open up VS and select “Alt-F-N” to begin creating a new project. In the “Project type” pane, choose “Visual C#>Silverlight,” and in the “Templates” pane choose “Silverlight Application.” Name the project “ToeTacTic,” uncheck the checkbox that reads “Host the Silverlight application in a new Web site,” then let VS build the framework code.
The XAML code
The first code you see when VS completes the initial, skeleton coding is the XAML in the MainPage.xaml file. This file defines the user interface. Put another way, it provides the page layout for your app. XAML is thus a lot like HTML, though much richer in terms of the graphics you can depict with it. As far as syntax goes, XAML’s syntax is an offshoot of XML’s, which you can see the moment you first view MainPage.xaml.
The Grid
Let’s define some graphical objects using XAML. First, so that you can see the layout, replace the opening Grid tag (
Next, paste the following markup between the opening and closing Grid tags:
<Grid.RowDefinitions>
</Grid.RowDefinitions>
<Grid.ColumnDefinitions>
</Grid.ColumnDefinitions>
The “row” and “column” terms in the foregoing code are a dead giveaway for a table definition. Code like this highlights the blood ties to HTML.
But notice the difference from HTML: in HTML, you’d nest your column tags ("
Press “F5” to have a look at the layout so far. You should see something like this:
Layout made from XAML column and row definitions
Read details about the Grid control here.
Add controls
Our next layout element is a set of user controls–text boxes, specifically. Paste the following XAML markup after the last Grid column definition end tag ("</Grid.ColumnDefinitions>"):
Re-run the program to see the “awaiting text” message appear in the four corners of the grid, then return to Visual Studio to study the XAML markup.
Notice how this markup works, in contrast to how HTML tables work. You’re not positioning the textboxes within the actual definition of the table defined inside the Grid’s RowDefinitions or ColumnDefinition’s tags. Instead, you’re specifying the position inside the textbox tags themselves. If HTML worked like this, it might look something like the following:
…(more
…(more
But, HTML tables aren’t marked up like this, so keep in mind that you can approach Silverlight’s XAML programming by applying your HTML skills, but only to a point. XAML is its own dog.
Read more about the TextBox control here.
Binding an event to a Text Box
Let’s begin to make the program actually do something, rather than just displaying a grid. We’ll create a fifth text box. But, unlike the other text boxes, we’ll bind an event handling function to the text box.
Start by creating the new text box: type the following code after the fourth TextBox’s end tag (""):
Now let the Visual Studio IDE work its magic: position the cursor just after the opening
Pressing “Space” to make the IDE display event handers
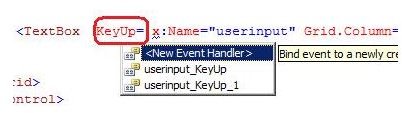
While the menu is still open, press “k” to jump the current selection to the “k” items, then arrow down to the “KeyUp” event. Press “Tab” after highlighting “KeyUp,” which will fill in the TextBox with the new attribute.
Create an event handler
When the next pop-up menu displays the choice “
The new handler should be named something like “userinput_KeyUp_1”. Right-click on that name and select “Navigate to event handler” to see the new function that VS has created.
The IDE brings you to an empty “KeyUp” method, which it’s your task to fill with code. The code will perform some action whenever your program’s user lifts her finger off the grid’s center textbox.
The action your code will perform will be to “echo” or repeat the exact text that the user is typing, while she’s typing it. Paste the following code inside the opening and closing braces of the “KeyUp” method:
echo1.Text = userinput.Text;
echo2.Text = userinput.Text;
echo3.Text = userinput.Text;
echo4.Text = userinput.Text;
Run the revised program, and type some text in the center square of the grid. Notice the text in the grid’s four corners: it automatically updates with every new character you type or delete.

Output from the complete echo program
Read more about event handler’s here.
Experiment with the program
The event-driven functionality of the preceding program definitely isn’t new; Silverlight didn’t invent this programming paradigm. If you’ve done any modern GUI coding, whether in Java, C++, C Sharp, or Visual Basic, you’ve worked with event methods and object oriented concepts. This will make your experience in learning Silverlight easier.
But, you still need to get acquainted with XAML, and how it fits within Silverlight’s event-driven programs. For that reason, take the time to tinker with this program. Use the MSDN library and the VS IntelliSense to learn of other events besides OnKeyUp that you can write code for. Use controls besides TextBoxes, including buttons, sliders, and then more complex controls like DatePicker. See the Toolbox window in your Silverlight project for other controls. Throughout your learning curve, maintain an adventuresome, inquisitive mindset as you answer the question: what is Silverlight 2?
References
Microsoft: Getting Started with Silverlight

Using LastPass to Keep Passwords Safe
Still writing your password on sticky notes? Do you use the same password for multiple sites? Why not use a password …

Installing and Using Ablock Plus
Do you have a limited data cap for your internet connection or are tired of seeing endless ads on your computer? …

Ad-blocker Versus Facebook – the Fight for User’s Rights
Adblock Plus is obviously having an impact on Facebook’s revenues as Facebook recently changed the way they code ads on …