You just finished building a new website. Before uploading it to a server, spend some time checking on how well it functions or first time visitors may be last time visitors. Dreamweaver CS4 includes a number of tools for website testing for functionality before putting it up for the world.
Link Checker
Broken links on a website are one of the worst types of design errors, which often drive potential users away from the site. To test for broken links, open a Web page on your computer in Dreamweaver CS4. The Home Page, which usually uses the file name “index.html,” is a good place to start.
Click on the “Window” menu, then “Results” and “Link Checker.” In the Link Checker panel that opens at the bottom of the screen, click on the right-pointing arrow next to “Files.” There are three options: to check the current document, to check links for the entire local site, and to check links for selected files. Unless you have a website with only one page, the best way to go is to choose to check links for the entire site. On complicated sites, which have gone through multiple iterations in development and contain lots of CSS and specialized fonts it is quite likely you will find some broken links. If so, click on the “Save Report” icon at the left of the panel. To review the types of problems quickly, click on “Broken Links” on the “Show” line and select broken links, external links, or orphaned links.
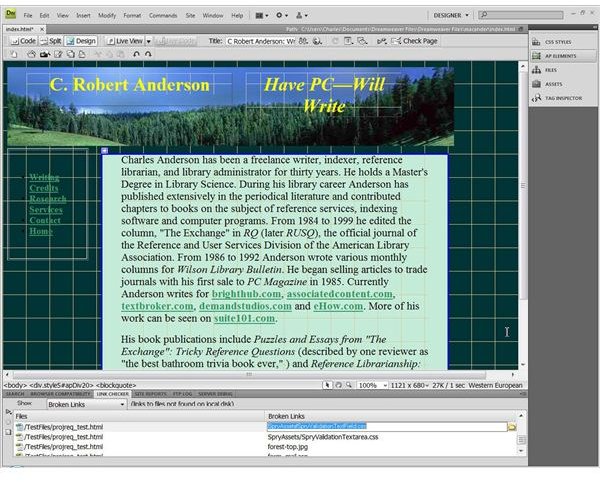
To fix broken links, select one from the list. The name will reduce in size and a folder option pops up on the right. This opens a “Select File” dialog box where you can work through finding the correct file and fixing the broken link. The following image shows some deliberately created broken links for this example.
Broken Link Checker
Website Validation
Only the most painstaking work in website development can avoid inserting a few tag or syntax errors. Dreamweaver CS4 has a Validator tool for testing websites that quickly finds these problems. Use this tool by clicking on the “Edit” menu, then select the “Validator” category. A quicker way to get to this if the panel from above is still open is to click on “Validation.” Click on the right-pointing arrow and choose “Settings.” With either method, by default there will be a checkmark in the HTML 4.0 box. Add any additional areas you want checked, then click “Options.” In options, put checkmarks in the types of reporting you want. Go back to the drop-down menu that included Settings and select what to check—the current document, current website, or selected files. When the check finishes, each error will have a line number and description of the problem. You can find out more about the errors by clicking on the “More Info” button on the left. Save the report as described in the previous section.
Browser Compatibility
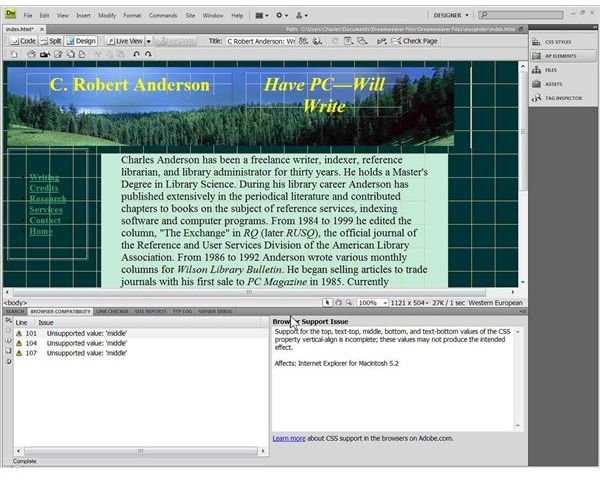
Dreamweaver CS4 includes a “Behavior ” that can test the browser type used by visitors and re-direct them to an alternate page if there are compatibility issues. You can pre-test this yourself using another Dreamweaver CS4 tool. Click “File,” “Check Page,” and “Browser Compatibility.” Double-click a problem to display the Code View and fix the problem. Get more information by clicking on the “More Info” or “Browse Report” icons on the left.
The associated image shows three unsupported values for a user with Internet Explorer for the Macintosh 5.2.
Accessibility
Good Web pages provide accessibility options for visitors. Click “Edit,” “Preferences,” and “Accessibility” to choose options. As an example, when you insert images, add at least alternate text for visually impaired users and possibly a longer description in an HTML file.
Clean Up HTML Code
During development, random HTML random errors like empty tags or improperly nested tabs may creep into your Web documents. Use the Dreamweaver CS4 to fix these. Click on “Commands” from the top menu, then click “Clean Up HTML.” Select which types of errors you want to remove such as empty container tags, redundant nested tags, or non-Dreamweaver items. You will see other options on the same screen as well. Click “OK” and a report will show in a popup screen about the results.
Download Speed
Downloading speed will affect how happy your site visitors are with your site. A general rule of thumb for website access is the “Eight Second Rule.” Many users will wait only eight seconds for your home page to load. If it fails to appear in that period, they get bored and move on to another Web page. Click “Edit” and “Preferences.” Select “Status Bar” from the list. This displays various window sizes depending on the display as well as a “Connection Speed” choice where you can choose pre-selected speeds or a custom setting depending on your bandwidth. Check on the download time based on the file size of a document by looking at the lower right hand corner of the page in document view. The file size and approximate download time shows as this example: 27K/1 sec. If the download speed is slower than eight seconds, edit the file size downwards to increase the speed.


