If you’re a blogger, then you probably know that writing with most blog editors can take some of the fun out of blogging. The next time you want to write and publish a post, consider using Google Docs. It makes writing, editing, and publishing your blog posts a breeze.
Introduction
There are 100 million blogs on the Web. You might even run one (or more) of them. If that describes you, then you probably know that your blog’s built-in editor leaves a lot to be desired. Most of them are either barebones, difficult to use, or just a bit too slow and balky.
Wouldn’t it be nice to write your blog posts in a familiar environment, and then publish them with the click of a button? There are a number of ways to do that. One of the best ways is to use Google Docs as your blog editor. It’s easy to use, works with a number of blog sites, and you can use it anywhere – even if you’re not at your own computer.
Getting going
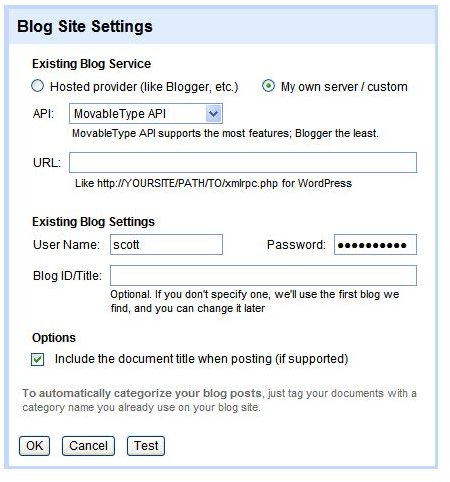
Log into your Google Docs account. In the upper right corner of Google Docs, click Settings. In the Settings window, look for the section labeled Blog settings. Then, click edit info to open the Blog Site Settings window. This is where things can become a bit tricky.
Why? Well, there are a lot blog sites and services out there. They fall into two categories: hosted services (like Blogger and WordPress.com), and those installed on your Web site (like WordPress and TypePad).
Choosing the type of blog
With hosted blogs, just click the Hosted Provider option, and choose an option from the list.
If you have a blog installed on your Web site, click My own server/custom. Then, select an option from the API list. Your choices are:
- Movable Type API
- Blogger API
- MetaWeblog API
Wondering what an API is? It’s just a way for two or more pieces of software to talk to each other – in this case, through a file called xmlprc.php that’s on your server. For most blogs, you can select MetaWeblog API. If that doesn’t work, try selecting Movable Type API.
In the URL field, point Google Docs to the file xmlrpc.php – for example, https://www.mysite.com/weblog/xmlrpc.php .
Finishing up
Regardless of what kind of blog you have, enter the following information:
- The user name and password that you use to log into your blog
- The ID or Title of your blog, which is its name – for example, Words on a Page
Click the Include document title when posting option. This will turn the title of a document into the headline of the blog post.
Then, click the Test button. Google Docs will try to connect to and log into your blog. If it succeeds, a message pops up.
Posting from Google Docs
Now that’s all out of the way, it’s time to get writing and publishing. Create a new document in Google Docs, type your blog post, and then save it. From there, click the Share button in the top right corner and then select Publish as Web page.
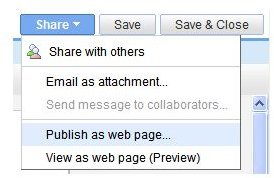
In the Publish this document window, click the Post to blog button. That’s all there is to it.
Drawbacks
Using Google Docs as a blog editor has two major limitations. First, you can only set it up to work with one blog. For most people, that’s not a problem. But there are those who publish two or even three blogs. For them, this can be limiting.
The second limitation is that you can’t change the date or time of the post to publish it in the future. A number of bloggers write several days’or weeks worth of posts in advance, and set the date and time at which those posts will be published.
Conclusion
Using Google Docs as a blog editor isn’t for everyone. But if you prefer to post immediately, or if you do a lot of live blogging, then it’s a easy to use and flexible way of churning out posts. And you can use it anywhere, anytime.


