Learn How to Edit Photos in Picasa 3 (Archived)
Editor’s Note: This article was originally published in 2008 and is intended for use with Picasa 3. Since that time Picasa is now available in version 3.9. The article has been placed in our archive and left up for informational purposes.
Picasa 3, the upgraded version of Google’s free photo management software, includes new and more powerful editing tools that allow you to add text to photos, automatically fix red eye and repair blemishes. You can also crop or straighten a photo, plus much more.If you are not familiar or comfortable with editing your own photos, Picasa 3 also has an “I feel lucky” button that will instantly fix common problems that are found in many photos.However, Google makes the new editing tools so easy to use that even first time users can personalize their most cherished photos to share with family and friends.
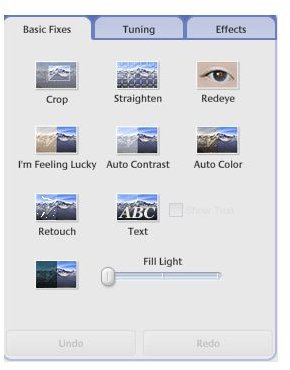
To Crop a Photo
1.Click the photo you would like to crop.
2.Select the basic fixes tab.
3.Click the crop tab.
4.Select a preset dimension, or manually make a box by using the “click and drag method”.
5.To view the new dimensions of your photos, Click the preview button.
6.If you are satisfied with the appearance of your photo, Select the Apply changes button.If you are not satisfied, choose the Cancel button.
To Straighten a Photo
1.Click the photo to be straightened.
2.Select the basic fixes tab.
3.Click the straighten button.
4.Using the slider control, and tilt the photo to the desired angle.
5.Apply or Cancel the changes.
To Fix Red-Eye
1.Click the photo that contains the red-eye.
2.Select the basic fixes tab.
3.Choose the red-eye tool.
4.Use the Click and Hold method over each eye until a box appears.Release the button to complete the red-eye fix.
5.If the changes are not satisfactory, Select Delete, and try again.
To Repair Blemishes
1.Choose the photo you would like to repair.
2.Select the basic fixes tab.
3.Click the blemish to be repaired, and then move the mouse to preview the repaired blemish.
4.Click on the photo to confirm the repair if you are satisfied.
To finish up the photo experience and add more personalization, you can also fine tune your photos as well as add various effects to the photos.
To Fine-Tune Photos
1.Click the photo.
2.Select the fine tuning tab.
3.Choose the fix that you would like to use.
4.Slide the bar in the left or right directions to make your adjustments.
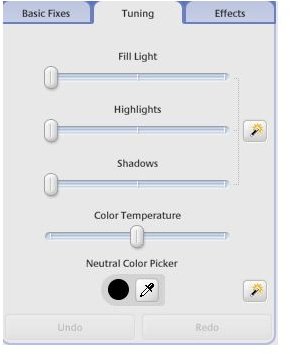
5.Apply or Cancel your changes.
The Natural Color Picker
1.Select desired photo.
2.Click the fine tuning tab.
3.Select the natural color picker.
4.Choose the spot where you would like to remove black or white color cast.
5.Select Delete if you do not approve of the changes.
The final touches to your photos can be applied by using the effects tab, which allows you to sharpen your photos as well as apply sepia, warmth, film and grain tones.

Adding Final Touches and Tones
1.Select desired photo.
2.Click effects tab.
3.Choose the effect that you would like to apply.
4.Apply or Cancel changes.
Your photos are now ready to be shared with all of your family and friends.
This article has been placed in our archives.