This Blogger Template Tutorial shows you how to upload and install your own Blogger Template from scratch, and where to find free Blogger Templates. This is great for dressing up your blog for special occasions such as Christmas, New Year or Valentines Day to make it more relevant to your readers!
Free Blogger Templates
Although Blogger comes with a standard selection of template designs, they are rather limited, and you may want to search for more choices online. There are thousands of template designs available for free on the internet. You just need to Google them out and download the ones you like.
This is particularly useful especially if you want to dress up your blog for festive or special occasions, such as Christmas, New Years, or Valentines Day to make it more relevant to your readers.
In the past, it was rather challenging for non-techie people to install your own blog design in Blogger, as it involves tinkering with a lot of coding which may look intimidating. However, Blogger has become a lot more user-friendly now and you no longer have to deal with template codes to have the blog template design of your choice. These are some of the best sites offering some awesome free Blogger templates .
Take your time to browse through the various blog designs and find a template that is suitable to the niche that you are blogging about. For example, if you are blogging about dogs, it would be appropriate to find a template that perhaps, has images of dogs or puppies, or even little paws in the design.
The template design should also match the tone of your blogging, whether it is formal, funny, or casual.
Once you have found the one that complements your writing, download it into your computer. The file is normally in a zip or rar format.
Blogger or Blogspot Template Tutorial
Just follow these simple step-by-step instructions to install your desired Blogger template.
Step 1: After you had downloaded your desired template into your computer, unzip the file.
Step 2: Log into your Blogger Dashboard.
Step 3: Click
on the Design Tab.
Step 4: Click on Edit HTML.
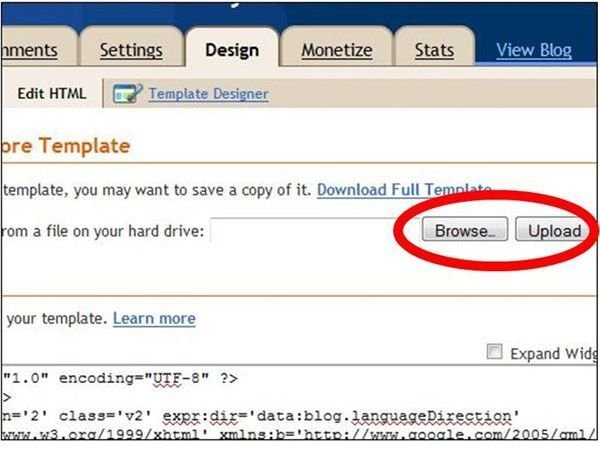
Step 5: You may want to backup your original template first, just in case things do not work out and you may want to revert to the old template to start over. Under Backup/Restore Template, there is a function where you can save a copy of it. Click on Download Full Template, and save it to your computer.
Step 6: Now you are all ready to upload a new template from a file on your hard drive. Click Browse and look for the template in xml format.
Step 7: Select the xml template and click Upload.
After you had uploaded the xml template, you will see that html in the box under Edit Template, had been automatically replaced with the html codes of the new template.
You may also find a message saying that says “Warning: Your new template does not include the following widgets”. Select “Keep Widgets”. You may click on Preview, to see how the new template looks like without losing the changes.
Once you are satisfied, click Save Template. And you are done! Your blog now has a nice new design.
Resources
-
Free Blogger Template - https://www.brighthub.com/internet/google/articles/84769.aspx
-
Blogger Help - https://www.google.com/support/blogger/bin/answer.py?hl=en&answer=41983
Advertisement


