Get green and crafty by recycling old sweaters into mittens! Using items that you already have around the house you can create warm and cozy mittens that can be used whenever a chill is in the air. Read on for a free pattern for recycled sweater mittens.
Recycled Sweater Mittens
A good way to go green is to recycle as much as you can on your own. When you use what you have, you save money and can breath some new life into old items that would otherwise be added into the landfills. One item that can be recycled at home and in a creative way is an old sweater. Most of us have at least one worn out looking sweater shoved in the back of the closet that can be used for something else. And if you have kids, there is sure to be more than one sweater that has been outgrown which can be made into mittens for the next year.
Here we are going to take that old sweater and give it a new use by turning it into mittens to keep those hands toasty during the colder parts of the year. This green craft project can also help to organize old clothing and free up some storage space in closets. Another bonus to making these mittens is that if you make enough of them, you’ll have some handmade green gifts ready for the fall and winter seasons. So, grab an old sweater and follow the free pattern below to get started on making some recycled sweater mittens.
Grab a Sweater
This first step for this project is to grab an old sweater. Take a look through the closets and drawers to find a sweater that just isn’t worn anymore. No need to worry if the sweater ends up having some small stains or rips because those can be cut around. Now, if there is a large stain or rip through the center body of the sweater that could prove to be a problem unless there is enough to cut around to make some mittens for smaller hands.
If the sweater has large sleeves, these can also be used to create some mittens. As a general rule, for an average adult size sweater there should be enough material to make two to three pairs of mittens. For a an average child sized sweater there can be up to two pairs of mittens made depending on sleeve and torso length of the sweater. The amount of mittens made from one sweater depends upon both the quality of the material and the hand size of the person the mittens will be for.
Make a Pattern
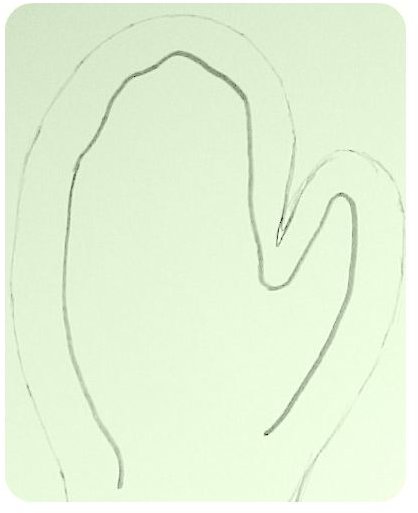
Making a pattern to create recycled sweater mittens is an easy process. You can use any type of paper found around the house for this purpose. Once you have some paper, take it and place your hand on the paper with closed fingers and thumb extended a bit as though you were already wearing a pair of mittens.
Once you have your hand placed, trace the outline of your hand onto the paper. When you have the outline made go back and trace a 1/2-inch outline around the hand outline you already made on the paper. Doing this will allow room for the seam that you will sew later. If the sweater material that you are using is very think and a bit bulky, make the second outline a bit larger than 1/2 inch to allow for seam room with the material. When you have created the pattern it should look like the image shown to the left.
Cutting the Pattern
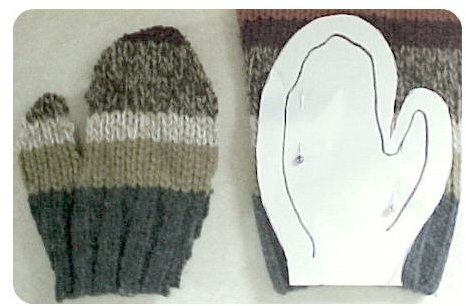
Next, you want to take your sweater and turn it inside out and lay it on flat surface. In some sweaters turning them inside out won’t really matter but in sweaters that have a different look to their pattern when turned inside, it’s a good idea to go ahead and turn it inside out before cutting the mitten pattern. Then take the pattern that you created and place it in an area of the sweater that has room to accommodate the pattern. Next line up the bottom of the pattern with a finished area of the material. For example, when using a sweater sleeve for material you would line the bottom of the pattern up where your hand would go in at the cuff of the sweater sleeve. Pin the pattern in place to the area that you’ve chosen and make sure that the sweater material is laying flat and straight.
After the pattern in pinned in place, start to cut around the pattern in the sweater material. Take care and make sure that when cutting the pattern you go slowly so the material will not bunch up around the pattern. You want to get a smooth and uniform cut as possible to help prevent fabric snags and unraveling in some sweaters.
When done cutting the pattern, you should have two cut outs of your mitten shape and this will make one mitten. Follow the same steps to cut out the next set of shapes that will be the material for the second mitten.
Sewing the Mitten
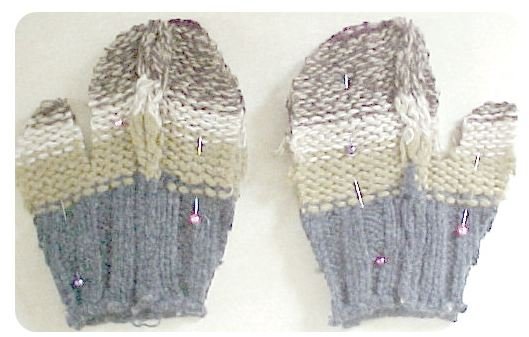
Take the two pieces from the first pattern cut and pin them together. Pinning them will help you keep each side in alignment while you sew the pieces together. There is no need to turn the pieces inside out due to cutting the pattern after you turned the sweater inside out.
Once the pieces are pinned, all you have to do is sew them together around the inside edge of the material while giving close to a 1/4 inch seam allowance. This means that you will want to measure 1/4 of an inch in from the edge of the material before you sew; the measurement can be marked with pins or a piece of chalk. You can use a sewing machine for a fast finished mitten or you can hand sew. Whichever method you use to sew the mitten pieces together is up to the individual preference. After the pieces are sewn together, repeat the sewing process on the next mitten pieces that you cut from the sweater.
When you are all done sewing, make sure you take the pins out and turn the mitten right side out. The only step left now is to put the mittens on and see how they feel!
It is important to remember that the mitten size you create is all based on the pattern that you make. Being able to trace the hand down, whether it is your own hand or someone else’s is really the key component in creating a well fitting set of mittens. If you are making these mittens to give away as gifts and are unable to trace someone’s hand then use your best judgment when making a pattern or find someone whose hands are close to the other person’s size to trace for the pattern.
Knowing that you are helping the earth by repurposing old sweaters is a good reason to use this free pattern for making recycled sweater mittens. What a sense of accomplishment too!


