How to Make Solar Space Heater for Your Garage or Enclosed Porch
The how to make solar space heaters project can be completed in about four hours after assembling all of the need materials. This really is an easy do-it-yourself green project that can be made with complete recycled materials or materials available at any home improvement center.
What is a Solar Space Heater
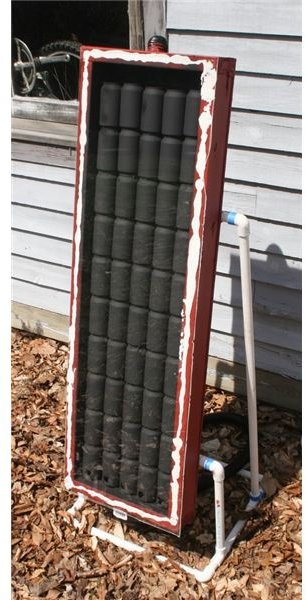
So what exactly is a solar space heater and how does it work? A solar space heater is basically a convection box that takes in cold air at the bottom of the unit and pushes heated air out of a vent in the top. It works by harvesting the heat energy of the sun with hollow black metal containers which cause the air on the interior of the unit to heat up. The heated air rises up to the top and is pushed out as new cold air enters the base. Units the size of a three by four foot window can heat an area of approximately 800 square feet. The actual temperature difference between the air entering the base of the unit and the air exiting will depend on the interior configuration of your heater and the amount of sunlight hitting the unit at any given time. A good average is about 15 to 20 degrees difference on a sunny day with a straight through interior set-up.
What You Will Need to Build
To build a solar space heater you will need framing material (either a preexisting window frame or 2x4s), a glass or Plexiglas panel, empty soda or beer cans, flat black spray paint, duct tape, epoxy, polystyrene board, a drill and standard household tools (nails, hammer, screwdriver, etc.). The number of aluminum cans you will need is going to depend on the size of unit you are making. The standard can size in the U.S. is 4.8 inches high and 2.5 inch in diameter so a three by four foot unit would require 14 cans wide by 10 cans tall (140 cans).
Construction
The first step in constructing a solar space heater is building the frame. If you have a preexisting window then this step is done for you, if not you’ll need to cut a rough frame (in this case two three foot long and two four foot long 2x4s) nailed together to form a sturdy rectangle.
Next the cans need to be prepared for air transfer. Using a screwdriver (or if your prefer a drill with a metal bit) punch a large hole in the bottom of each empty soda can the size of a quarter (if you want a faster flowing unit you can cut away even more of the bottom). Lay your frame on the ground and tape a row of 14 cans (or however many will fit on the bottom of your rectangular frame) side by side with duct tape into the frame leaving about half an inch of space between the bottom of the cans and the base of the frame. Add a second row on top of the first, nesting the base of the top layer into the tops of the cans on the lower row. Secure these with duct tape as well. Continue this process until the entire inside of the frame is full of taped, empty cans. A second routing method of snaking the cans through the interior instead of stacking them straight up is possible. This would require more cuts and possibly some tubing but would result in the air spending more time in the aluminum heating chamber and thus create a higher output temperature although the force at which the air would leave the unit could be compromised.
Once the cans are secured into the frame flip it over so the front of the frame is facing you. Spray paint the cans and frame with the flat black paint* (glossy paint may look better but I prefer using flat paint to reduce any reflection and loss of heat).
*If you are using an existing window you will need to paint the cans before they are assembled.
Now glue your Plexiglas to the front of the frame with the epoxy glue to seal in the hot air and promote the convection process. This is the best way to adhere the Plexi to wood without compromising the seal.
Flip the unit back over. Attach the polystyrene board to the back of the frame with epoxy, again to seal the frame. Once the backing is secure it is time to put in the air intakes and the vent. Cut three evenly spaced half inch holes in the polystyrene backing just above the base of the frame to allow cold air in. At the top of the frame cut out a hole for your vent. Some people prefer to run a piece of dryer duct from the back of the unit to the room they are heating while others flush mount the unit against an existing window. Either way is totally acceptable as neither will have an effect on the convection current.
Optimal Placement of a Solar Space Heater
A solar space heater will only work efficiently if it is placed in an area that receives a good amount of sun. The best orientation for this is to face the unit directly south to take advantage of the most sun during the cold winter months. South-east facing units will heat up faster than those facing directly south but will not get as hot. Because the hot air is moved through convection the unit can be turned any direction with the upper vent attached to flexible dryer duct and routed to the interior of the building.
A well placed solar space heater could be the only heating source you need for an exterior building like a workshop or garage although it will take a few hours to heat up every morning. If you happen to be an early starter you might want to consider the solar unit as an addition to a propane or oil heater. Once you know how to make solar space heaters you may find yourself supplementing your current forced air heating system with this passive, and free, solar alternative.
References
https://www.motherearthnews.com/Renewable-Energy/2006-12-01/Build-a-Simple-Solar-Heater.aspx
https://www.thegoodhuman.com/2009/06/09/solar-space-heater-made-from-soda-cans-an-old-window/
https://blog.hemmings.com/index.php/2007/04/26/almost-free-garage-heat-just-drink-a-lot-of-soda/
Image courtesy of Daniel Strohl