Sure thing, you can pick-up a ready-made HDTV antenna, but for the DIY lovers and those who don’t want to shell out even a penny on buying one, here’s a handy guide to make a homemade HDTV antenna within an hour or so.
Overview
Ready-to-use Yagi style HDTV antennas are available for under $100 in the market, though they may not be the most comfortable ones to use. Some of these come with a rotor, but no indicator. And, you may definitely have a hard time pointing the antenna in the right direction. More so, dealing with digital signals with moving antenna isn’t going to be pretty; it may take several minutes for signals to stabilize, meaning you’ll have to do several iterations that too very slowly, to get the best results.
Well, worry no more about these problems – here are some simple steps to build your own homemade HDTV antenna, which is bound to produce far better results than your old analog antenna. You may not have to face a lot of drop-outs with this, and homemade HDTV antennas are far more economical, literally costing you few dollars at the most.
Eight Simple Steps to Build a Homemade UHF Antenna
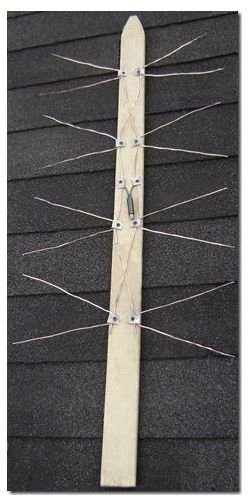
1. Pick a small plywood piece (or other weather resistant or weather impervious material) - say 30x16 inches in size, and some grates from an old oven or a couple of metal drying racks.
2. Wrap the piece with the aluminum foil type of high temperature duct tape.
3. Now, cut a 2 X 4 to the proper length and prepare a notch cut in the bottom (so as to be able to mount it in the rotor or on the mast). For instance if your board is 30x16, you may want to keep a 5 inch notch cut.
4. Lay down the 2 X 4, lay the board face down on top of it and center it, and nail it in with some roofing nails.
5. Next, you need to figure out the place for bowties, and then the matching transformer needs to be connected at the center.
6. Grab a few screws and washers, and four coat hangers. It’s time to get rid of the head of these hangers and cut the base to form couple of V-sections from each of them.
Moving on, you need to trim these 8 V-sections in such a way that their legs are about 7 inches long, and then polish or roughen the elbows of these V sections with sand paper just where they make contact with the washer.
7. You need to find more coat hangers, or probably anything stiff that can do the trick. Having done that, it’s time to put your V sections under each washer, with the wire.
Next, tighten the screw, but before that you may want to ensure that your wires and V’s have same length so as to create the right phasing. More so, the wires will crisscross on the ends, but you’ll have to keep at least one of them insulated.
8. Finally, you’re good to go ahead and connect your matching transformer in the middle, and check that the Vs are parallel with the foil background and placed uniformly.
Now, it’s time to bid a happy goodbye to all the age old crappy antennas that you’ve (if any) and install your latest DIY creation.
Note: This antenna is expected to work well with UHF frequencies, and you can’t expect it to catch the weakest VHF channels for sure.
Further Improvements and Points to Remember
Here are some points to keep in mind -
• For better results, you may want to add a reflector four inches behind the antenna. This can be any type of lightweight mesh material, and it should protrude beyond the bowties equally on all sides.
• Position the bowties as precisely as you can.
• Exact measurements will always produce better results.
• If you use copper wire in the bowties, try to keep it as straight as possible.
Note: There are several ways to make a homemade HDTV antenna and this is just one of the simpler ways.
Having built an HDTV antenna, you may also want to learn how to Improve HDTV Reception
If you don’t have time to build your own HDTV antenna, you may check out some good ready-made HDTV Antennas here


