Learn How to Build Home Media Servers
Reusing Old Computers
Servers are a central component to networks. They provide services to other computers or programs and most businesses rely on these computers to backup data stored on individual devices. Home media servers work just like these business servers. They allow you to create a network of devices and computers, as well as back up important data.
While media servers are wonderful, they are also expensive to buy. You, however, can learn how to build home media servers yourself using an older computer. Most of us have at least one or two computers that we are no longer using. These computers work fine as servers. You will, however, need to make some adjustments to it.
Computer Upgrades
The major upgrade that you’ll need for your older to computer to make it a media server is to improve the hard drive. You need a lot of memory if you plan on backing up your entire library. Shoot for at least 500 GB of memory if your computer can handle it.
Before you make any upgrades, however, examine the components that are already in it. Generally, you need to get the same types of components that are already installed on the computer. For example, if you have a SATA hard drive, then invest in another type of SATA hard drive. Do not install an IDE hard drive. Your computer won’t work properly, and you run the risk of completely crashing it.
Besides the hard drive, invest in better memory. Again, you have the option of DDR2 and DDR RAM. If you are unsure what type of RAM or hard drive that you have, simply remove the part, and take it to your local computer store. They can immediately tell you what type it is. Or, input the serial number into a Google search.
For most people, changing out the hard drive and RAM is going to be enough to satisfy their home media server. Some people, however, may want to run a home website business via their home server. In this case, you want to upgrade the graphics card to handle the additional graphics demands.
Don’t worry about the look of the computer because it doesn’t have to be pretty. Most servers are installed where people don’t see them anyway. There’s no need to spend money changing the case when no one’s going to see it. Also, don’t worry about purchasing a monitor or keyboard for the server. Servers usually don’t require either.
Keep Your Server Cool
If you are having trouble with your server, and you want to work on it, just hook up the monitor and keyboard from your regular home computer to it. Once you are done tweaking the server, remove the peripherals.
There is something to consider when installing your server. Make sure that it has enough air circulation. Servers that run a lot of processes can get extremely hot, which can cause them to overheat. If you are installing the server in a closet, consider purchasing an exterior fan to keep the computer cool.
Windows Networking
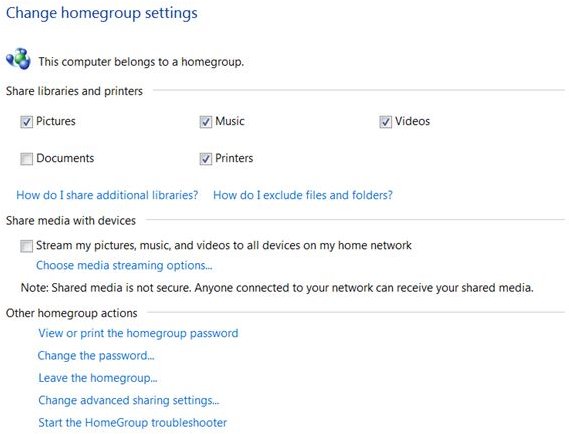
Once you are done with the upgrades, you need to actually setup your network. Depending on your version of Windows, this may involve using either the Network Setup Wizard or the Homegroup (Windows 7) option. For the Network Setup Wizard, use these steps:
- Click on the “This computer connects to the Internet through a residential”, and hit Next.
- Give your Server a description and name, and hit Next.
- Give it a workgroup name, and hit next.
- Click on the “Turn on Windows File and Printer Sharing” options, and hit Next.
- Hit Next, and then Just finished.
- Finally, hit Next and Finished.
Now, you need to right-click on the Network Sharing and Security folder, and check both the “Share this folder on the network” and “Allow network users to change my files folders”.
Windows 7 makes this process a little easier. You simply need to create a Homegroup, and click on the information that you want to share between devices. For example, you can choose to stream your music, videos and pictures on any device within your home network. You can password protect your media to keep anyone else from viewing your streaming media.
Mac Networking
For Macs, you create a network by following the below procedures:
- Go to Apple and System Preferences.
- Click Network, and select AirPort.
- Click on the “Show AirPort status in menu bar”.
- Name your network, and pick a channel.
- Add a password.
You now know how to build home media servers. These instructions will work for nearly any type of computer or operating system that you have.
References
Verducci, Anthony. “How to Build Cheap Linux and Windows Home Media Servers in Three Easy Steps.”
Make Use Of. “How to Build a Home Media Server from an Old PC”.
Image courtesy of author
