Windows 7 is a new operating system with lot of new features and bugs as well. Daily users are encountering new issues in Windows 7 and often complain about blue screen appearing on their screen. Find out how you can prepare Windows 7 blue screen memory d
Troubleshooting Win 7
Windows 7, a new operating system came into the market with lot of new features like enhanced graphics, new paint application, new wordpad, improved Aero feature and along with that came some new issues and bugs. Yes, you heard me right; new issues and bugs. People around the world have been reporting many issues in Windows 7 to Microsoft and some complain about blue screen appearing on the screen more often. Microsoft should reward such users who are helping them by sending Windows 7 blue screen memory dumps to fix issues.
What is Windows 7 Blue Screen of Death?
Blue screen often termed as Blue Screen of Death is caused when the system tries to access a resource which is either corrupt or has stopped functioning. In such a scenario, the operating system reboots itself after showing a blue screen along with an error that caused the issue. If you are using a genuine Microsoft Windows , then you can ask Microsoft for help providing them with details like how to reproduce the issue and sending Windows 7 blue screen memory dump. Here, is a guide that will help you prepare Windows 7 blue screen memory dump.
Windows 7 Blue Screen Memory Dump Instructions
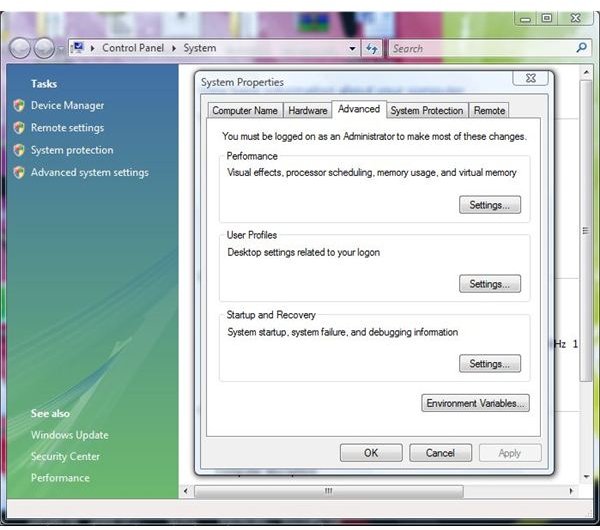
Step 1: On the screen, right click on the My Computer icon and from the pop-up menu that appears, select Properties. A new System window will appear. From the System window, click Advanced system settings link present on the left.
A new System Properties window will appear.
Step 2: In the System Properties window, click on the Advanced Tab. In the Advanced tab, under the Startup and Recovery section, click Settings button. A new Startup and Recovery window will appear.
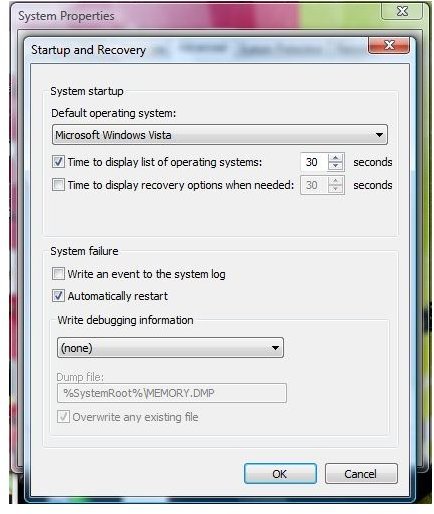
Step 3: In the Startup and Recovery window, under System Failure section, you will find a drop down under Write debugging information section. From the drop down, select Kernel Memory Dump. Do not change the memory dump file name.
Under the same section, make sure the checkbox entitled “Overwrite any existing file” is checked.
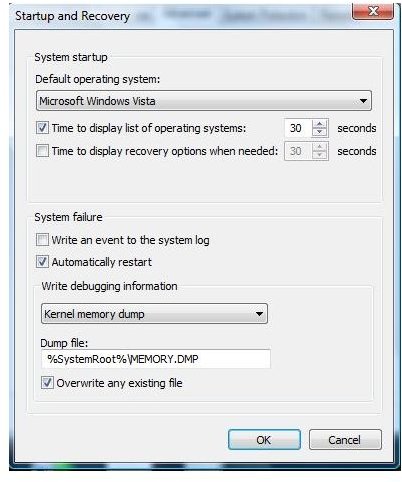
Finally, press the OK button to save the changes. Now, again press the OK button to save the changes and restart your computer system, if necessary.
Now, whenever you encounter some problem that could lead to a blue screen, Windows 7 blue screen memory dump will automatically be prepared and saved under the file name b. You can then send this file to Microsoft to help fix the issue.
Note: Memory.DMP file size can range from few kilobytes to Megabytes. Never try to edit the Memory.DMP file or you will end up sending a corrupted or wrong Windows 7 blue screen memory dump file to Microsoft.
To fix blue screen of death issues, read this tutorial Windows 7 Blue Screen of Death Fix
Images Credit
Windows screenshots by Microsoft


