Scanning documents indescriminately can lead to you finding you’ve saved the imaging files - but can’t quite remember where your put them! This guide explains a series of ways to find lost files.
Missing Image Files?
It’s easily done - files can be lost, misplaced or accidentally discarded when saving to a temporary location or opened directly from an email. You might even be scanning a document and found yourself unable to find the output on your PC. Microsoft Office Document Imaging files should be saved to the specified location, but if you’re using a third party scanner management app, this might not be the case.
Additionally, your imaging file could be accidentally deleted or lurking in a hidden folder. If you’ve lost Microsoft Office Document Imaging files, follow these steps for tracking them down…
First Things First
Before we get technical, let’s start with the basics. Missing files can often be found lurking in the Recycle Bin, or in an email client.
Whenever you’re looking for lost files, whatever the format, it is always worth checking the Recycle Bin on your Windows desktop. Note that this will only retain files that have been deleted in the normal manner that previously existed on your PC’s hard disk drive; files stored on removable storage or on a network drive will not be sent to the Recycle Bin upon deletion.
Similarly, your missing file might in fact me in an email client, either in the Drafts or Sent Items folder, or more likely, the Deleted Items/Trash folder.
Find Lost Microsoft Office Document Imaging Files in Recent Documents Folder
It’s even worth checking the Recent Documents Start menu item in Windows XP, Vista in 7 – if the document was created or last accessed recently it will show here.
Of course, there are a limited number of items stored here, so you will need to view the full list of available, recently accessed documents to get the full view of what’s available in order to find your lost Microsoft Office Document Imaging app.
You can do this by browsing to
C:\Documents and Settings\[USER]
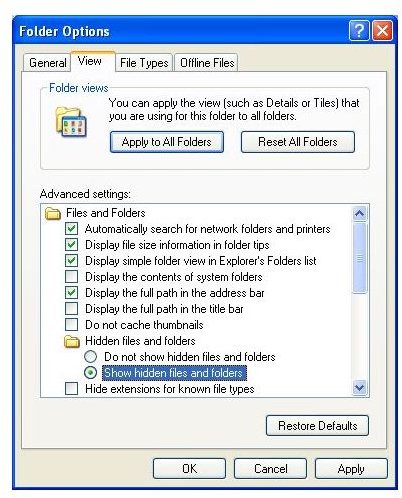
where [USER] is the user profile as which you are logged in. Go to Tools > Folder Options… and on the View tab select the option Show hidden files and folders. Click on OK and return to the folder view – open My Recent Documents and you will find a huge selection of recently accessed files. Check through these for your missing imaging file.
My Pictures
By default, a lost Microsoft Office Document Imaging file should be saved to a location in My Pictures if you are creating the files on your scanner.
Typically, the files will be saved into a folder you have setup as part of the Microsoft Windows-managed scanning procedure.
However, if you have used a third-party app, perhaps bundled with your scanner, you should run this and see where it points to when you begin a new scan – you should find the last used location is retained.
Search and Retrieve
Using the Windows Search function is a particularly useful way to find a missing file – ensure you are searching in all files and folders, and run a search for the missing file. If you don’t know the name, this shouldn’t be a problem – simply search for the file extension. For instance, a Microsoft Office Imaging Document might well be a TIFF format file, so search for *.tif, where the * acts as a wildcard.
Finally, if you are still having difficulty finding the missing file, you may need to consider a file retrieval utility. If Windows Search and all of the other suggestions have failed, this would seem to be your best option. For more on this, see the article Top 5 Free Hard Drive Recovery Tools that includes software for retrieving lost files.


