Windows 7 tries to make life a little easier for you by using Windows Updates to download drivers for new devices you add. If you want to install a driver manually, though, this can be counteractive. Learn how to stop Windows 7 automatic driver installation.
Overview
There are two methods that you can use to stop Windows 7 automatic driver installation. The most successful method seems to be going through the Local Group Policy Editor. However, the Group Policy Editor is only available in the Windows 7 Enterprise, Professional or Ultimate editions. If you are using Windows 7 Home Premium or Starter editions, you will not be able to use the Group Policy Editor method and will need to try disabling automatic driver installation by changing the device installation settings.
Group Policy Editor
To stop Windows 7 automatic driver installation using the Local Group Policy Editor, click the Start button and type gpedit.msc into the Instant Search box at the bottom of the Start menu. Press Enter and the Group Policy Editor will open.
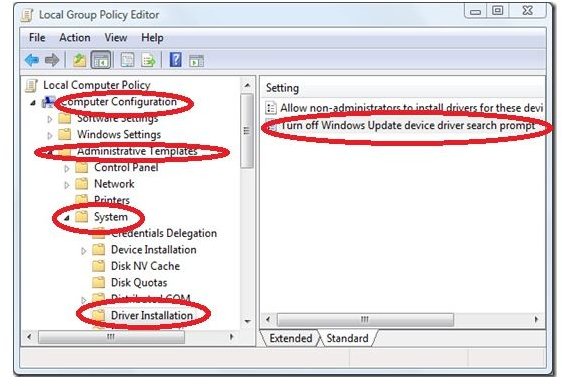
Select Computer Configuration in the left pane of the window. Open Administrative Templates, System and then Driver Installation. Double-click Turn Off Windows Update Device Driver Search Prompt in the right side of the window. Go to the Setting tab of the dialog box. Select the Enable radio button, click Apply and then click OK.
You will need to restart the computer in order for this change to take effect.
Device Installation Settings

To stop Windows 7 automatic driver installation using the device installation settings, click Start and open Devices and Printers. Right-click your computer name under Devices and select Device Installation Settings. The Device Installation Settings dialog box will open. Under Do You Want Windows to Download Driver Software and Realistic Icons for Your Devices? select No, Let Me Choose What to Do. Your options will expand once you make this selection. Select Never Install Driver Software from Windows Update and click Save Changes.
If you try to stop Windows 7 automatic driver installation using these steps but it still automatically installs device drivers, you can uninstall the driver Windows 7 added and then manually install the driver you wish to use. To uninstall a driver in Windows 7, click Start, right-click Computer and select Properties. Select Device Manager from the left pane of the window. Double-click the type of device you have added. Right-click the specific device and select Properties.Go to the Driver tab of the Properties dialog and click the Uninstall button. Click OK once the driver is uninstalled. Restart your computer and manually install the driver you wish to use.
Related Articles
For more help with your Windows 7 computer, check out the Bright Hub library of articles, tips and tutorials with titles such as Deleting Libraries in Windows 7 , Customize Windows 7 – Change the Logon Screen Background! and How to Customize Windows 7 Start Menu .


