How to Print Portrait and Landscape Pages in the Same Word 2007 Document
Modern word processors have evolved greatly over the last 20 years to the point where they function much like desktop publishing programs rather than just word processors. The number of options in a word processor can be overwhelming such that even seemingly simple tasks take some patience to set up.
Perhaps the world’s most advanced word processor, Microsoft Word 2007 offers more options than any other application. With the introduction of the Microsoft Office 2007 Ribbon, some users find themselves hunting for functions that were once at their fingertips. Follow the steps in this article to get Word 2007 pages to print in both portrait and landscape orientations.
Why Print Portrait and Landscape Pages in the Same Word 2007 Document?
The standard document in Word 2007 is an 8.5-inch by 11-inch page that is taller than it is wider. This standard-sized page is used almost exclusively throughout the Western world, particularly in North America. A problem occurs when this size page is too narrow to contain text, tables, images, or charts that would benefit from a page that is wider than it is taller.
Luckily, Word 2007 allows you to print pages of different orientation in the same document. When you rotate an 8.5x11 page to be 11x8.5, you are said to have changed the page’s orientation. Generally, pages that are taller than they are wider (8.5x11) are said to be in a portrait orientation and those that are wider than they are taller (11x8.5) are said to have a landscape orientation. Read on to learn how to print both page orientations within the same Word 2007 document.
Setting up Word 2007 to Print Portrait and Landscape Pages in the Same Document
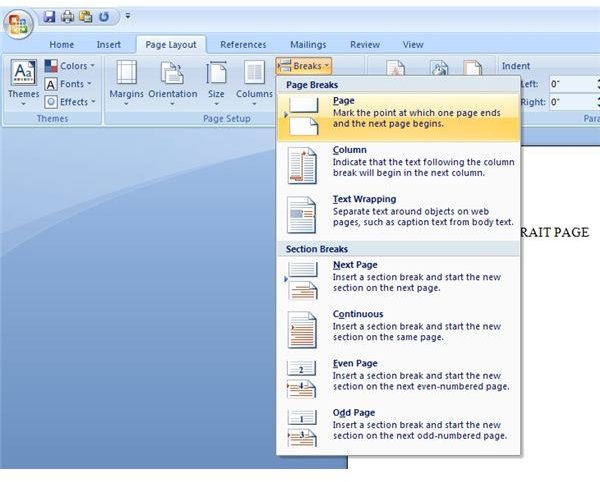
Setting up a Word 2007 document to contain both portrait and landscape pages is a procedure involving Page Breaks and a little formatting of the pages using the Page Layout Menu. First, start a new document in Word 2007 and type in some text. Then, position the cursor at the end of that text and click on the PAGE LAYOUT tab on the Word 2007 Ribbon. Click on the arrow next to the BREAKS option under the PAGE SETUP portion of the Ribbon (see Figure 1) and click on PAGE. A new page should appear at the end of the document. This is the page that we will make into a landscape page.
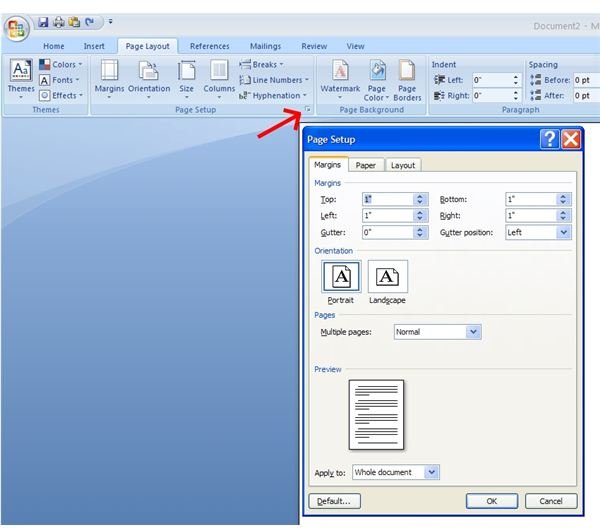
Position the cursor back to where you first created the Page Break (just after the text you typed) and click on the Page Setup Dialog Box button at the bottom right of the PAGE SETUP section of the Ribbon. The Page Setup window will open (see Figure 2). Click on the picture of the LANDSCAPE page under the ORIENTATION section of the window. Then, under the PREVIEW section of that window, choose THIS POINT FORWARD from the APPLY TO drop down menu. Click OK and the second page in your Word document is now in landscape orientation.
Now insert your text, table, image, or chart on the new landscape page. Then, position the cursor to a line just after whatever you just put on the landscape page. Insert a second PAGE BREAK at that position using the same procedure as above (see Figure 1).
Now you should have three pages, the first is in portrait orientation and the second and third are landscape. Position your cursor just before the PAGE BREAK you just created on page 2 and click on the PAGE SETUP DIALOG BOX again (see Figure 2). Click on the picture of the PORTRAIT page under the ORIENTATION section of the window. Again, choose THIS POINT FORWARD from the APPLY TO drop down menu.
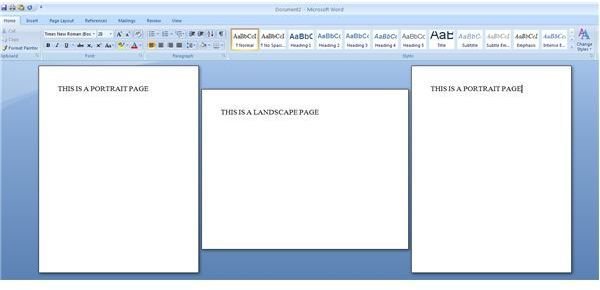
If all went well, you now have three pages in your document. The first page should be portrait, the second landscape, and the third portrait again (see Figure 3).
Conclusion
The steps involved in setting up both portrait and landscape pages in the same Word 2007 document may seem confusing but there is a reason for doing it this way. First, as you add more text to the document, the landscape page will always contain the text, table image, or chart you placed on it regardless of how much text you add before or after the landscape page. Second, the landscape page you created will float throughout the document no matter how many pages are added or deleted before or after the landscape page. When you are ready to print your document, you can be sure that you will not have to reposition anything in the document to make it print the way you wanted it to print.