Why are Windows XP Plug and play devices not working? Plug and Play devices are a pre-identified category in Windows XP and should work as soon as you connect them to any USB port. Sometimes Windows fails to recognize these devices. This article helps in troubleshooting Windows to fix this problem
Windows XP Plug and Play USB Not Working – Possible Reasons
There can be many reasons why your Windows XP Plug and Play USB is not working! The database of Windows XP holds definitions for most of the known plug and play devices. Microsoft introduced the plug and play feature with its Windows 98 operating system, where the USB ports supported numerous devices without having to install device drivers for each of them. The list of devices was increased in Windows 98 SE and currently Windows XP has the largest support for plug and play devices. I have not checked the more unusual instruments such as the Kodak DVC on Vista and Windows 7 so I cannot comment on the plug and play support of these latest operating systems.
There are not many reasons why Windows XP won’t detect a plug and play USB device. Please remember that if a USB device needs any drivers to be installed in order for the device to work on XP, it won’t be categorized as a plug and play device. An example of such a device would be your USB wireless broadband stick or a locally manufactured cell phone. Such devices need related drivers to be installed prior to their functioning on any computer.
The most common reasons they won’t work are:
1. Malfunctioning Devices;
2. Incorrectly Configured Hardware;
3. Mismatched USB Cables;
4. Outdated Firmware;
5. Problems with USB Root Hubs.
If you find a plug and play device that should be detected automatically but is not being recognized by Windows XP, you can troubleshoot Windows XP, keeping in mind the above possibilities.
Testing the Plug and Play Device
The first step to take when you find that Windows XP is not recognizing your plug and play device is to take the device to another computer running on Windows XP and plug the device into it. If the device is detected, the first computer has some sort of problem with the USB ports. If the other computer also fails to detect the device, the plug and play device has problems that need to be fixed.
You should also check whether the computer is asking for any device driver or for the location of any file. This means that the USB device is not in the list of Windows XP plug and play devices. Contact the manufacturer of the device for the drivers to make it works on Windows XP.
In the next sections, we show how to proceed with troubleshooting when your Windows XP plug and play devices are not working.
Basic troubleshooting
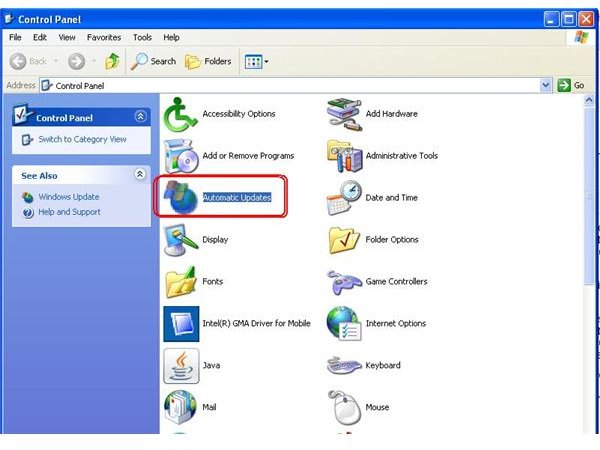
If the plug and play USB device is working on the other computer and not on your computer, the first recommendation is to download the latest updates for Windows XP, including Service Pack 3. Use the Windows Update option under Tools Menu of the Internet Explorer to get the latest updates. If you are using another browser, you can use the Automatic Updates icon in the Control Panel to get the Windows XP Updates. See the image to identify the exact icon for automatic updates.
Create a system restore point before you download and install any updates you may be missing, or before installing Service Pack 3, if it is not on your computer.
The system restore point is created using the System Restore option. Click on Start -> All Programs -> Accessories -> System Tools -> System Restore. Once you get the System Restore Window, select “Create a Restore Point” and click on Next. The next page will ask you for a name to identify the system restore point. Once you enter a unique name that you can remember, click on “Create” button and finally on “Close”. All the current settings of your computer will be saved so that if anything goes wrong, you can use the system restore to undo the changes done to your computer.
Using System Restore to Fix the USB Plug and Play Issue
If the USB plug and play device was working previously and has suddenly stopped working on your computer, chances are that something went wrong with the settings of the USB hub or with any system file associated with your device. In such a case, you can use the system restore to fix the issue. Open the System Restore Dialog Box and select “Restore my computer to an earlier time”. This will present you with a list of restore points in a calender format. You need to recall the restore point prior to which the USB plug and play device was working. Once you find it, click the restore point and then again click on the “Next” button. This will restore the previous settings so that you can use the USB plug and play device again.
Note: If you are using system restore, you may lose any custom settings and software installed after the creation of the restore point you selected to restore your computer.
Power Cycle and Cables
Power Reset: The first step is a simple one, called “Power Cycle” or “Power Reset”. Detach the USB device from the computer and turn off the computer. Unplug the power supply and wait for a minute. Plug the power cord back and turn on the computer. Wait till Windows XP loads fully and then insert the plug and play into the USB port. The power cycle causes the data bus to reset. This may help Windows XP to identify the plug and play device. Most of the time, the problem is fixed at this stage. If Windows is still unable to detect the USB plug and play, check out the next step.
Problems with Malfunctioning Cables - If you are using a USB extension cord to connect the Windows XP plug and play USB device, detach the USB cable from the computer port. Move things around so you can connect the plug and play device directly to the USB port. If the operating system recognizes the device, you need to change the cable. Please note that not every cable will work with all USB plug and play devices. The USB cables are categorized based on the data transfer speeds, which vary from cable to cable. You need to check for a cable that is compatible with your plug and play USB device. I recommend that you note down all the specifications of your computer and take it to the shop so that the sales person can understand your requirements.
If the cables are fine, then we need to move on to more advanced troubleshooting.
Advanced Windows Troubleshooting for Plug and Play Devices
Windows XP has a certain power limit for each of its ports. If any of the ports attempts or starts consuming more power than the specified limit, the operating system suspends the port temporarily. This may happen to the USB ports, which could cause the Windows XP plug and play device not to be recognized.
Note: If you feel uncomfortable with playing around with your computer, it is recommended that you call in a technician. And even for advanced users, I will remind you the creation of a system restore point is always a good idea – so that you can restore your system back to the previous state in case anything goes wrong.
Updating the BIOS and USB Firmware to Restore the Settings of Windows Ports
Though the power settings are restored when you complete a power cycle as explained above, sometimes the problem lies with the firmware, meaning the hardware itself. There may be plenty of reasons why a port would draw more power than allocated. In case the power cycle did not fix the USB port, you may need to update the firmware. In addition, you can also update the system BIOS so that you can start afresh.
You can explore the website of the manufacturer of your computer for the latest version of USB firmware and any BIOS update so that you can download it. If you are still under warranty for support, you may call or chat with the technical support to get the link that provides you with the latest version of the firmware and system BIOS.
Once you have the links, download the updates, install them, and restart the computer. Insert the Windows XP plug and play device into the USB slot. This should solve your problem. In case the updates too fail, our final resort to fix it ourselves is to reinstall all the USB controllers.
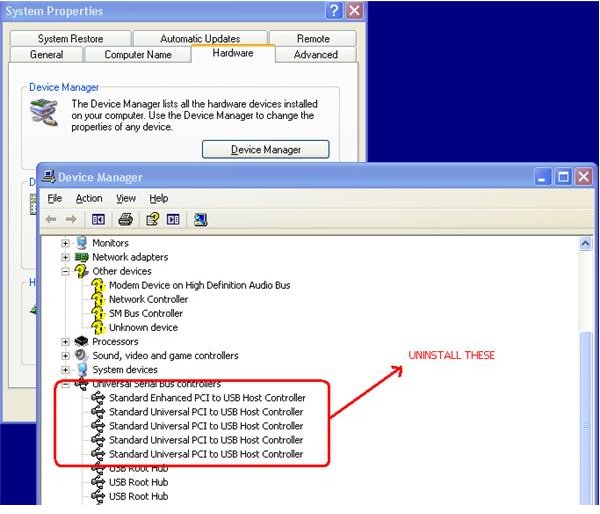
ScreenShot - Removing USB Controllers in Windows XP Device Manager
Troubleshooting Windows XP for Plug and Play – Reinstallation of USB Controllers
If your Windows XP plug and play device is still not working, there are two possibilities. Either the USB controllers are corrupt or the USB ports are bad. In the latter case, you will have to replace the USB ports. But before that, try reinstalling the USB controllers to see if it solves your problem.
Note: If you are using a login password or BIOS password, please disable them before rebooting, especially in case where you are using a USB keyboard/mouse. If you do not disable the login/BIOS password, you won’t be able to type the password as the USB drivers will be reinstalled only after the reboot is completed. You can cancel the USB drive uninstall before rebooting by clicking the icon in Device Manager that says Look For Changes.
To reinstall the USB controllers, you need to uninstall them first. To uninstall the controllers, open the Device Manager by holding down the Windows key and hitting the Break key. In the System Properties Dialog box that appears, select the Hardware tab. Then click on the Device Manager Button (first one from the top). In the dialog box, expand the Universal Serial Bus Controllers. You will find it at the bottom of the window.
Once expanded, right click on each of the USB Controller and select uninstall from the context menu. You may be presented with a message saying something about system instability. Ignore the message and uninstall all of them.
Note: Please check the Screenshot above to make sure that you are uninstalling the correct entries.
Once you are done with the uninstall process, restart your computer. All the USB controllers will be automatically be reinstalled with fresh configurations. Once the installation process is finished and Windows XP is ready, insert the plug and play device into the USB port. This should fix the problem of your Windows XP plug and play USB device not working. If your problem is still there, you will have to get a technician who can replace the USB ports on your computer.


